

Warhammer Quest: Darkwater is not just pretty art and grungy Nurgle vibes, it is a tight little puzzle box.
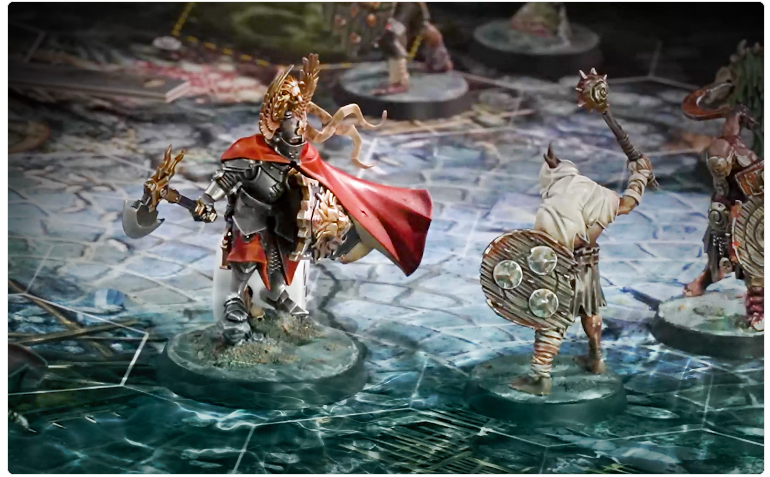
Every encounter is about squeezing the most out of your actions while the dungeon actively kicks you in the shins. Moreover, the article walks through a full turn using Edmark Valoran, the Manticore Knight, as the star example. Consequently, we get a clear look at how heroes move, attack, burn energy, and desperately try not to get mulched by swamp monsters. Finally, it also teases how the enemy behaviour system keeps everything lethal even with a small number of models on the board.
Heroes, Stats, And The Energy Juggling Act
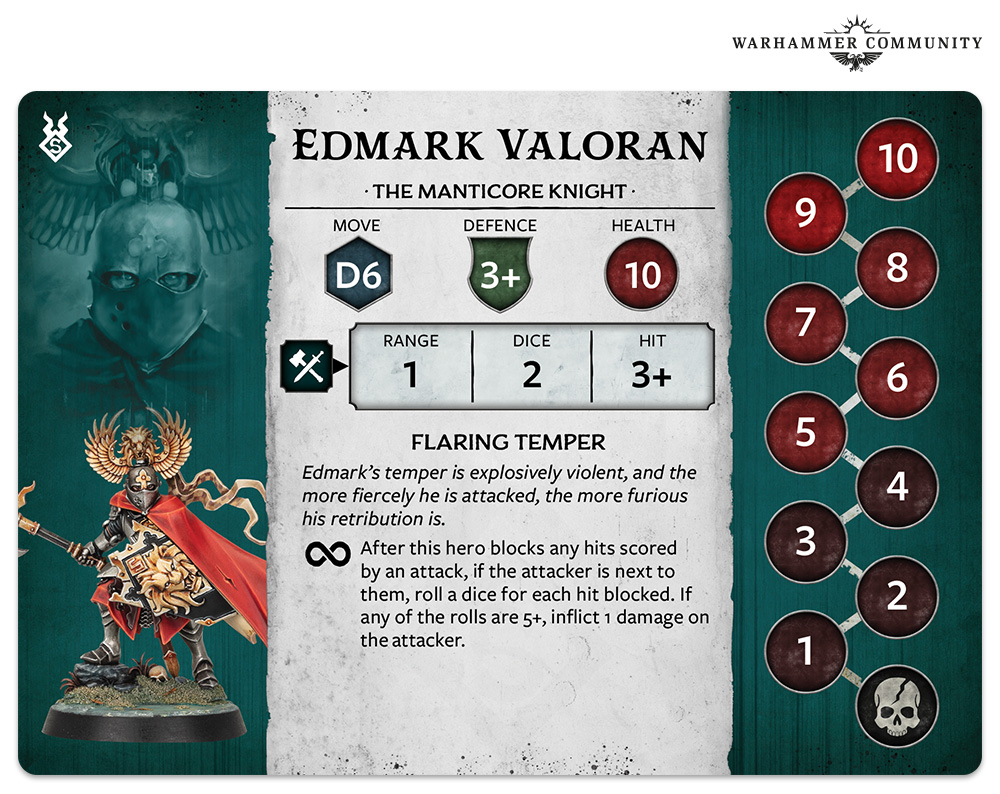
Heroes in Darkwater are not just stat sticks. Each has Movement, Defence, and Health, plus a combat profile that shows how they attack. For Edmark, that means swinging his axe into adjacent hexes, rolling two dice and hitting on a 3+. Moreover, he has a passive ability, Flaring Temper, that lets him lash out whenever he blocks a hit, dealing damage on a 5+.
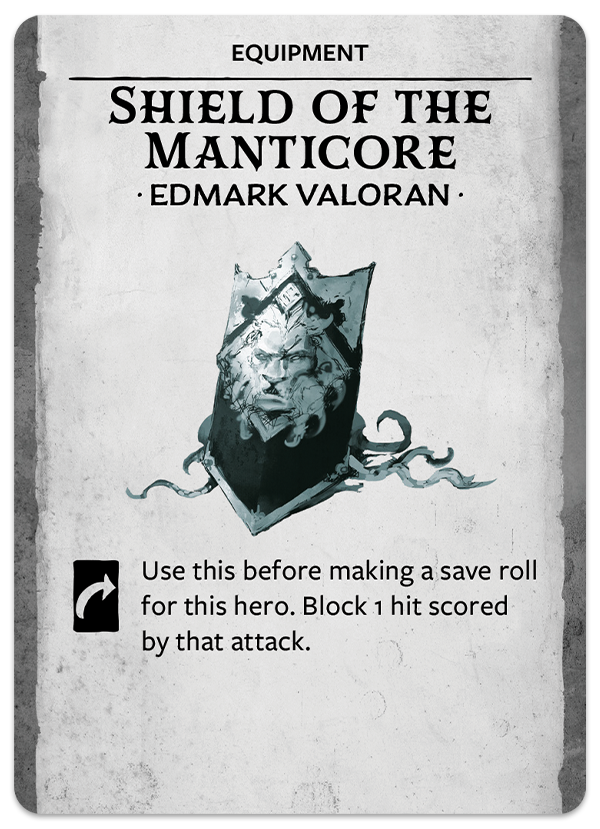
Additionally, each hero has a piece of signature equipment. Edmark carries the Shield of the Manticore, which you can expend before making a save to automatically block one hit. Crucially, Flaring Temper can still trigger off that blocked hit, so his shield is not just defensive, it is a damage engine. Consequently, you are always thinking about when to blow that expend icon for maximum spite.
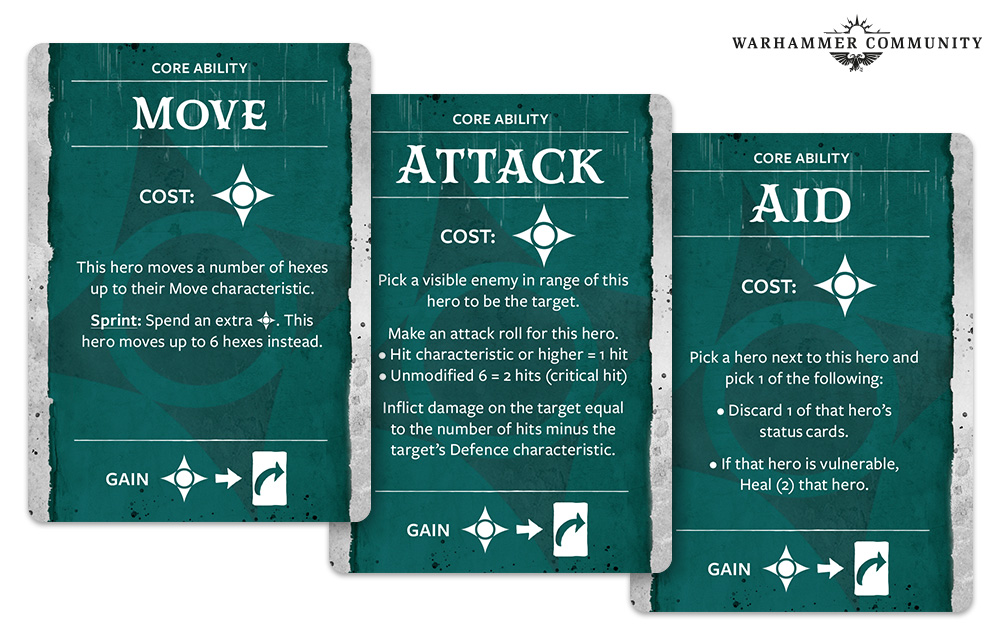
Every hero also has three core ability cards: Move, Attack, and Aid. These cards do two things at once. They show what actions you can take, and they are also your main way of generating energy. Moreover, Darkwater revolves around expending these cards to create energy, then spending that energy to fuel actions. Once a card is expended, you cannot use or expend it again until your next turn, when all your expended cards refresh.
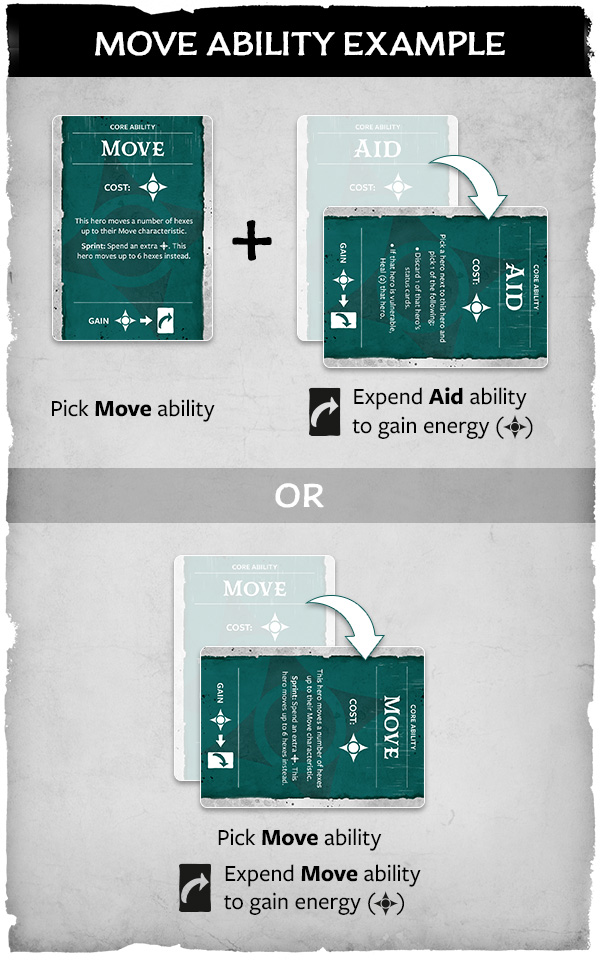
In a typical turn, Edmark might want to Move and then Attack. To Move, he chooses the Move card, but he must expend another core ability to get energy. Often Aid is the first thing to go, especially if nobody is bleeding out yet. Additionally, the Move action usually involves a dice roll for distance. In the example, the player expends Aid, rolls a miserable 1 on Move, and realises that will not cut it.
Consequently, they choose Move again, this time expending the Move card itself to get more energy. This second roll comes up a healthy 5, and they pick to Move 3 hexes to reach the enemy. Moreover, because Move and Aid are now expended, only Attack remains available to expend, so Edmark can attack once. If that first Move roll had been higher, the player could have kept Move and Attack ready, then expend Move for energy and Attack for energy, attacking twice that turn.
Additionally, there is the Sprint option on the Move card. Sprint costs two energy but gives a guaranteed move of 6 hexes. Consequently, you are constantly weighing risk and reward. Do you gamble on a high roll to save cards, or play it safe and Sprint while burning more energy and options.
Enemies, Defence, And Behaviour Dice
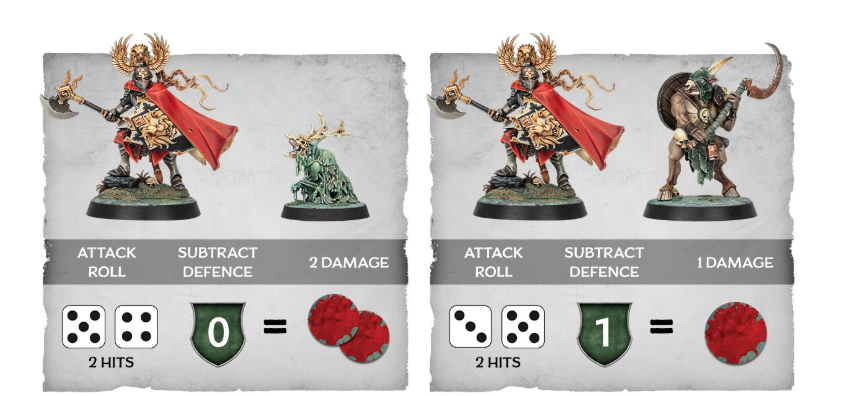
Enemies in Darkwater are not passive roadblocks. They have stats like heroes, but with key differences. Each enemy has a fixed Defence value that acts like an automatic save. Moreover, heroes roll their attack dice and count hits, then subtract the enemy Defence to work out how much damage gets through.
In the example, Edmark attacks a Mire Kelpie. He rolls two dice, getting 5 and 4, so that is two hits. The Mire Kelpie has Defence 0, so nothing is blocked and it takes two damage. However, a Pestigor with Defence 1 would reduce those two hits to one point of damage. Additionally, just like in Age of Sigmar, a roll of 6 is a critical hit for heroes and counts as two hits. Some enemies have nastier crit thresholds, scoring crits on lower rolls.
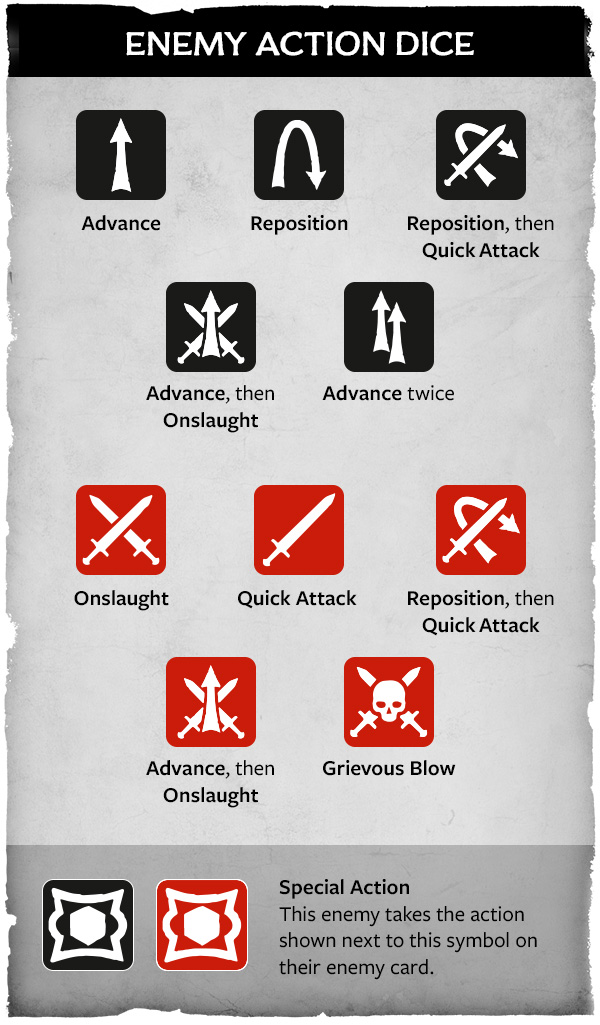
The real spice, though, is the enemy behaviour system. Enemies and heroes alternate activations, and enemy groups act according to behaviour tracks on their cards. The Mire Kelpie, for example, has a Group value of three, meaning three of them act per enemy phase. Moreover, the lead player rolls a special enemy action die for each one.
Initially, you roll the black action die. The faces include commands like Advance, which makes the enemy move toward the nearest hero, and Reposition, which sends them toward the furthest hero they could still attack. Additionally, there are combo faces like Reposition then Quick Attack, or Advance then Onslaught, or Advance twice. Quick Attacks are lighter swings where criticals are downgraded to normal hits. Onslaught is a full attack that can benefit from critical hits.
However, the enemies do not waste actions. If the die shows Advance but the Kelpie is already in base contact, it will perform a Quick Attack instead. There is a detailed behaviour chart that covers these edge cases, so they always do something relevant. Moreover, one face of the die shows a Special Action icon, which triggers unique abilities on the enemy card.
As rounds pass, the behaviour track advances and the enemies swap to a different action die. For Mire Kelpies, the second round uses a red die, which includes nastier options such as Grievous Blow, where all successful hits count as critical hits. Additionally, in the third round they all perform an action called Retch, splattering a status effect onto heroes. After the third round, the track resets to the black die and the cycle repeats, keeping encounters tense and dynamic.
Status Effects, Splatter, And Being Vulnerable
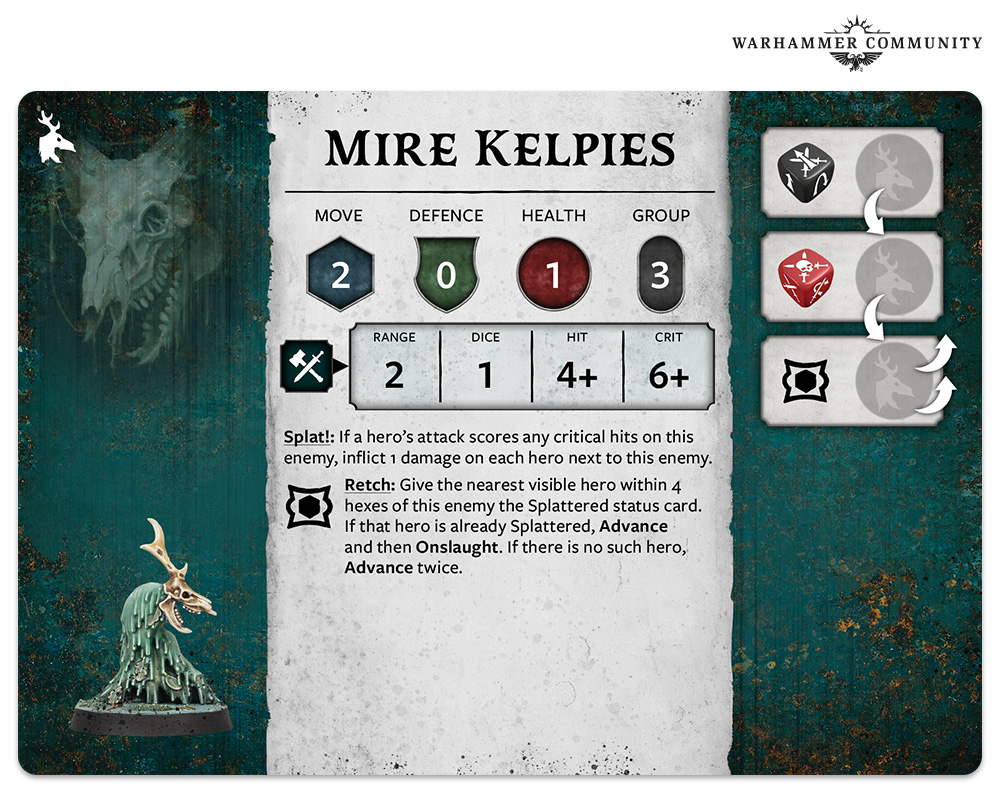
Darkwater also leans hard into status cards to keep heroes on the back foot. In the Retch example, Mire Kelpies collectively slap the Splattered status on a hero, covering them in filth. While Splattered, a hero cannot use any ability except Struggle Free. Moreover, Struggle Free costs one energy, and discarding the card cleans them up.
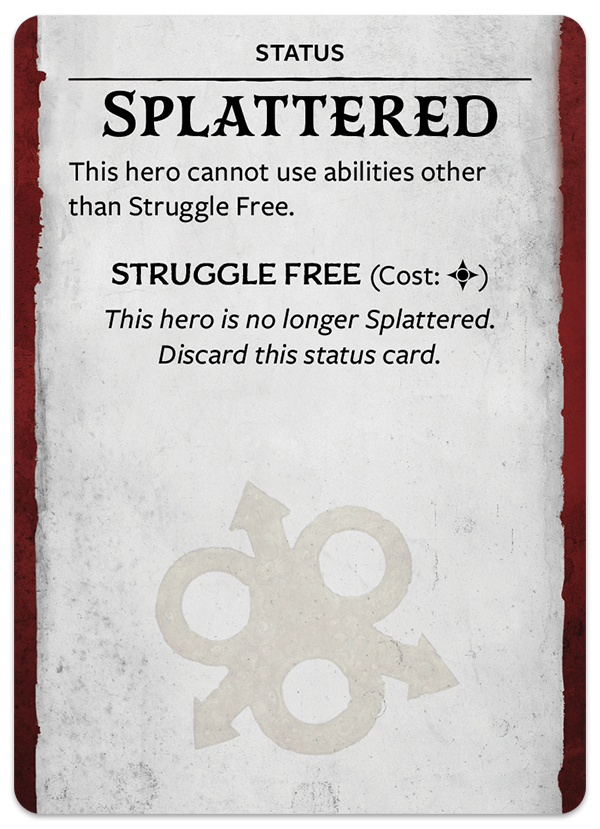
Additionally, the rules cover what happens if everyone is already Splattered or hiding out of sight. The game always has a way to keep the pressure up. Some status effects are much nastier than Splattered, so you quickly learn not to treat them as minor annoyances.
When a hero’s Health hits zero, they are not immediately dead. Instead, they become Vulnerable. In this state, their core abilities flip to weaker versions. Move becomes Struggle, Attack becomes Hinder, and Aid becomes Guard. Consequently, they can still contribute with support and interference, but they are clearly hanging by a thread.
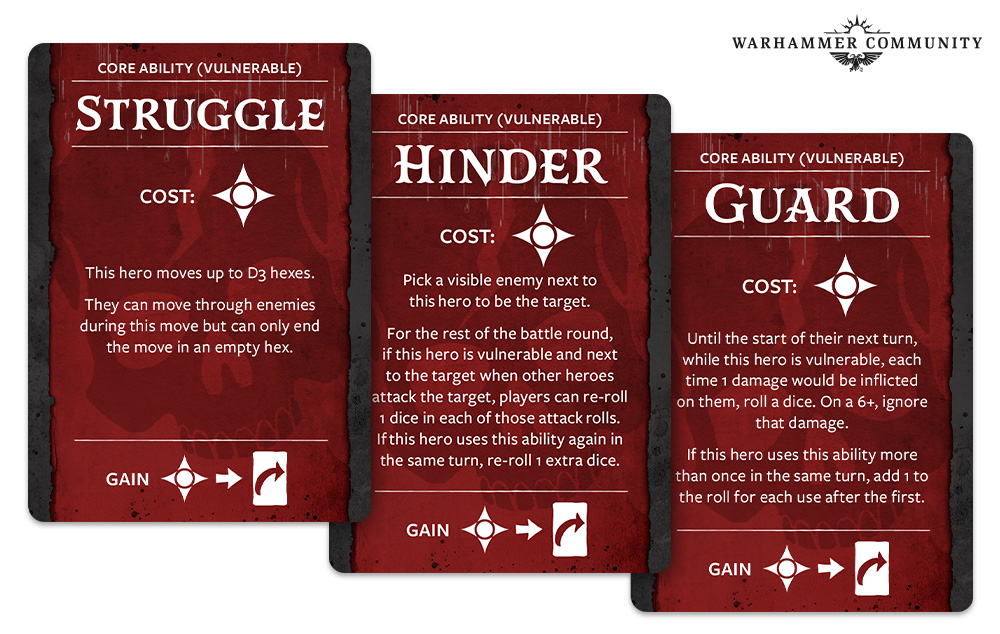
Moreover, taking damage while Vulnerable infects your abilities. Each time that happens, one ability becomes infected and now costs two energy to use instead of one. If every ability is infected, enemies will ignore you completely when moving and attacking, assuming rot and entropy will eventually finish the job. It is very grim, very Nurgle, and very on theme.
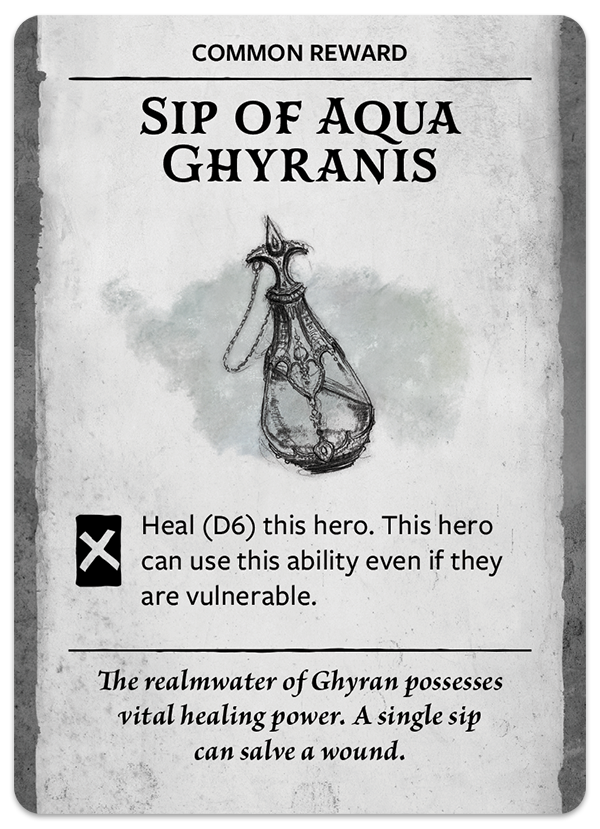
Thankfully, heroes have ways to claw back from the brink. Aid actions can heal, reward cards like Sip of Aqua Ghyranis can restore D6 health even while you are Vulnerable, and there is a small automatic D3 heal after each encounter. However, being knocked into Vulnerable repeatedly does not bode well for future rooms, especially once the enemies get more complex than basic Mire Kelpies.
Growing Complexity And Campaign Hooks
Everything in the article is pitched as the basic rules. It is the foundation that future scenarios and enemies build upon. Moreover, as you play through the campaign and earn reward cards, your action economy changes. New gear and boons add more options, more combos, and more ways to burn energy in clever sequences. Additionally, later enemies will have more elaborate behaviour tracks and more dangerous specials, making those decision points with Move, Attack, and Aid even more important.
Scenarios will also introduce special conditions and map constraints, turning the Jade Abbey into a proper evolving puzzle. Furthermore, the article reminds readers about the Forge Your Destiny email mini campaign. Each week you get a little narrative choice with two options, which lets you explore the Abbey in a lightweight way and maybe figure out which hero suits your playstyle before you hit the full box.
Summary
In short, Warhammer Quest: Darkwater is not just “move, roll to hit, move on.” It is a tight energy and card management game wrapped in grimy Ghyran dungeon crawling. Moreover, heroes like Edmark juggle Move, Attack, Aid, and signature kit to squeeze every hex and swing out of a turn. Enemies like Mire Kelpies answer back with predictable but escalating behaviour dice that keep the board state dangerous from round one. Additionally, status effects, Vulnerable states, and infected abilities mean you never feel truly safe, even when you technically survived the fight.
So if you like Warhammer games where the table talks through every single action and groans at every single die, Darkwater looks ready to deliver. Next up, Games Workshop will be breaking down scenarios and the campaign map, so we will see how all these crunchy moment to moment rules plug into a full journey through the Jade Abbey. Until then, it might be worth signing up for that Forge Your Destiny series and seeing how your choices play out in the ruins, even before your heroes hit the table.
And remember, Frontline Gaming sells gaming products at a discount, every day in their webcart!


