


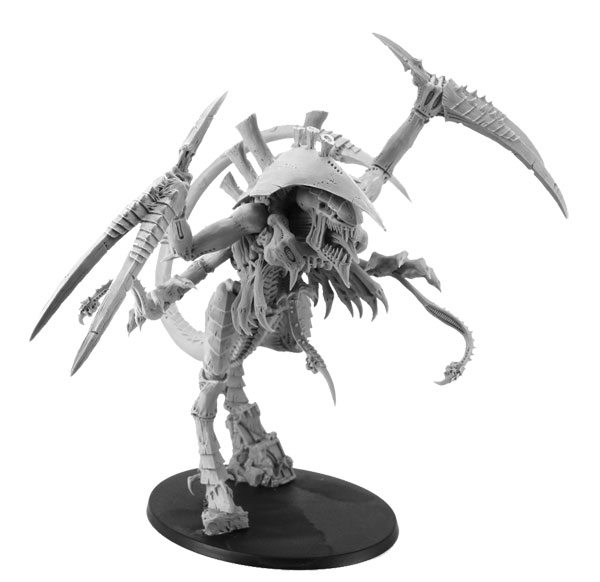
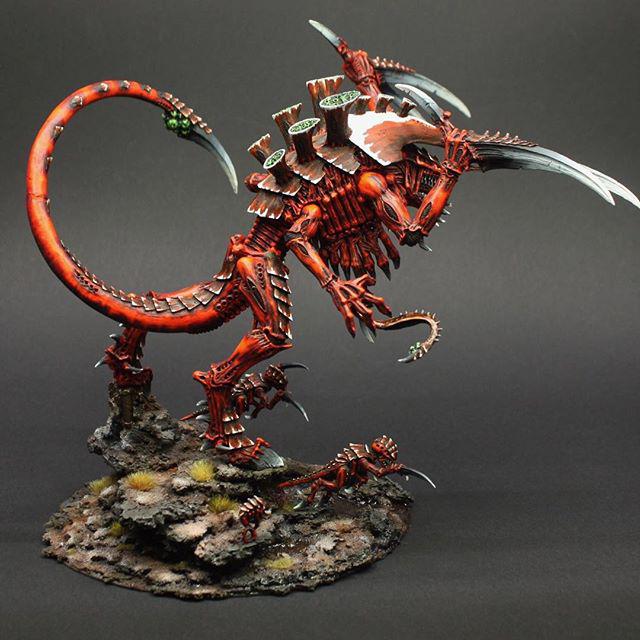
Hey everyone, Danny from TFG Radio here, and today, we are going to take a look at one of the prettiest dang Bugs you did ever see, the Dimachaeron. It has the looks, but it ain’t just a pretty face: it can murder a whole lot of things quick and speedy. Of course, don’t forget to check out all the goings-on over at Frontline’s Tactics Corner!
Yes, I am going out of order, but I know that the Dimachaeron has got people excited, so I decided to go right for it. The Dimachaeron is all about being a mid-board beater with excellent threat projection and some surprising resilience when leveraged correctly, and it is a showy little Bug, just like its namesake, the Dimachaerus. Let’s get into it:
Wargear:
- Massive Scything sickle-talons: Melee. S+1. AP-3. Dd3+3. You can reroll hit rolls with this weapon.
- Scything Tail: Melee. S User. AP-3. D2. You get 1 free attack with this weapon and can only make 1 attack with it.
Special Rules:
- Instinctive Behavior: Unless this model is within 24″ of a HIVE FLEET Synapse unit, it suffers -1 to hit for shooting attacks against enemy units that are not the closest, visible unit to it, and it suffers -2 to charges against enemy units that are not closest to it.
- Leaper Killer: 5++ invulnerable save. During a Normal Move, Fall Back, Advance, or Charge Move, this model can move horizontally and vertically through models and terrain features (it cannot end on top of another model/base).
- Death Throes: When this model dies, roll a d6. On a 6, all units within 3″ suffer d3 mortal wounds.
- Thorax Spine-Maw: After this model makes its close combat attacks, select one enemy model within Engagement Range (No AIRCRAFT). The opposing player rolls a d6 and adds that to the model’s Strength. If the total sum beats the Dimachaeron’s Strength, nothing happens. If the roll is equal to or less than the Dimachaeron’s, that model’s unit suffers d6 mortal wounds.
- Digestion Spine: If any enemy models are killed by the Thorax Spine-Maw ability, then the Dimachaeron ignores wounds on a 5+ (a 5+++ Feel No Pain).


Starting with raw stats, the Dima is a beefy bug with Strength and Toughness 7, 18 wounds, and the all important 3+/5++. That’s solid defense for Bugs all told, and it makes the Dima relatively resilient to small arms fire. It takes more than 200 Bolter shots to kill a Dima on average dice. The 5++ is important for the usual megadeath melta and what not out there, but keep in mind that the Dima may be tough, but the usual big threats like Eradictors still do 19.56 wounds on average dice for a full squad within half range (but no other buffs). The fact that the Dima is 18 wounds means that it doesn’t benefit from Obscuring Terrain, and because it is a tall, impressive model, your opponent is going to get shots off on it. If you can get the Digestion Spine to go off and you get the 5+++ Feel No Pain, then the Dima is just about as tough as Bugs can get, but this is an “if”. It is not necessarily worth chasing unless building off another combo, but if you get it to work, it really does make the Dima that much more annoying to handle in any context. On top of Turn 1 though, the Dima is tough, but it isn’t invincible by any means. You can always put it into Tactical Reserve, if you have the CP for it, but even then, the Dima doesn’t have anyway to naturally boost its own charge out of reserve, so you either need to build for the usual combos or just hope for a 9.

The Dima really wants to charge too. At Move 12”, WS 3+ with a rerollable to hit on those sweet D3+d3 claws, the Dima is going to massacre medium infantry and most vehicles. Even against the hardest threats like a Knight, you can spend 1 CP for the Insatiable Hunger strat and get a 75% conversion rate on those wounds, which is still pretty good. The Spine-Maw can help clear out weaker units that got in your way, but at most, a Dima can only kill 13 models under ideal conditions, and while that’s enough to slaughter a standard 10 man chaff unit, a larger tarpit unit is going to mostly be there. Still, that actual d6 mortal wounds can absolutely swing a combat your way, and it is also especially useful against characters with a strong invulnerable save. The Dima doesn’t pump out enough attacks to threaten any massed infantry, so you don’t want to waste those sweet hits on a chump unit, but thanks to Leaper Killer, you can just Fall Back over enemy models, so they can’t trap you.
This is, in my view, the Dima’s most powerful tek: unobstructed movement as a Monster. One of the big downsides to being a Monster is that you have to navigate terrain, and it is easy to screen one big threat, but the Dima cares not for these concerns. You can jump chaff walls, jump pesky ruins in the way, and overall, you get to navigate the board with a huge amount of freedom, which means the usual anti-Monster tactics just don’t work on the Dima. The movement phase is in my mind the most important phase of the game, and the Dima’s mastery of it coupled with Tyranids’ various ways of manipulating movement means that you have a winning combo here.

You can send the Dima deep up a flank on Turn 1 with Metabolic Overdrive, getting it 24+d6” of movement on Turn 1. Yes, it can’t charge, but if you send this big bug on the far side of the board, your opponent suddenly has to make a decision about how to handle it, all while you have other threats on deck. If using Kraken, the Opportunistic Advance strat and Onslaught means that a Dima can easily pull off a first turn charge, and again, because it can jump terrain and enemy units, you can absolutely hammer into the sweeter targets while avoiding chaff. Throw in a Swarmlord for movement during the shooting phase, and the Dima has no guns so nothing lost there, and really, you can actually send 3 Dima’s deep into your opponent, two of them charging, on Turn 1. That’s a lot of heat. A variation of this is to use a Scythed Hierodule as the flanking threat as it is a bit tougher with T8, and so your opponent has to try and clear the Dimas already in the center while also trying to deal with the other big murder beasty on their flank.
In terms of other combinations, anything that boosts speed is clutch. If you really want to try a Dima out of reserve, then you can try either Hive Instinct or Hunter’s Drive. Hive Instinct pairs well with a Broodlord that can quickly scurry up the board to set up the charge (it has to get there first) so the Dima coming out of reserve can get that sweet 3d6, drop the lowest charge. You can also use a Tyrant (or an Adaptive Physiology Exocrine/Barbed Hierodule/Tyrannofex) to shoot down a target to trigger Hunter’s Drive, again granting that 3d6, drop the lowest, or even try to combine them both together, but that’s not easy and super CP intensive. If going Kraken again, (I always end up to Kraken), a Dima and a Toxicrene work well together as Swarmy can Hive Commander the Toxicrene into a charge, the Dima can take Opportunistic Advance, and they can hit the same chaff wall together, unlikely to break it, but the Toxicrene can pop its strat to hold the unit in place, so both are safe for a turn before the Dima Falls back over the chaff and is free to charge. This is also a great way to try and get the Digestion Spine to trigger.

Hive Fleet is important here, and really, the Dima can benefit from most of them. Kraken is an obvious choice for sheer speed and the ability to Fall Back and Charge. Being able to charge a chaff line, make them fall back or stay there with you, and then jump over them next turn to charge deeper into the enemy is amazing. Kraken’s bespoke psychic power is also clutch for helping land longer charges with a free reroll. Gorgon is workable here as rerolling 1s to wound on a S8 attacks is some efficiency to be sure, and of course, if going custom, Prey Sight is awesome for rerollable WS 2+ attacks on the charge. Pair this with either Metamorphic Regrowth for some healing, or for pure offense, go Bestial Nature for +2 attacks when at bottom tier: the Dima is a threat until its very last attacks, especially since WS 5+ that rerolls is still hitting about 50% of the time, and with 8 attacks, that’s still 4 hits out of those big claws, and it gets even better if you charge. If doing a 3D-Swarmy list, Bestial and Prey Sight work wells for just a ton of offense until each bug dies, but Kraken offers more blistering speed and tactical flexibility. If doing a Jormungandr Nidzilla gunline, a Dimachaeron isn’t too bad as with Movement 12” when healthy, you can still traverse the board fairly quickly while also rocking a 2+ save.
Adaptive Physiology can work with on a Dima, namely Murderous Size to really make those claws brutalize whatever they hit, but you can also go with Synapse since Dimas can easily outrun their Synapse aura, but that isn’t really necessary. That’s one of the main strengths of the Dima: it is not in any way resource intensive outside of its point cost. You don’t need to use Adaptive Physiology on it at all since it already has a 5++ and hits like a truck. It has a reroll inherent to its main attacks, so no need to be locked into Prey Sight for accuracy. It uses the Fast Attack slot, so you can run a true Nidzilla list in one battalion and not have to worry about running out of Heavy Support slots. This makes even one Dimachaeron pretty much plug and play for an immediate big stick threat that your opponent has to consider.

So what’s the downside? Well, again, there are really only two things against it: cost and size. 230 is a lot of points, especially if you start throwing more than one in. You get a lot of bug here, but if you start taking more than 1, you are really forcing yourself into a Nidzilla style list, and that has some big problems playing the mission. 9th edition really rewards having bodies, whether MSU or Horde, to take those objectives, so if you start wanting to take several, you have to keep that in mind. Especially if you throw in the usual support like Swarmy, Malanthrope, or Maleceptor, you’ve used up most your points.
The other downside is again that the Dimachaeron cannot make use of Obscuring Terrain to hide, so against really potent shooting armies, it might never get a chance to do anything, so then you need to carefully consider if putting them into reserve is worth the CP or if you can win without them doing anything. Again, at 230 points, that’s a lot of points that you want doing something besides dying on Turn 1. The Dima is an especially tall and beautiful model, so it is pretty easy to be seen just about anywhere on just about any board. These are certainly not deal breakers, but since 9th edition is very much a mission-oriented game, a single badass monster might not be as effective as a bunch of little bugs that are Obsec.
Overall, 85/100. The Dimachaeron is just one of the meanest melee monsters in the game, let alone for Tyranids, and with Tyranids’ myriad movement tricks, you can get a lot of mileage out of them all while ignoring several of the biggest mechanical issues with Monsters, but it still has a few.
Thanks as always for reading, and be sure to hit up TFG Radio for our usual end of year contest and win some models. Be safe everyone, and play some games.
#mc_embed_signup{background:#fff; clear:left; font:14px Helvetica,Arial,sans-serif; } /* Add your own Mailchimp form style overrides in your site stylesheet or in this style block. We recommend moving this block and the preceding CSS link to the HEAD of your HTML file. */And remember, Frontline Gaming sells gaming products at a discount, every day in their webcart!


