

For the impatient and bloodthirsty, Battle for the Pass throws out most of the subtly and rewards aggression. Let’s talk about channeling that aggression best!
The Mission:
A throwback to an absolute classic from Warhammer Fantasy, if only in name, Battle for the Pass is a scenario built for driving players forward. The subtlety of many of our recent scenarios is present to a far lesser degree as frankly, sometimes it is just fun to push forward and get stuck in!
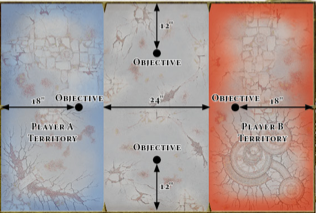
Players set up along their narrow table edges, with 24” of deployment available to them. 18” into their zone, and on the center-line is what will be their only home objective. Two additional objectives are placed on the “other” center-line, each 12” in from the long table edge.
No fuss, no muss, players simply score at the end of each of their turns, gaining one VP for their own home objective, two VP for either of the no-mans-land objectives, and a whopping four VP for their opponent’s home objective.

How to Win:
As with all good scenario writing in games, different scenarios should suit different player types, inherently making it more difficult to find one list/approach that rules all. Where the last few articles in this series worked on decoding some mind-games a player might use, or discuss psychology, this scenario simply rewards players whose lists can strike early, hit hard, and keep pushing forward.
Valid to consider is whether you want to push centrally, using outrider units to claim objectives (while leaving the core of your army to functionally act as a wedge/snow-plow), whether you want to go hard at one flank, or finally go with a “soft center” where you army is roughly divided in two.
The later of those options risks your home objective being the most exposed, and as such will only work in very specific match-ups that I leave to your discretion. If you grossly outnumber your opponent in model or unit count, it is a choice to consider.
The other two options will depend greatly on your armies particular balance of staying power versus killing speed. Armies with strong defensive lines should be more inclined to stay central, while very aggressively offensive armies will tend to see more success by punching through a single side, and credibly threatening the opponent’s home objective. This has added value of forcing your opponent to redeploy or forfeit good positioning to prevent a frankly oppressive swing of four points.

Which Armies Does it Favor:
I hate to be stuck on repeat, but armies with ready and guaranteed access to teleports, should just be assumed to have a bit of a leg up on this (as with most) scenarios. That those teleports are still oddly and conveniently accessible to some of the game’s strongest armies is a related issue that will eventually need to be addressed.
That said, all aggressive lists have credible avenues to success. A methodical holding of the mid-field, with horde armies is just as valid as blitzing the opponent with a strong alpha-strike along a flank, thus exerting a lot of board-control.
Nearly any battletome can be run in some flavor of an offensive configuration, and this is a scenario that very much calls for that. One thing to keep in mind though is that you do always need to be aware of your opponents flyers, redeployers, or simply fast units. Even in aggressive tactics there is an element of the dance, and in pushing into your opponent’s territory, you accomplish nothing if you leave your own wide-open.
And remember, Frontline Gaming sells gaming products at a discount, every day in their webcart!


