

Hello, and welcome to another tactical tidbit by Skari from Art of War. In this article, I will explore the nuances of the Heroic Intervention rule within Warhammer 40k.
We will first define the rule and how it works, as well as some examples of the rule within some other codexes that change or expand it. Then, I will show you an example that happened to me recently, where this rule was used in a very cunning and nuanced way. The aim of this article is to inspire you to use the rule within your games and add it to your strategy tool belt. For more tactical information, coaching, and training, you can always reach out to me through the war room!
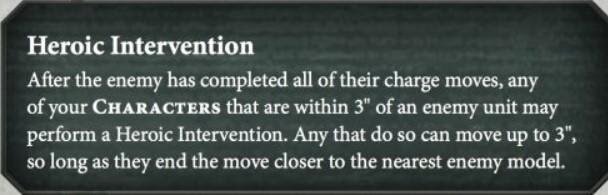
Heroic Intervention
At its core, this rule is a very basic one. If your enemy is close, you can get a nearby character to intervene and get stuck in to heroically save the day. However, the rule itself is quite a useful one and, when used effectively, can be a powerful competitive tool to use. My question to you is, have you used this rule before? Do you skip over it? Do you keep it in mind when playing? So let’s refresh our memory on the rule:

There you have it. As a reminder, it was FAQ’d that this movement can be made even though your opponent did not declare any charges, so it is essentially something that happens at the end of your opponent’s charge phase. Some armies have mechanics that allow this to change in a variety of ways:
Space Wolves – all wolf characters can heroically intervene (and move) within 6″ rather than 3″. They also have a stratagem that allows them to pick any unit to heroically intervene with like a character (and move 6″).
Custodes – have a warlord trait that confers it to not only the character but nearby units as well!
Harlequins – have a stratagem to allow a character to move 6″ as well.
Space Marines – Company Champions and the Emperor’s Champion seek out characters with their heroic interventions and can more towards them with more distance.
These are only some of the examples, please comment with any that I might have forgotten! Having some of these exceptions in mind now allows us to really dive into a case study for heroic intervention.
Drazhars Heroic Tap Dance
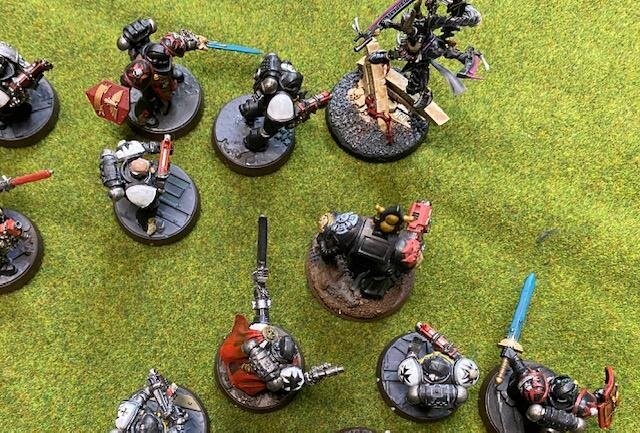
I was playing a game on time recently (yes, on tts technically) and had a great use of heroic intervention that allowed me to come out of a very precarious situation and gain an advantage for the late game of an ITC mission. I wanted to share this because it was a very subtle use of the rule, though the ramifications of what happened after were remarkable. I was playing against a Space Marine player who had taken King of the Hill. The middle of the table was hotly contested as there were two objectives really close to each other. Drahzar had jumped in aggressively and killed a squad of aggressors (yes, he’s a badass, also use of -1 ld bubble and a Heamonculus strat) In retaliation, the Space Marine player shot and subsequently charged Drahzar the following turn. He had two large units of Deathwatch Veterans with storm shields as well as bikes and Terminators charge in. However, because of the 9″ bubble for King of the Hill and how advanced the game was… and other factors… he was in a pickle. My opponent had to choose to commit the full movement into Drahzar or just get into within 1″ of him with both bike models and stay inside the 9″ bubble for the secondary point. After his movement, this is what it looked like for reference:

Now, what I was able to do was use the Heroic Intervention rule to move Drahzar 3″ to get closer to the nearest enemy model. This, however, took him away from the second unit. Forcing my opponent to make a choice: either to have just one unit attack the character or to pile in with the second unit and get more attacks but give up his king of the hill point.

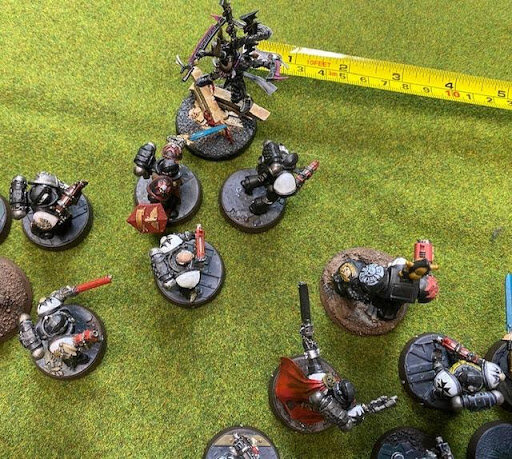
My opponent chose to pile in with the furthest unit giving up his point. Drahzar subsequently survived, however, and ended up being a pivotal part of me winning that game (this is part of a much larger lesson in close combat technical play). BUT, the point I’m trying to make is this… use Heroic Intervention creatively, and you will find yourself in some fascinating tactical situations.
I used it above to make a hard choice for my opponent. However, other uses include things like moving into base contact with an enemy model to prevent any further pile in moves (and potentially consolidations) to make sure that the enemy can’t engage other units. Another use would be to make more room for other units to get in close to attack the enemy. You could even get a character into an existing combat on your opponent’s turn in order to use a trapped unit on your turn.
I hope you found this interesting. What sort of cool ideas do you think you can come up with? What about using it to get equidistant between two models to then pile in towards the model of your choice when activating the character? As always, reach out to me for coaching or list building advice on the Art of War. Thanks a lot for reading, and I shall see you on the next Skari Tactical Tidbit.
Skari – Out
And remember, Frontline Gaming sells gaming products at a discount, every day in their webcart!


