


Hey everybody, Danny from TFG Radio here, and today, I am going to continue musing over the many, many myriad ways to build Tyranids in the post-Blood of Baal world, and this time, I am going to look at flooding the board with models. If you have a strong back and patience, check it out, and well, it never hurts to learn and adapt to what others are doing, so check out Frontline’s Tactics Corner for more.

From previous experience in 8th edition, leveraging one of our strongest elements, morale immunity, running a horde has been my most effective archetype of list, and really, this isn’t changing thanks to Blood of Baal. Our monsters got a huge boost, and believe me, I looooooove me some Nidzilla, but Tyranids really do excel at a submission style army where you are grinding out wins over 6 turns, not trying to table someone by Turn 3. With that in mind, these lists are all about winning in the late game, not really blowing past your opponent but steadily smothering them in just waves after waves of your infantry. Let’s check out a few different iterations.

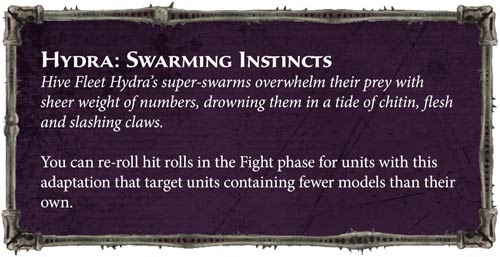
Hydra Super-Swarm
Hydra Battalion
Tervigon, WL, Dermic Symbiosis
Tervigon, Dermic Symbiosis, Resonance Barb
4×30 Termagants
Maleceptor
1×6 Venomthropes
Hydra Battalion
2x Broodlords
1x Malanthrope
3×30 Hormagaunts

This list has one simple premise: drown your opponent in bodies. You have 210 little bugs, all of whom reroll to hit against any target they outnumber and are Obsec. You have a full unit of Venomthropes to make sure your whole army is in range of the -1 aura (with a bonus Malanthrope just in case), and of course, a Maleceptor to make S4 into S3, keeping those little bugs alive longer.
The 2 broodlords exist to take turns running forward with the little ones and popping Death Shriek, staying as close to the action as possible to make it painful for your opponent to actually kill your models. This is especially true if you also have Caustic Blood up on that unit, but with Death Shriek, you can spread it around and have 2 units that are dangerous to kill rather than 1, but if your opponent has to kill a unit camping a critical objective, well, Death Shriek and Caustic Blood together gives you a 30% chance of a mortal wound for each model killed in melee (if within Death Shriek aura). If you could magically get a whole squad in the aura, a wiped squad of Termies or Hormies will do 9 MW on average, which isn’t too bad at all. And if nothing else, the Broodlords offer you a bit of melee punch with a few smites thrown into the mix.
The 120 Termagants also have 2 separate Tervigons pumping little ones out, so they are not going to be exceptionally easy to take down quickly. This also gives you a strong play with Engineers as even against an army with good out of LoS shooting, are they going to be able to kill 30 gants that get some reinforcements each turn? As this is all Obsec bodies, you are getting on objectives and just scoring points that way. This list wins by just making sure your opponent is never getting you off the objectives, and as long as you are killing one unit a turn, you should be keeping pace in a standard ITC mission set. You also have the CP to suicide a Broodlord into an exceptionally hard target as if it gets the charge off, it fights, dies, then fights again, and getting 12 attacks out a Broodlord can do big damage to most targets. Don’t forget 5 smites and 1 psychic scream, and that can add up, especially if it is a forward threat that is barreling down on your lines.

Like any swarm, the problem here is that you lack threat projection. A Broodlord can do damage, and you still have 5 smites, so anything that gets too close can take some real damage, but you are relying on rerolling to hit WS 4+ and S3, not the best math there. If your opponent stays back and cedes the first few turns to you, you may struggle to get any kills in the early game, and while you may be holding more, they are killing more, so it is all even, and you may find yourself out of steam by the late game as you’ve done little to no damage and your forces have been taking turns of punishment. You have to play smart to be able to get kills, and not kill low-hanging fruit all at once. You also have to pick good secondaries (mostly board control ones) and make sure you are maxing those. Another important aspect is to try and deny kills, keeping weakened squads out of the fight as if you can snake kill more in just one turn or even just tie, you are setting yourself up for a win. This isn’t always the most exciting way to play, but it is consistent. You can easily tweak the list too by going either Leviathan for the 6+++ Feel No Pain or doing a Build-A-Bug Hivefleet for the 6++ for the little ones. This is a bit less kill, but it is more resilient.
Genestealer Tricks
Build-A-Bug Battalion: Senses of Outer Dark and Shrewd Predators
Broodlord
2×20 Genestealers (both with Adrenal Webs)
1×3 Rippers
Build-A-Bug Battalion: Adaptive Exoskeleton and Membranous Mobility
2x Neurothropes
1x Malanthrope
2×3 Rippers
1×24 Termagants
3×3 Zoanthropes
2×30 Gargoyles

This list is about tricky-tricky Genestealers and then stall tactics. You have a new BoB take on the Genestealer rocket with Swarmlord and 40 Genestealers, but the difference here is that these Genestealers have a 4+++ Feel No Pain against Overwatch and can consolidate in any direction if there are no enemy units within 3″. With Adrenal Webs giving them a 2d6″ consolidate move, both units are capable of either sniping a small unit then scurrying back to safety or rushing forward and tri-pointing or tagging a huge chunk of your opponent’s lines. That’s really what the Stealers and Swarmy are there to do, put Turn 1 pressure on your opponent and keep them bottled up on their side of the board. The Genestealers will die, but hopefully not until T3 or 4, and your opponent is still mostly in their own deployment zone.
The second wave is a durable psychic base with 9 Zoans and 2 Neurothropes sending out smites to kill whatever gets through the Genestealers. There are also 24 Termgants and 60 Gargoyles to screen out and take objectives while keeping the Neuros and Zoans safe. Even if melee forces make into your Zoans or Neuros, they are -1 to hit and have a 3++. And getting to them is not easy as the Termies have a 6++ but the Gargoyles have that and a -1 to hit in melee. It won’t be easy for your opponent to chew through the second wave that are dominating objectives and keeping your smite factories safe from melee. Since there are 3 squads here rather than 2 larger squads, you also have the threat of the Zoan stratagem Psychic Barrage, which, with good advance rolls on the first turn, can core out a castle, all before the Genestealers get there to cause even more trouble.

The downside here is that this list is much stronger going first than second, which is not a winning strategy overall. It can go second if you have the terrain to hide your Genestealers and Swarmy, but if not, a good alpha strike will cripple the Genestealers/Swarmy, and now your opponent has all the time in the world to kill the Gargoyles and/or Zoans. In general, since it still has a decent amount of drops, you have to deploy conservatively against any shooty army, and that depends on the table layout, deployment map, etc. There could just be some games where the deployment map and table layout mean you have to sit there and take the punch, and say against Tau or Iron Hands, that’s not so good. The list also struggles to deal with a wide variety of T8 as you have to rely on smites, but that requires that you position well, and in general, you don’t pump out enough smites to kill a Knight a turn reliably.
If looking to tweak this a bit, you can also eschew psychic for some out of LoS shooting with Hive Guard or really up the psychic by dropping the Malanthrope and Termagants and just getting more Zoans. If you hate building Gargoyles, you can also switch this up by subbing out Membrous Mobility for Cranial Channeling and going full Termagant wall, getting you about 30ish more bodies all told.

Ground Control
Build-A-Bug Battalion: Adaptive Exoskeleton and Pack Hunters
Broodlord
Malanthrope
Tervigon, Dermic Symbiosis
3×30 Termagants
1×6 Hive Guard
Maleceptor
Build-A-Bug Battalion: Bio-Metallic Cysts and Pack Hunters
2x Broodlord
Malanthrope
3×30 Hormagaunts

So this list is about controlling the board and winning the mission more than anything else. With 180 bodies, 90 of which can be replenished by the Tervigon, you have essentially two distinct waves for your opponent to chew through, the Hormagaunt rush where they are going to be AP -2 against most targets (or -3 with 1 CP), and while S3 isn’t great, with their AP high enough, they can do real work. They have the obligatory Malanthrope to help make them a bit harder to kill, and overall, it forces your opponent to focus on killing these 90 models first as they rocket up the board. There are also 2 Broodlords rolling with them for smites and suicide charges against harder targets.
Next, they have 90 Termagants with a 6++ who are also -1 AP in combat against most targets. They have the usual Malanthrope escort, and with the Tervigon, a squad is healing 10 models a turn unless you take it down early. The Tervigon will always get Adaptive Physiology for the 5++, and with the Malanthrope and Maleceptor aura, it will not be easy to shift at range. The Maleceptor is of course there to keep the aura up, and it adds some decent first turn protection as through smart deployment, you can keep most of your forces inside the bubble on the first turn.
The punch of the army is really in the few broodlords running around and of course, Hive Guard. Hive Guard are excellent at generally making sure you can score Kill a Unit each turn as they can camp in a ruin and lay down fire. If need be, they can shoot twice if you have to eliminate a very hard target. You do have a spare Adaptive Physiology to throw out, so I recommend buffing the Hive Guard if possible for either ignore AP-1/2 or +2 in cover to make them exceptionally resilient to other out of LoS shooting. You need them to stay alive as long as possible.

Melee armies run into the problem that killing anything in combat opens you up to Caustic Blood, which can ruin an elite unit’s day, and this list still has a variety of smites to help increase overall damage potential. Really, it is designed to swallow objectives in walls of Obsec bodies while doing just enough damage to stay ahead in the mission. It will likely not table another list, but few lists will have the steam to clear the Hormies and the Termagants quickly.
The downside here is that you really have little overall kill, and the Hive Guard can’t kill everything. While it is easy to look on paper on the Super-Hormie, which you can do here, it is really not that threatening all told thanks to S3. A list with a lot of superior out of LoS shooting could be trouble, and especially Assault Centurions can do big damage thanks to the huge volume of S4 shooting. Another issue is that you only have 13 CP, and 2 CP hungry units, the Maleceptor and the Hive Guard, so really, you only have 3 turns of Encephalic Diffusion and Single Minded Annihilation, but Broodlords also want CP if they suicide into something. This is why you need to play for 6 turns and not use Single Minded Annihilation unless it is critical a unit dies (like say Assault Centurions or Aggressors). Having Encephalic Diffusion up to protect the swarm is more important in the long run most times.
Well, that’s another 3 lists that have been clawing their way to the top of my pile, but as always, there are dozens upon dozens of new lists to try, but if you have the patience, the long-term planning, and the back brace to play 150+ models for 8-16 hours, then you should check out the grindfest that is the swarm. Thanks as always for reading, and hey, next time, I think I am going to look at one of my favorite styles of lists: Jank, pure, whacky jank. See you all at LVO everyone. Come represent for the Hive Mind.
And remember, Frontline Gaming sells gaming products at a discount, every day in their webcart!


