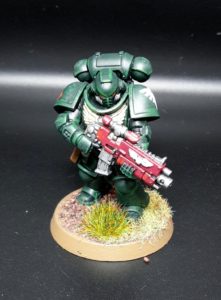
Hi everyone, Michael here with another update on my all Primaris Dark Angels army. This time, I take a look at how I get my infantry models painted up. For more reviews and analyses, check out the Tactics Corner.
Once you have your models assembled (see Part 2 for tips on assembling the models), you need to get them painted up. With my new additions to the Dark Angels force, I decided to re-vamp my painting methods for the army.
Dark Angels were my first 40k army, way back in 3rd edition. I took to the army due to the evocative background of the force, as well as the mix of Green wing, Ravenwing and Deathwing components of the army. This was a way to make three different colour schemes in one army. A bit daunting when you are first starting out, but it gives you somewhere to go as you grow your skills. My first Dark Angels models from this time featured a very simple colour scheme; washes weren’t really a thing back then, and I didn’t even bother with highlighting. My models were painted Dark Angels Green (obviously!) and the first versions featured bases painted Goblin Green with green flock on them, the classic GW look at the time. It took me several editions to get out of painting my bases green and experimenting with different colours and flocks!
I decided that for my new force, I would try some edge highlighting. I had been doing this with my Deathwatch force with some success, so wanted to apply it to the Dark Angels as well. I based my colour scheme on the awesome Warhammer TV video tutorials, more specifically the Dark Angels Hellblaster and Dark Vengeance Tactical Marine videos.
This colour scheme is quite easy to do. I can generally get a unit of 10 Primaris Marines painted in a couple of evenings. I must say, the Primaris Marines are a joy to paint. The bigger size of the models and simple level of detail on the models makes getting a good looking force quite easy to do (I was never a big fan of the “bling” Marines of previous editions, absolutely covered in pouches, purity seals, banners, chains, etc.).
Step 1- Undercoat the model with Caliban Green.
Step 2- Give the model a wash of Nuln Oil.
Step 3- Drybrush with Caliban Green. Drybrushing is a process of picking up areas of highlight on a model with ease. You take some paint on your brush and wipe off the excess paint until the brush is almost dry. Then you draw the brush over the raised areas of the model, going back and forth to build up the colour until it is to the level of highlight that you want.
Step 4- Drybrush the model with Waaagh Flesh.
Step 5- Edge highlight the armour with Warpstone Glow. Edge highlighting is a more time consuming, but accurate way of picking out highlights on a model. For this, it works better if you thin down your paints with a roughly 1:1 mixture with water. There are some great tutorials online for edge highlighting you can check out. You want to run the brush at an angle to the edge you are highlighting, so that you transfer just a little paint to the edge of the surface to create a small line of highlight.
This is probably the most time consuming part of the process. If you don’t want to do it, you can probably just use a drybrush highlight of Warpstone Glow on the models to get them to basic or tournament standard in a quick time.
Step 6- with the armour done, it’s time to pick out the details on the model. I tend to fill in all the other colours before applying other washes. The metal areas are painted Leadbelcher, the purity seal waxes and gun casing are painted Khorne Red, the pouches are in Mourfang Brown, the sections between the armour plates are painted in Abaddon Black, the icons on the guns are painted with White Scar and the purity seal tabs and front eagle on the chestplate are in Zhandri Dust.
Step 7- Wash the metal areas, gun casing and chestplate eagle with Nuln Oil, wash the pouches and purity seals with Agrax Earthshade. Ensure that all the washes are dried before moving on to the highlighting stage, otherwise the highlights will run.
Step 8- Apply the final highlights. I use a drybrush for most of my final highlights. The metal areas are highlighted with Stormhost Silver, the red areas with Khrone red, followed by Evil Sunz Scarlet. The pouches are highlighted with Steel Legion Drab, and the chest eagle and purity seals are highlighted with Ushabti Bone. The white section on the gun is highlighted with White Scar.
Step 9- I then paint the eye lenses with Evil Sunz Scarlet.
Step 10- Paint the base your desired colour and add appropriate material. I paint mine with Steel Legion Drab to match the rest of my Imperial forces, then add brown flock and green static grass to break up the colour on the base.
So that is the model complete. I tend to batch paint my models in units of 5 to 10 to speed up the painting process. This is quite a quick method with the drybrushing highlights and simple base colours. Once the unit is complete, you can add any transfers or unit markings and varnish the model to keep it safe from the rigours of gaming.
Most of my units are painted in this fashion, with a little variation for character models or vehicles. Hopefully, you have found this guide useful for painting up your own Primaris army.
And remember, Frontline Gaming sells gaming products at a discount, every day in their webcart!

