


Charlie here from 40kDiceRolls, here again, to discuss one of the T’au Empire’s leader battlesuits, the XV86 Coldstar. As always, for more tactics articles, check out the Tactics Corner!
This article has been updated since its initial publication to reflect Chapter Approved 2018 changes.
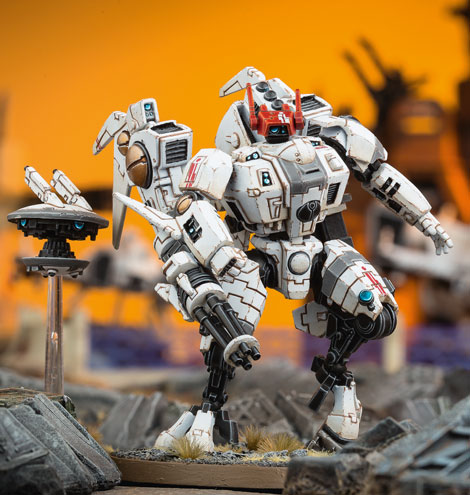
Today we’re talking about the fastest battlesuit in the T’au arsenal, the Coldstar Commander. Once the rank of Shas’o (Commander) has been obtained, this chosen T’au will serve his sept until death or until he has earned honored retirement. The Coldstar battlesuit is best equipped for those commanders seeking high-velocity aerial warfare.
On the tabletop, the Coldstar Commander is an incredibly agile and lethal single model unit.
| M | WS | BS | S | T | W | A | Ld | Sv |
| 20″ | 3+ | 2+ | 5 | 5 | 6 | 4 | 9 | 3+ |
Wargear
The Coldstar Commander is equipped with a high-out burst cannon and missile pod. It may replace these two weapons with choices from the Ranged Weapon and/or Support Systems lists. It may also take two additional items from the Ranged Weapon and/or Support Systems lists. Further, it may be accompanied by up to 2 Tactical Drones (p.109)
Ranged Weapon list (p.89 of the T’au Empire Codex)
- Airbursting fragmentation projector (AFP)
- 18″ Assault D6 S4 AP0 D1
- This weapon can target units not visible to the bearer
- Burst cannon (BC)
- 18″ Assault 4 S5 AP0 D1
- Flamer
- 9″ Assault D6 S4 AP0 D1
- Autohits
- Fusion blaster (FB)
- 18″ Assault 1 S8 AP-4 D[D6]
- If within half range, roll two dice for damage and discard lower
- Missile pod (MP)
- 36″ Assault 2 S7 AP-1 D[D3]
- Plasma rifle (PR)
- 24″ Rapid Fire 1 S6 AP-3 D1
*Note, the Coldstar Commander may not take Cyclic Ion Blasters (CIB’s)
Support Systems list (p.89 of the T’au Empire Codex)
- Advanced targeting systems (ATS)
- For all the bearer’s weapons (included the “unarmed weapon” used in close combat), make the AP one better (e.g. an AP0 of a weapon becomes AP-1)
- Counterfire defense systems (CFDS)
- Reroll failed hit rolls when firing overwatch
- Drone controller (DC)
- Add 1 for To-Hit rolls for any <Sept> Drones within 6″ of the bearer
- Early warning override (EWO)
- If any enemy units are set up with 12″ of the bearer as a result of an ability that allows them to arrive mid-battle (i.e. teleporting to the battlefield), then at the end of that phase, the bearer may immediately shoot at one of those units as if it was your shooting phase, but subtract 1 from To-Hit rolls.
- Multi-tracker (MT)
- Reroll To-Hit rolls of 1 in the Shooting phase for the bearer if it fires all its weapons at the same target and that target contains 5 or more models.
- Shield generator (SG)
- 4++ invuln save
- Target lock (TL)
- The bearer doesn’t suffer the penalty for moving and firing a Heavy weapon or for Advancing and firing an Assault weapon. The model may also Advance and fire Rapid Fire weapons, but must subtract 1 from To-Hit rolls.
- Velocity tracker (VT)
- Add 1 for To-Hit rolls when the bearer shoots at something with the <Fly> keyword.
Special Rules
The Enforcer Commander’s special abilities include:
- For the Greater Good
- Allows units within 6″ of a charged unit to fire overwatch as if they were the target of the charge, at the cost of not being able to fire overwatch again that turn
- Master of War, once per battle choose one of the below choices by declaring Mont’ka or Kauyon
- Kauyon
- For the remainder of the turn, Tau sept units within 6″ of the Commander can reroll failed To-Hit rolls, but cannot move for any reason
- Mont’ka
- T’au sept units within 6″ of the Commander can both advance and shoot as if they have not moved
- Kauyon
- Manta Strike
- Standard deep strike ability as long as you come in >9″ from an enemy unit, at the end of your Movement phase
- Coldstar
- When this model Advances, add 20″ to its Move characteristic for that Movement phase instead of rolling a D6
Tactics
The Coldstar Commander is one of the top three best T’au units right now. Even though they cannot take T’au most versatile weapon (CIB’s), their incredible movement, excellent BS, and access to multiple strong stratagems, weapons, and relics result in a “scalpel” of a unit that nearly every T’au list would benefit from. Since both the high-output burst cannon and missile pods came down a few points in CA2018, his stock loadout is cheaper and better, at least by comparison to what it was pre-CA2018.
In lieu of CIB’s, the most obvious choice would be to load a Coldstar with four FB’s which is now even better thanks to a slightly-reduced cost of the FB’s thanks to CA2018. With the 40″ movement, you can reliably get within 9″ of your target for the “roll two dice for damage and discard lower” perk. Nothing is safe. Does your opponent have a couple of Manticore’s parked behind some far off building out of line of sight? Zoom your Coldstar over there to deal with them. Because of its relatively small base size (compared to other units who can move 40″ in a single turn), many opponents will be caught off guard that your Coldstar has just enough room to land amongst their high-value siege units. If you can manage to get slightly closer beforehand, so that you don’t have to Advance to get within range (still feasible due to M20″), what you don’t outright kill with the four fusion blasters, you can charge. The only thing that artillery (without the <fly> keyword) hate more than a shot to the face is to be touched in combat, even by something as martially inept as T’au.
Unfortunately for our Coldstar, this is almost assuredly a one-way trip. Understand how many points you have to kill in your single turn of shooting because on your opponent’s following turn, they’ll have a juicy Coldstar target amongst their ranks. No native invuln (you took 4 FB’s, remember?) means that any source of significant AP (just a Sv3+, normally) will just pass through as damage. Understanding this, and understanding what you need to kill/do to make it worth their inevitable death is key to utilizing a Coldstar effectively. Would a 4FB Coldstar earn his points back if it could instagib a Manticore and then charge into another Manticore or Punisher Gatling cannon Tank Commander, removing their ability to shoot next turn? I say yes. You certainly don’t have to kamakaze your Coldstar in. Careful positioning and screening with your other units could result in a Coldstar that remains deadly for the full duration of the game. However, you need to always be aware and looking for opportunities to zip 40″ across the field and most importantly, your opponent needs to be afraid of you doing that.

Maybe you feel like you have enough anti-tank and are looking for something else. Against armies who rely on T3, 4 or 5 wound support characters to pull off amazing things, an assassin-style Coldstar could also be very effective. My personal go-to character-killer loadout consists of 3 burst cannons and the Supernova Launcher (18″ Assault D6 S6 AP-2 D2). With this, you can move up to 40″ with a turn-one Mont’ka, still hit on 2’s, and throw a ton of shots at a single important character. Pair this with the Sa’cea sept Orbital Marker Distribution Uplink (2CP) stratagem to get a markerlight on the character in question, even though they aren’t the nearest visible enemy unit, and your ability to reroll 1’s for all those shots coming from the Coldstar will do a great job ensuring that they’re swiftly dealt with. Just like the 40″ movement let you get into position to nuke vehicles, the 40″ movement here will allow you to circumvent both the normal inability to target those characters (unless you brought Sniper Drones) and the normal inability to have a unit so far deep in your opponent’s backfield turn one. Forget Manta Striking, you have 40 freaking inches of movement!
If your Commander is from the Vior’la sept, you could replace a flamer with a Thermoneutronic Projector which is 8″ Assault D6 S6 AP-1 D2, auto hits. Disregarding that the auto hits circumvent the Coldstar’s BS2+ (which is one of the principal reasons why you’re taking a Coldstar), the Thermoneutronic Projector is just straight up worse in range and AP than the Supernova Launcher. I’m not sure why you’d take the flamer relic over the AFP relic. Long-range Coldstar seems a little like an oxymoron, but there’s no reason why a Coldstar with a Plasma Accelerator Rifle (30″ Rapid Fire 1 S7 AP-3 D2, which takes place of the standard Plasma Rifle) would be inherently bad, especially since it did get slightly cheaper in CA2018. Lastly in the topic of offensive relics, Fusion Blades (18″ Assault 2 S8 AP-4 D[D6], exact same as two fusion blasters and Melee S8 AP-4 D[D6], can only make two attacks with this weapon each time it fights) are just as bad on Coldstar Commanders as they are on Enforcer Commanders, namely due to the low number of attacks and “gimmicky-ness” of it all.
You might be tempted to try and keep your Coldstar alive. You might not be willing to accept that they will be annihilated on the following turn that they rush 40″ across the board. You might think that 3 fusion blasters and a shield generator could just keep your Coldstar alive to see the second turn. This would be a trap. By taking that shield generator, you’re taking one less FB or burst cannon or another source of firepower that, in turn, increases the chance that your target will outlive the high-velocity onslaught you’re bringing to it. It would be an absolute travesty should you jump across the board, fail to kill what you wanted to kill due to lack of firepower, and then your Coldstar dies anyway despite the Shield Generator you took on him. When it comes down to it, a 4++ won’t stop the weight of fire from killing your W6 Coldstar and since you have to sacrifice firepower to take it, makes it not worth it. If you want to keep it alive, play defensively and screen accordingly
As a counter to this, Signature Systems like the T’au sept only Vectored Maneuvering Thrusters and the Dal’yth sept only Dynamic Mirror Field could actually prove useful, namely because you aren’t necessarily giving up firepower to take them (i.e. you could take Vectored Maneuvering Thrusters and still take 4 FB). The thrusters allow the bearer to move up to 6″ after attacking in the Shooting phase. It’s reminiscent of the old T’au tactic Jump-Shoot-Jump and if your Coldstar Commander were positioned well enough, could keep the enemy from returning fire. The Mirror Field requires enemy units to subtract 1 from all To-Hit rolls that target the bearer, but that’s not as good as just not being shot at so my vote (if you’re going for either of these) would be for the Thrusters.
While Coldstar Commanders will be primarily “Rambo-ing” into your opponent’s vital bits, they can be just as useful to access and take advantage of stratagems as Enforcer Commanders are. Some of the below stratagems require a commander to utilize and others are beneficial to the Enforcer Commander due to the fact that they are also <Battlesuits>.
- Multi-spectrum Sensor Suite (1CP)
- Use this before a <Battlesuit> unit shoots, the target of the attacks cannot claim cover bonuses to their save for this phase.
- Fail-safe Detonator (1CP)
- Use when a <Battlesuit> unit is destroyed in the Fight phase but before removing the last unit. Roll a D6 for each unit (friend and foe) within 3″ of that model and on a 4+ it takes a mortal wound.
- Automated Repair System (2CP)
- Use at the start of any turn. A <Battlesuit> or <Vehicle> can regain D3 lost wounds.
- Neuroweb System Jammer (2CP)
- Use this at the start of the enemy Shooting phase. Pick an enemy unit within 18″ of a <Battlesuit> <Commander> in your army. Your opponent must subtract 1 from hit rolls made for that unit this phase.
- Repulsor Impact Field (1CP)
- Use after an enemy successfully charges a <Battlesuit> unit. Roll a dice for each model in the enemy unit within 3″ of your unit. On a 6 that model suffers a mortal wound.
- Command-and-control Node (1CP)
- Use this stratagem at the start of your Shooting phase. Pick a <Sept> <Commander> form your army. That Commander may not shoot, but one <Sept> <Battlesuit> unit form your army that is within 6″ of that Commander may reroll failed wound rolls this phase.
- Emergency Dispensation
- Your standard “pay 1CP for an extra relic, pay 3CP for two extra relics” stratagem.
- Orbital Ion Beam
- Use in your Shooting phase if a <T’au Empire> <Commander> from your army did not move or use their Manta Strike ability in the preceding Movement phase. Pick two points on the battlefield 2D6″ apart. Draw a 1mm imaginary line between the two points and roll a die for any unit (friend or foe) under this line. On a 4+ that unit being rolled for suffers D3 mortal wound. Once per game stratagem.
If you dive headfirst into your opponent’s units (or even just move up into a screened, defensible position), you’ll be perfectly poised to take advantage of Neuroweb System Jammer (NSJ). Typically, however, you’ll be so close to everything else, that it will be far too little to keep your Coldstar alive. You’d have to be quite deft indeed to be able to position your Coldstar well enough to take out their key target, use the Vectored Maneuvered Thrusters to hide, and then use NSJ to keep the few things that can see you from killing you. I suppose it might be possible though. Should you find yourself wounded but alive, dear Lord don’t forget Automated Repair Systems to heal up before jetting off again.
The last thing to cover regarding the Coldstar Commander would be warlord traits. I don’t actually advise that you make your Coldstar your warlord, due to the aforementioned short lifespan. If you plan on somehow guaranteeing that they will live to see turn two, then Through Unity, Devastation is probably the best take, as it allows you to choose one enemy unit visible to your Warlord and friendly units within 6″ of your warlord that shoot at and wound on a 6 increase their AP by 1 (e.g. AP0 becomes AP-1). This pairs well with nearby Riptides, Firewarriors, and any other T’au unit with volume of fire.
Even Exemplar of the Mont’ka (can Advance and fire as if he had not Advanced) and Precision of the Hunter (re-roll wound rolls of 1’s against <Vehicle> and <Monster>) which may prove useful to the whole “diving into your enemy” tactic, will only help your Coldstar be more effective at killing his target (good thing), but will still inevitably die in the return fire (bad thing). If you can postpone your 40″ move until turn two and the board position allowed for it, you could Manta Strike Shield Drones to rendezvous with the Coldstar, thus giving him more tools to try and stay alive with. The ability to do this is far from guaranteed, however, especially since you still have to be outside of 9″ from enemy models after having used Manta Strike and the Coldstar will be placed right amongst all the enemy models in most cases.
Counters

To start with, Coldstar Commanders have the same restriction that all <Commanders> have in that you can only take 1 <Commander> unit per detachment. Not only can you not take more than three of the same Commander, but you’d also have to take three detachments in order to be able to take three <Commanders>. Specifically speaking of Coldstars now, a savvy and wary opponent will understand the desired tactic that you want to use with the Coldstar and appropriate deploy and screen against it. Proper unit placement will not leave a space big enough for a Coldstar to come to assassinate a key support character. Add in a decent invuln save and the four shots that a “4FB Coldstar” gets could feasibly be thwarted with rerolls and luck.
Apart from unit placement, there’s not a ton that can be done against Coldstars and that’s what makes them so strong. It won’t be hard for you to kill the Coldstar that just appeared in your deployment zone, but if they killed your 250 point vehicle beforehand, it’s a good trade for the T’au. Proper unit placement doesn’t end after deployment either. A patient T’au Coldstar will wait until the opportunity arises to trade preferably in the T’au’s favor. Don’t get caught off guard. Use of the “new” assassins, in general, seems like an advisable strategy against T’au, thanks to all of their T3 buffing characters so if you were already bringing them, they won’t hurt in hampering the Coldstar’s plan.
Summary
Overall, the Coldstar Commander is a force to be reckoned with simply because it allows for near-unprecedented movement and surgical precision. Though potentially not as diverse a tool as the Enforcer Commander, the Coldstar can be a threat to many different types of targets turn one and remain so for the duration of the game. I’d go so far to say that any T’au list NOT running a Coldstar is doing something wrong. Coldstar Commanders are tricky but not impossible to deal with however and understanding what they’re good at and what the T’au player will want to do with them is the first step towards adequately combatting them.
How many Coldstar Commanders are you running?
And remember, Frontline Gaming sells gaming products at a discount, every day in their webcart!


