


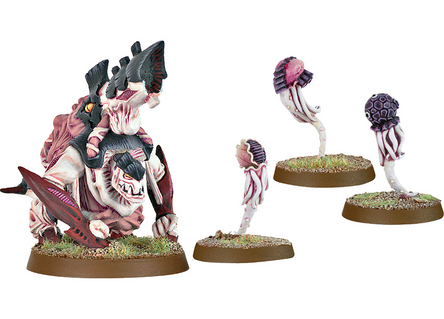
Hey everybody, Danny from TFG Radio here, and today, we talk about a model that has had many forms, each more impressive than the last, the mighty, not-so-tiny Biovore! This is a model that rewards creative thinking and skill, so if you want to up your game, check out the Tactics Corner.
Equipment and Biomorphs:
- Spore mine launcher – 48″ Heavy 1, ignores Line of Sight, cannot be used in Overwatch. If you hit, on 2-5, target takes 1 mortal wound. On a 6, it takes d3 mortal wounds. If you miss a shot, you can place a Spore Mine anywhere within 6 of the target and more than 3 away. If you can’t place the mine, it is destroyed. It cannot move or charge the turn it was set up.
Special Rules:
- Instinctive Behavior: Unless within 24 inches of a HIVE FLEET synapse creature, -1 to hit for shooting attacks against any target that is not the closest, and -2 to charge a unit unless it is the closest.
- Spore Mine Launcher – See above.
The venerable Biovore, our first gun-beast, may be old, but damn, can it still kick butt although toned down a bit. Chapter Approved 2017 upped the points, but that’s ok, that’s likely for the best. The Biovore is still all about board control. The Spore Launcher may be able to generate some mortal wounds, but that’s a bonus really, a sweet, sweet bonus. Whenever you miss, you get to drop down a spore mine (for free), and from there, you can start to dictate the flow of battle. Whether it is clogging charge lanes or just making movement an annoyance, your opponent has to react to these new models. There is nothing sweeter than a spore mine taking a smite or being the closest model for targeting purposes against characters. This really can change the dynamic of a turn, and again, it forces your opponent into movement and target priority decisions, which leads to the opportunity for misplays.
As the mines cannot be placed within 3, they do not go off, but again, it does allow you to somewhat quarantine units if you have enough Biovores shooting to essentially form a wall that they cannot move through and have to shoot if they do not want to take some mortal wounds. Especially against Knights, Spore Mines are great at restricting their movement since they are never there in combat to Fall Back over, and they cannot Fall Back over Spore Mines as they are not Infantry anyway. Again, spore mines often don’t do much damage, but being able to dictate and influence your opponent’s movement phase and shooting phase is clutch, and especially against psychic heavy armies, spore mines really do love eating Smites.

Of course, mortal wounds are really good too, and oddly enough, our cheapest heavy support is also one of our best ways to put reliable wounds on a model although not a lot of wounds. Biovores are not really going to put big damage up, but well, consistency is important. For 150 points, you will do 1.11 wounds on average to a target, whether a Guardsmen or a Knight. While that’s not exactly impressive numbers, sometimes you really, really need just 1 more wound. Let’s not forget that Biovores actually give you something when you miss, so there’s that. With 9 now being the max, you can’t spam like you used to, but 9 isn’t a massive investment either all told (although still not cheap), and it allows you really mess with the flow of the board and do some lovely mortal wounds. 9 puts out just about 3.5 wounds, guaranteed to a unit, and again, that is not a big number, but 3.5 wounds against say a Knight can be a lot harder to achieve at range than you think.
Again, ignoring LoS means that you can keep these bugs out of sight to rain down fire, and it definitely helps set up a beta-strike list where you can keep boots on the ground but out of the line of fire, so going second isn’t a big deal. Coupled with a board control list (re: lots of termagants/hormagaunts), you can really dictate the flow of battle and win the objective game. I have had some fun and success with a beta-strike list with a lot, a lot of gribblies, the new and improved Broodlords, Old One Eye, and Hive Guard/Biovores where there are really no good targets for my opponent other than little bugs, but I can consistently do damage while hiding and controlling the board. It is not a super killy list, but it plays the ITC missions quite well. You can also use Biovores with Hive Guard as your starting board presence (who can just hide and still contribute offense) and then bring on the reserves in Turn 2 and Turn 3 (our new GSC friends pair well with this).
Hive Fleet has some impact here. With Kronos, you get a reroll 1, so an 8% increase in accuracy, which isn’t a bad thing at all if you are looking to get more wounds out of the bugs. The Spore Mines are also the same as your Biovore, so launching a spore mine up to 48″ across the table to be a Deepest Shadow trigger is pretty awesome and a great way to shut down psychic armies like Ynnari that really need that one power to go off. If you don’t want to hit, you can always shuffle slightly, and get those sweet 5s to hit (or as I think of it, 1-4 to create a spore). Jormungandr is good for a 3+ save against any fast units that can line up shots, or even Leviathan in case the Bios go against any other ignore LoS weaponry. At T4 with 4 wounds each, the 3+ from cover and/or a 6+ Feel No Pain can make them annoying to kill at range, especially for light mortars and such. That really is it as the Biovore doesn’t really benefit from any of the other Hive Fleets in any really meaningful ways.

The downside is what you expect for a small mortar: they suck at combat and need Synapse. They only have 2 attacks each, and yah, if they get locked up in combat, they are not going to kill anything, and if they fall back, they aren’t doing their job. Do not let them get engaged. You also need a good babysitter if you want them to do damage as you need to them to hit, but if you really only want them for Spore Mines, then eh, no big deal. They are weak against hordes as they do not do enough damage, but then that’s not their job to be fair. Still, if you are trying to just kill models upon models, the Biovores are not going to do it for you. They are a bit squishier than say Hive Guard, and they have seen a points increase, which is fitting to be sure. That said, they are not quite as economical as they were before, and they are definitely on a curve of effectiveness: the more you take, the more impactful they get. Only taking 1 or 2 isn’t likely going to get you much other than a backfield objective holder or filling out a Brigade slot, so if you do want to play with Biovores, then more is better, and that does start to eat up points. Spending nearly 25% of a 2k army on 9 models isn’t super ideal either and definitely forces you into a specific army build, so the Biovore isn’t as interchangeable as Hive Guard that go well with just about any list. They are also on some pretty beefy bases, so finding room to hide them all, even just 3, can be difficult depending on the terrain. Without the sheer kill factor of other units, you need to use them precisely, and that ups the difficulty curve. Biovores are awesome control pieces, but they require smart model placement and smart target priority as you need to factor in where you want to charge on your turn, what you need to block, and where you want your opponent to go. It is a lot of math to keep in your head during a game, and if you misplay the Biovores, they really aren’t doing anything for you while eating up valuable points. If you dedicate to them, you are a bit locked into a specific tactic, which has counter-plays to be sure.
80/100. A good unit that really allows you to control the board and maybe do a tiny bit of damage, but if you are looking for kill, there are certainly better units. That said, Tyranids are really great at being a board control army rather than just sheer search and destroy (seems a little wrong though, doesn’t it?), so Biovores complement that style of play. Thanks as always for reading, and hey, be a cool kid and check out Battle for Los Angeles.
And remember, Frontline Gaming sells gaming products at a discount, every day in their webcart!


