Equipped with its Pulse Bombs the Sun Shark can… wait, what exactly is “pulse energy”? I’m not quite certain, and I don’t think Games Workshop is, either. Click to read the updated CA2018 article, or check out the Tactics Corner for other reviews and strategies.
Overview
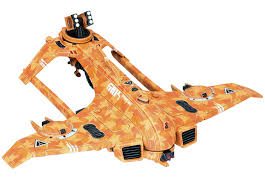
The Sun Shark Bomber is a development of the chassis used for the Razorshark Fighter-Bomber- we know this because of its designation (AX39) indicates that it was built from the same frame as its predecessor (the AX3), though a casual glance at the airframe makes it obvious as well. Though lacking the more powerful engines and the heavy strafing firepower of its cousin, the AX39 still carries a significant weapons loadout that can be used to rake targets with missiles and pulse fire as it passes overhead. The real heart of the vehicle is its advanced Pulse Bomb Generator, however; its capacitors can build a powerful blast of pulse energy and contain it within a special apparatus, and then as it sweeps over the desired target the mass of energy is released to fall to the ground and detonate in a spectacular explosion.
On the tabletop, the Sun Shark’s profile is a bit on the low end for an aircraft, but not unusually so. With a base movement rate of 20″-60″ it can pretty easily cross the field when it desires to do so, though its limited turning radius means that you need to be careful when maneuvering it. Toughness six and twelve wounds make it reasonably resilient, although with only 4+ armor even small arms fire can be a significant threat to it in numbers. A ballistic skill of 4+ isn’t great, but since its weapons are at least all assault or rapid fire you don’t need to worry about movement penalties at least. At 146pts for its base loadout, the Sun Shark feels a tad expensive overall, though it isn’t horrible.
Special Rules and Wargear
Like most all flyers, the Sun Shark has the Airborne, Supersonic, and Hard to Hit rules, meaning that it can only turn ninety degrees before moving in a straight line as well as being unable to assault (or be assaulted by anything other than Fly units.) Enemies also take a flat -1 to hit it with any attack in made in the shooting phase. Finally, if destroyed, it can crash for d3 mortal wounds to nearby units.
Beyond that, the Sun Shark comes armed with a Markerlight, two Seeker Missiles (S8 AP-2 DmgD6 one use each), and a Missile Pod (48″ S7 AP-1 DmgD3 Assault 2); an additional Missile Pod can also be added to its armament for 15pts, which is a reasonable price (if not an exciting one.) Note that as a vehicle, the Sun Shark is allowed to fire its Markerlight alongside the other weapons it has, contrary to the usual restrictions.
The Sun Shark also comes with two Interceptor Drones, which have the usual profile for a Drone model (T4/4+, BS5+, etc) except that they can move 20″ per turn. Interceptor Drones are armed with two Ion Rifles, which can be fired on either normal mode (30″ S7 AP-1 Rapid Fire 1) or overcharged (30″ S8 AP-1 Dmg2 Heavy d3 any 1s to hit cause a mortal wound to this model). Since they will almost always be moving, I think that the overcharge mode is much too risky to use unless you have built 4+ Markerlights on a target (and ideally 5+ in order to completely negate any chance of them dying.) The drones start the game embarked on the Sun Shark and so long as they remain so they fire as though they were a part of the vehicle, including using its ballistic skill, but they can detach as though they were disembarking from a transport, at which point they act independently.
The most important part of the Sun Shark, though, is its Pulse Bomb Generator. It can drop a bomb on one unit that it moves over in the movement phase; unlike many other bombers, there is no limit to how many times this can be done (though it can only drop one bomb per turn.) When doing so, roll a die for each model in the unit up to a maximum of ten, adding +1 if the target is Infantry, and every 5+ does a mortal wound to them. With the preponderance of large infantry units out there for blocking, the Pulse Bomb can be a very effective way to thin them down a bit; it will rarely wipe anything out, but it can easily clear a bunch of Space Marines or Genestealers from a spot before you open up with your guns. Note that the Bomb does not require line of sight to be dropped, which can make it surprisingly-effective for clearing units from enclosed buildings or other spots that are hard to draw line of sight into.
Uses
The Sun Shark isn’t a particularly impressive unit overall; although it has relatively decent firepower, like most Tau units it suffers heavily from any penalties to hit as well as to stats lost to damage- and given how fragile it can be, this can happen quite quickly. Although the -1 to hit and immunity to most charges will protect it to a degree, any kind of “real” anti-tank firepower will still drop it in pretty short order and its low toughness actually means that there are quite a few weapons that are extra-effective against it. Armiger Helverins, for example, are an absolute nightmare for the Sun Shark, as are a lot of other guns out there. So you’re not going to be seeing the Bomber at the top tables of any tournaments particularly soon, unless it gets a major price drop. However, it also isn’t so bad as to be unusable, as it brings some fairly useful firepower to the table and can be a nice way to fill some gaps in the Tau lineup.
The first thing we should note about the Sun Shark is that it actually has pretty decent shooting firepower on its most basic level- very comparable to the Razorshark, in fact. At ranges of 15″ or less (where it can doubletap with its drones) the Sun Shark is putting down six mid-strength shots per turn (eight if you paid for the extra Missile), which can do a good job of chipping away at light-to-medium vehicles and other multiwound targets; the addition of the inbuilt Markerlight and two Seeker Missiles also means it has the potential to drop a significant alpha strike onto something with a bit of luck. (Remember that the Uplinked Markerlight stratagem can allow you to fire off the missiles at full BS even without any other support.) While none of these are blowout features, they all add to the general utility of the platform and allow it to continue contributing through the shooting phase.
The Sun Shark’s main job, of course, is dropping its bomb on infantry units and you should generally be prioritizing this over other concerns with it, as the bomb is most certainly its best asset. With the ability to eliminate half of a unit each turn regardless of armor saves, the Sun Shark can be quite dangerous to the more expensive infantry out there (i.e. anything beyond your typical Cultist or Guardsman), but even against lower-end targets it is no slouch and can put in a decent amount of work. Targeting non-infantry models can also work, although losing out on the bonus is pretty significant and such units tend not to come in as large of sizes- still, if you can get ten dice against a squad of Bikes or the like that can sometimes be more valuable than bombing random infantry, so don’t completely overlook that option.
The fact that the bomb does mortal wounds is critical, because Tau have very few ways of doing mortal wounds, as they lack any kind of psyker (or even allied psyker) and have only a small handful of weapons that trigger such abilities in the shooting phase. Since these cut through not only all kinds of saves (both armor and invulnerable) but also bypass any kind of hit rolls or other defenses short of ignoring wounds, the Pulse Bomb can be very useful in whittling down or even eliminating a unit that would otherwise be very difficult for Tau to deal with, such as a unit of Rangers or Wyches. Also, don’t underestimate its value in sniping the last wound off a character that is trying to hide from you- the Bomb doesn’t care about targeting restrictions or invuln saves, which are typically what characters use to keep themselves from getting killed and taking out that Warlock or Captain that is sitting on its last wound can make a huge change in your plans. Also, since it happens in the movement phase, you can base the remainder of your decisions for the turn on how it turns out- so move your Sun Shark and see what the bomb does, and then move your other units as appropriate to do what you need to based on the results you’ve seen.
I’d also like to take this moment to call out the Interceptor Drones, which are often forgotten. Like all drones they can potentially survive the destruction of their carrier- so when you’re getting ready to pull the Bomber off the table, don’t forget to roll those two dice to see if the drones survive, as they can be a very sneaky way to keep some presence on the board. With a 20″ movement and a decent gun, Interceptor Drones can’t typically be ignored by the enemy for long, and like all drones they can soak wounds for your battlesuits if needed, though their expense makes this something of a last resort in most cases. But their speed (and the fact that many players will forget they exist until the Bomber dies) means they are great for sneaking onto objectives or table quarters in order to score points, and like the Bomber itself they can often sneak up on an enemy HQ and put some shots into it to finish it off, though with their poor ballistic skill I certainly wouldn’t count on this often. I think they are best used as a harassment unit that stays largely out of line of sight and threatens the enemy with the possibility of contesting/controlling objectives rather than attempting to have a direct influence on the battlefield, as their low survivability and model count make that a risky play.
Countering
If you’re dealing with a Sun Shark Bomber, there are a number of ways you can mitigate its effectiveness. As a flyer, its limited turning radius and movement paths mean that you should generally know a round in advance where it can potentially go- and as it wants to be passing over enemy units as it moves, this can further dictate the way it proceeds across the field, to the point where it often will have only a small number of patterns that it typically follows. You can use this to your advantage by ensuring that the units you don’t want to get bombed aren’t under these paths, or place them such that the bomber can’t safely land after passing over them- spots near table edges can be particularly good for this, since you can potentially force the Bomber into a position where it can land safely this turn, but will automatically crash the following turn due to having nowhere to go.
As we have already pointed out, the Bomber is also quite vulnerable to certain types of weapons, and with its weak defenses any unit that is able to assault it has the potential to inflict a significant amount of damage. While units such as Assault Marines might not seem like exceptional threats to the Sun Shark, the possibility of being forced to roll 5-10 saves on it is not an appetizing one given how poor its armor save is- to say nothing of the presence of any special melee weapons such as a Thunder Hammer. Attrition is a serious enemy for the Sun Shark and every wound you can chip off it puts it one step closer to degrading, which will significantly impact the performance of its weapons.
Final Thoughts
Although the Sun Shark is significantly improved from its version in the Index, it’s still not a particularly strong unit, especially with Tau having access to so many strong shooting platforms with good resilience already (e.g. the Riptide.) If you want something to play around with and enjoy in a more casual game it’s certainly viable for that and won’t be a complete disappointment, but ina competitive setting it’s never really going to impress.
As always, remember that you can get your wargaming supplies at great discounts every day from the Frontline Gaming store, whether you’re looking to start a new army or update an existing one.