Mathhammer : Maximizing the Psychic Phase
Hey guys, Deejay here with a mathhammer article talking about the psychic phase, and how to use it to your advantage!
Have you ever wondered what is the best way to use the psychic phase to get the most out of your game? What exactly are the chances of having a perils compared to the chances of getting those powers off. Just how hard is it to deny the witch? This article will be covering all these questions, and more. We will be talking a lot about binomial distribution, but we will be discussing it in a way for everyone to understand.
Binomial Distribution
What are the chances of you getting double sixes when throwing out multiple dice? To find this we use something called binomial distribution formula b(x; n, P) = nCx * Px * (1 – P)n – x
Luckily, you can use excel or google sheets to do the hard work for you, and I’ve already done all the work relevant to the psychic phase for you.
The Perils of Perils
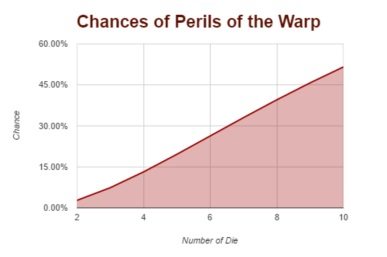
A perils occurs when you have two 6s when attempting to manifest a psychic power. As you throw out more dice, the chances of you getting a perils result increase. The exact chances are the following.
| Number of Die | Chance |
| 2 |
2.78% |
| 3 | 7.41% |
| 4 | 13.19% |
| 5 | 19.62% |
| 6 | 26.32% |
| 7 | 33.02% |
| 8 | 39.53% |
| 9 | 45.73% |
| 10 | 51.55% |
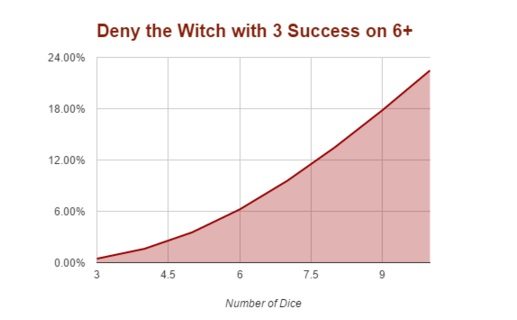
We humans also like visual representations of numbers to help our brains wrap around the concepts, so the graph of those numbers is also shown below. As you can see, it’s almost a linear progression in the increase of the chance of perils to the more dice that you throw.
What this means is that if you are throwing out more dice, you are more likely to perils. Throwing out 6 or 7 dice on powers on a regular basis means you are likely to score some perils. It also means throwing out two or three dice dramatically lowers the chance of a perils, with 2 dice having a 1/36 chance of getting that perils.
So how bad it it to get a perils result? Well, it does not automatically signify death for your psyker. In fact, in ⅓ of the perils you will not take a wound if you pass a leadership test. If you do take a wound, you can still take a FNP save. The worst results are losing a power, losing dice from your pool, and of course, death. While they are not good, these results are no reason to avoid throwing lots of dice at powers if you need them to get off.
| Dice | Perils Result |
| 1 | Make a Leadership check. On a success, the psyker takes one wound/glancing hit with no saves allowed. If the test failed, the psyker is immediately removed as a casualty and any unit he was part of immediately suffers d6 S6 AP1 hits |
| 2 | Psyker suffers 1 wound/glancing hit no saves. randomly select one power from the psyker. it’s lost for the rest of the game. |
| 3 | Psyker suffers 1 wound/glancing hit no saves. if it’s the psychic phase, both players lose d3 warp charge points |
| 4 | Psyker suffers 1 wound/glancing hit no saves. |
| 5 | Psyker takes a leadership test. if failed Psyker suffers 1 wound/glancing hit no saves. If passed no effect |
| 6 | Psyker takes a leadership test. if failed Psyker suffers 1 wound/glancing hit no saves. If passed psyker gains a 3+ invul, fleshbane, armour bane, and smash until the next friendly psychic phase. |
Some armies have ways to mitigate a perils result. Eldar farseers can throw out a warp charge to negate the wound. If you are going to summon more daemons, it’s better to summon them from a squad of horrors, where you can pop one model from the unit instead of taking a wound on a herald. If you have a librarian in a unit with an apothecary, it’s better to throw 7 dice at invisibility with him than with a librarian not with a FNP save.
Your Finite Resource — Warp Dice
Each turn your army has a finite number of resources to throw at psychic powers. At the top end, armies will have around 20 psychic dice, plus the d6 rolled during the phase to use. Even this can go very fast if you are throwing 7 dice on each power!
To maximize the psychic phase we will use mathhammer to determine the chances of passing each power and use that as our benchmark to know how many powers you can cast per turn.
I like to rate powers in one of three priorities. The first is a ‘nice to have’ priority where it would help my game if the power went off, but it won’t hurt it if the power fails. When I am trying to cast these powers I shoot for a 50% success rate.
The second priority is my ‘standard priority’, which is a power I want to have a good chance to succeed. In this case I want at least a 75% chance of getting the power off. This is the majority of my casts.
Finally, there are powers that I ‘really need’. In these cases I want at least a 90% chance of the power to go off. Sometimes I’ll assign the more dice than the 90% requires for the power to cast if I must avoid a deny the witch. As you will see later in this article, denying a power with 3 or more successful dice can be really hard to do. Going for more than three warp charges harnessed to avoid denial is not a sound tactic, as diminishing returns will start to come into effect. As such, the most you should ever really throw at a power is 9 dice.
Let’s say that you want to cast powers using a standard priority, and you want to cast three level one powers, two level two powers, and one level three powers — you will need 23 psychic dice to achieve this.
Your approach to the psychic phase may also differ depending on your opponent’s warp dice pool. If your opponent has few or no psykers, the order of your casts is not as important and you can throw out the minimum amount of dice required to generate your successes. Often during this phase I’ll find my opponent just wait it out and at my last cast they throw all their dice, knowing their 3 dice will not do anything. You can set them up for this by making your last power the 2 or 3 cast power making it nearly impossible to stop.
This is why mathhammer is so important when thinking about your psychic phase. If you just ‘throw dice at powers’, you are going to get less powers off per phase. For armies that are heavily reliant on their psychic phase, this is extremely important.
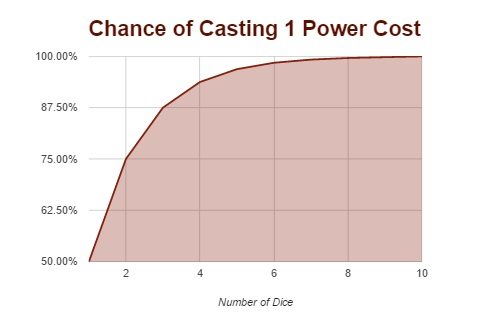
Chance of 1 Warp Charge Power
The chances to harness a warp charge one power on a 4+ are shown below.
| Chance of Casting 1 Power Cost | |
| Number of Die | Chance |
| 1 | 50.00% |
| 2 | 75.00% |
| 3 | 87.50% |
| 4 | 93.75% |
| 5 | 96.88% |
| 6 | 98.44% |
| 7 | 99.21% |
| 8 | 99.60% |
| 9 | 99.80% |
| 10 | 99.99% |
The visual reference for this is shown below. As you can see, the point of diminishing returns for this happens extremely quickly, but the chances of getting that perils jumps up. While more successes mean that it’s harder to deny, anything that is denied on a 6+ is extremely hard to deny and should not be a major concern. More about denial will be covered later.
This means that if your power is a ‘nice to have’, throwing one dice at it is fine. This might be tossing guide on a unit of scat bikes, or throwing up cursed earth on your backfield horrors. I might just throw one dice if I am looking to cast flickering fire at the back of a rhino from fateweaver.
In most cases, I’ll just throw two dice at these powers, which gives a 75% of success with only a 2.78% of perils — a very safe bet. With 20 dice, I can throw out 10 such spells and expect to get 7 of them off.
Finally, when there is a power I really need to get off like Iron Arm on my prince that is going to be targeted by every model on the board in the following turn — I will throw four dice at it. This gives a 13.19% chance of perils with a 93.75% chance of success. Throwing more dice at the power will only increase the chance of perils without much of a noticeable increase in success chance.
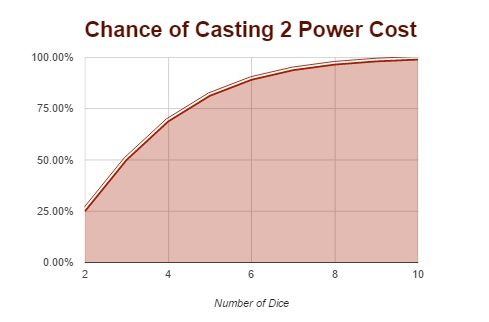
Chance of 2 Warp Charge Power
The chances to harness a warp charge two power on a 4+ are shown below.
| Chance of Casting 2 Power Cost | |
| Number of Die | Chance |
| 2 | 25.00% |
| 3 | 50.00% |
| 4 | 68.75% |
| 5 | 81.25% |
| 6 | 89.06% |
| 7 | 93.75% |
| 8 | 96.48% |
| 9 | 98.04% |
| 10 | 98.92% |
Like before, the visual reference for this is shown below. The point of diminishing returns is more gradual than with a warp charge 1 power. This means the entry point of getting a decent chance to get the power off is much higher than a level 1 power. Once you have thrown enough dice at the power, you will hit that point of diminishing returns and extra dice are wasted.
This means for a ‘nice to have’ power, you need to throw at least 3 dice at it. Yes, this is 3 times the dice required to have the same chance as a level one power. The best way to these extra two dice is the ‘barrier of entry’ into the power.
For a usual power I will throw between four and five dice at it — depending on how many I have in my pool and how much I want to risk a perils. There is a big difference between a 68.75% and 81.25% chance of success, so usually I am throwing five dice at the power.
When I absolutely need a power, I will throw either 6 or 7 dice at the power — again depending on how many I have in my pool. Given the point of diminishing returns and increased perils chances, I’ll often just throw 6 at this if I need it to go off, as there is not much difference between 89.06% and 93.75%.
Chance of 3 Warp Charge Power
The chances to harness a warp charge three power on a 4+ are shown below.
| Chance of Casting 3 Power Cost | |
| Number of Die | Chance |
| 3 | 12.50% |
| 4 | 31.25% |
| 5 | 50.00% |
| 6 | 65.62% |
| 7 | 77.34% |
| 8 | 85.54% |
| 9 | 91.10% |
| 10 | 94.53% |
The visual reference for this is illustrated below. The point of diminishing returns is significantly more gradual than with a warp charge 1 power. Level three powers take extremely large amounts of your dice pool to get off.
This means that the ‘nice to have’ chance of 50% is five casting dice! Given the cost of entry, rarely will I risk a ‘nice to have’ with a level 3 power. It sucks having a 19.62% of suffering a perils with only a 50% chance of success.
Normally I will throw 7 dice at this power for a 77.34% chance of success. With a 33.02% chance of perils, it will happen often during the course of the game at this rate. It’s just the cost of doing business.
If there is a level 3 power that is a ‘must have’ to get off, then throwing 9 dice at it is required. This is a huge amount of of anyone’s pool, and will have a 45.73% of perils!
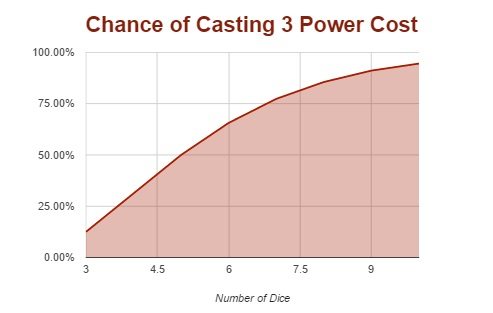
Table For Warp Allocation
I normally use google sheets to print up my army list, and I throw this table on my army list for quick reference. If you have easy access to this table, it will help you quickly plan a mathematically better psychic phase.
| Power Priority | Warp Charge One | Warp Charge Two | Warp Charge 3 |
| Nice to Have | 1 | 3 | 5 |
| Standard | 2 | 5 | 7 |
| High Priority | 4 | 6-7 | 9 |
When my psychic phase begins, I look at what powers I can cast that turn, and pick the ones I want to go off. I start with standard priority on all powers, and upgrade any that need a ‘high priority’ and then downgrade any that are ‘nice to have’ until I have selected all the powers I want to go off. If I have extra dice, I’ll add more powers to cast, or increase the chances of success by throwing more dice at each power cast.
For example, let’s say that I can cast the following powers, and I have 20 +d6 dice to throw at them — something that is very common in my army.
- Incursion
- Summoning
- Cursed Earth
- Flickering Fire
- Psychic Shriek
- Bolt of Change
- Prescience
- Forewarding
- Possession
At the start of the game, I will write a table with each power and put each turn next to it. If the buff power goes off, I will put a check mark next to the power so I remember. It sounds complicated but it takes me roughly 60 seconds to draw this out, and I do it while my opponent is setting up his models. The chart looks like this.
| Power | Turn One | Turn Two | Turn Three | Turn Four | Turn 5 |
| Incursion | 7 | 5 | |||
| Summoning | 7 | ||||
| Cursed Earth | 2 | 2 | 4 | ||
| Flickering Fire | 1 | 2,2,2,2 | |||
| Psychic Shriek | 1 | 2 | |||
| Bolt of Change | 2 | 2 | |||
| Prescience | 5 | 5 | 3 | ||
| Forewarding | 1 | 2 | |||
| Possession | 9 |
On turn one, there were not a lot of enemy threats nearby so I put summoning additional models as a higher priority. I wanted to cast prescience on my Renegade Knight, and I wanted to have cursed earth up to help with the summons. Forwarding, shriek, and flickering fire were my ‘nice to have’ powers.
On turn two, fatey was more engaged, and doing more work, so I have his powers a higher priority. With 24 dice this turn to toss around, I used most of my dice on prescience on the Renegade knight and a bunch of flickering fire from my warphost. Fatey also was doing work with his powers. I put incursion as a ‘nice to have’, as 3 more plague drones would be helpful, but would not dramatically affect the game.
On turn three, enemy units are about to hit my horror squads. I’ve lost a few psychic dice, and I don’t have enough to power fatey right now and protect my own squads. On this turn, I really need to get a D-thirster out so I throw 9 dice to make this a high priority. Likewise, Cursed Earth this turn is a high priority. Bolt of Change and Forwarding have normal priority and prescience has a ‘nice to have’ priority this turn.
Your order for throwing these powers is important if your opponent has enough dice to deny. You might want to consider throwing out some lower cost powers first to draw out your opponents dice pool and save your real heavy hitter powers for later on. In my games I use ‘cursed earth’ to draw out dice before I cast ‘incursion’. Cursed earth is temping enough to make someone throw dice at it. Another good example is psychic shriek. This is tempting enough to make someone throw dice at it, especially if cast with only 2 dice initially. If they waste 5 dice denying your 2 dice power, you are ahead in the psychic phase.
As you can see, a little pre-planning with your psychic phase goes a long way. This chart not only helps you plan how many dice to use with what power, but also helps to remind you of what powers you have each turn. Sometimes you forget that you can still use that one power after playing the game for 2 hours.
Another advantage of this solution is that you are now showing your opponent what you are planning on doing. If you have 10 psychic dice, and you put 6 of them off to one side, your opponent will know that you plan on manifesting one big power, and might try to wait for that one power to use their dice.
This is the solution that I have found that works for me. You may have your own solution that works. The key is that you need to have a plan for each psychic phase and not to just ‘wing it’.
Deny the Witch
All armies have a chance to say ‘no’ to any successful power. The chances of denial vary dramatically, depending on the unit targeted and the number of dice thrown at the denial chance. In most cases you will deny on a 6+, as most people will target units that don’t give you the full denial dice, or will be casting buff powers.
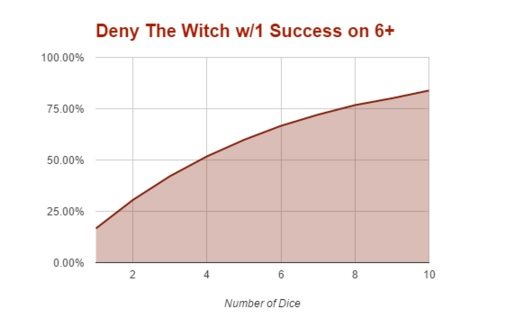
This is the chance to deny one success on a 6+.
| Deny 1 die on 6+ | |
| Number of Die | Chance |
| 1 | 16.67% |
| 2 | 30.56% |
| 3 | 42.12% |
| 4 | 51.77% |
| 5 | 59.81% |
| 6 | 66.65% |
| 7 | 72.09% |
| 8 | 76.74% |
| 9 | 80.06% |
| 10 | 83.84% |
As you can see, there are diminishing returns on this as well. Your ‘sweet spot’ for denial is between five and six dice, but you need at least 4 dice to have decent chance. If you have 8 dice, break them out into two pools of 4 dice. If you have 7 or fewer dice, then throw them all at one deny.
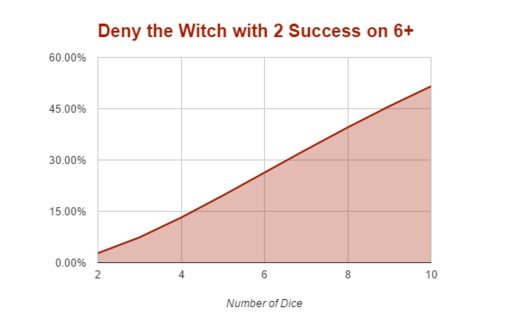
This is the chance to deny two successes on a 6+.
| Deny 2 die on 6+ | |
| Number of Die | Chance |
| 2 | 2.77% |
| 3 | 7.40% |
| 4 | 13.19% |
| 5 | 19.62% |
| 6 | 26.32% |
| 7 | 33.02% |
| 8 | 39.53% |
| 9 | 45.73% |
| 10 | 51.54% |
The good news is that this does not have the diminishing returns that denying one dice has…the bad news is that it’s much harder to get that deny off. To have a ~51% to deny a power with one success you need to throw four dice at it, but to deny a power with two warp charges, you need to throw 10 dice! If you are not throwing 10 dice or more to deny this, don’t bother unless you have nothing else to deny.
This is the chance to deny three successes on a 6+.
| Deny 3 die on 6+ | |
| Number of Die | Chance |
| 3 | 0.46% |
| 4 | 1.62% |
| 5 | 3.54% |
| 6 | 6.22% |
| 7 | 9.57% |
| 8 | 13.48% |
| 9 | 17.82% |
| 10 | 22.47% |
As you can see from the graph below, the chances of denial drop dramatically when 3 successes are needed. If someone gets three successes on casting that invisibility, you might as well toss your entire dice pool at it and hope for the best, but don’t plan on it.
I often see people holding all their denial dice to attempt to block that one big power. This is, mathematically, a very poor choice. If someone is really trying to get that invisibility power off, they should be throwing 5 or 7 dice to get it off. This means they are likely to have 2-3 successes with the power. If you have 10 dice to deny with and the power went off with 3 dice, you could throw all 10 dice at the deny with 22.47% of success, or you could try and deny two powers that were cast with 1 success with a 59.81%.
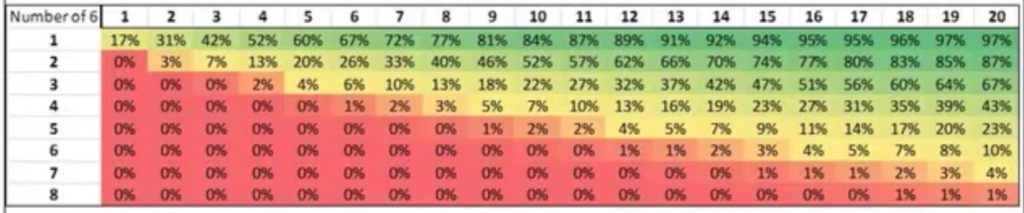
As the number of successes go up, the situation gets worse. If you look at the chart below, you can see that if four successes are made on a cast, even 20 dice thrown at denial only gives a 43% chance of denial. These are horrible odds given the number of dice you have to throw. Therefore, try and refrain from throwing all your dice at a hard deny unless one of the following criteria have been met.
- Your opponent cannot manifest any other powers you care about
- Your opponent is using the rest of his dice to manifest this power, so any remaining dispel dice would be wasted.
- The one power is crux for your opponents strategy and losing it will cost him the game.
If you are denying on a 5+ or a 4+ the chances get much greater to succeed. To look at the chances of a denial on a 4+, look at the charts for harnessing powers on a 4+ — as the chances are exactly the same. As I mentioned earlier, this rarely happens, but when someone does shriek your level 3 psyker with a level 2 psyker and 1 success, you know you can throw 4 dice at it to get a 93.75% of denial.
This chart will show you the chances of a successful denial dice from 1 to 8 casting successes.
Harnessing Warp Charges on a 3+
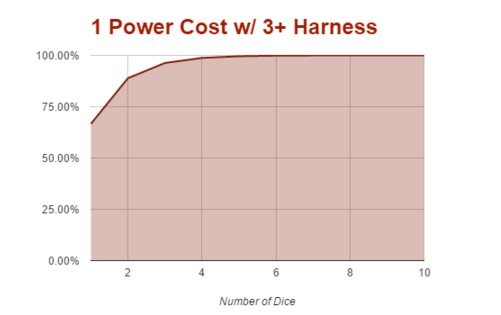
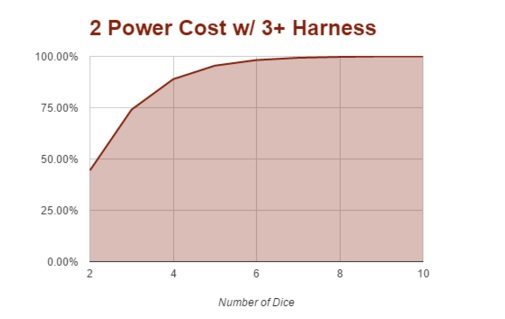
Harnessing powers on a 3+ is a prime example of how Games Workshop does not use mathhammer when making their own game. When you increase the probability of success in a binomial distribution you dramatically affect the chances of success. While the curve of the graphs below matches the 4+ harness powers, the chances to get them occur much more quickly.
| 1 Power Cost w/ 3+ Harness | |
| Number of Die | Chance |
| 1 | 66.67% |
| 2 | 88.89% |
| 3 | 96.29% |
| 4 | 98.76% |
| 5 | 99.58% |
| 6 | 99.86% |
| 7 | 99.95% |
| 8 | 99.99% |
| 9 | 99.99% |
| 10 | 99.99% |
| 2 Power Cost w/ 3+ Harness | |
| Number of Die | Chance |
| 2 | 44.44% |
| 3 | 74.07% |
| 4 | 88.89% |
| 5 | 95.47% |
| 6 | 98.21% |
| 7 | 99.31% |
| 8 | 99.74% |
| 9 | 99.99% |
| 10 | 99.99% |
| 3 Power Cost w/ 3+ Harness | |
| Number of Die | Chance |
| 3 | 29.62% |
| 4 | 59.25% |
| 5 | 79.01% |
| 6 | 89.98% |
| 7 | 95.47% |
| 8 | 98.03% |
| 9 | 99.14% |
| 10 | 99.65% |
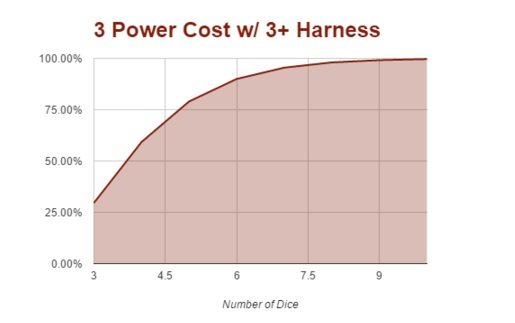
This is the chart for powers harnessed on a 3+. As you can see, in most cases the powers will take between 1 and 3 dice less to cast.
| Power Priority | Warp Charge One | Warp Charge Two | Warp Charge 3 |
| Nice to Have | 1 | 2 | 4 |
| Standard | 2 | 4 | 5 |
| High Priority | 3 | 4-5 | 6-7 |
In our earlier example where we wanted to cast powers using a standard priority, and you want to cast three level one powers, two level two powers, and one level three powers — you will need 16 psychic dice to achieve this where someone harnessing on a 4+ will need 23 dice. That means you can cast a lot more powers per turn if you are harnessing on a 3+. In our example, the seer council or librarian conclave can cast two additional level two powers per turn.
Furthermore, your chances of hitting a perils are significantly less. This ‘double dipping’ effect means that in addition to manifesting more powers, you also take less damage from doing so.
In Closing
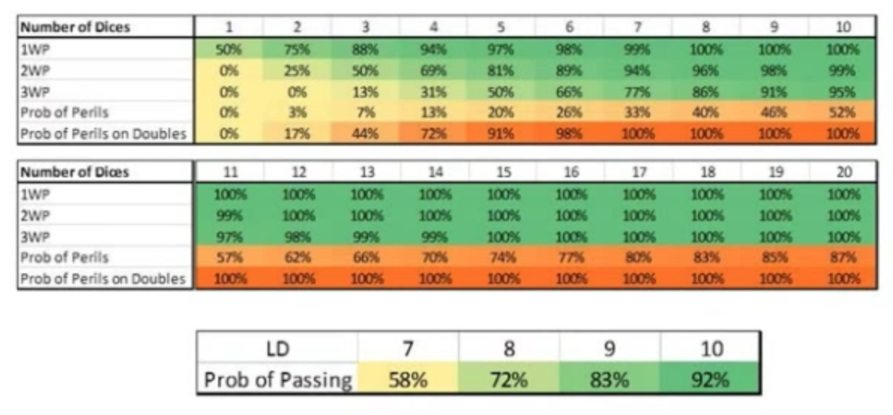
Learning how to mathhammer your psychic phase will give you a big advantage in your game. A little preparation will help you apply the right amount of dice to each power you want to cast, and will also speed up the phase!
If you are going to print out one chart showing the chances of success, Victor Ques made this chart and it’s quite excellent for showing your chances.