
Anonymou5 is back with part 2 of his tournament report featuring his Beastsar Deldar list! As always, check out the Tactics Corner for more great tournament reports!
If you haven’t read part 1 already, go check it out. Don’t worry, I can wait.
https://frontlinegaming.org/2014/03/10/anonymou5-tournament-report-stones-river/
And if you didn’t read it and refuse to follow my links because you hate me (and I am very hate-able), here’s a summary. I took a Beaststar to the Battle for Stones River and went 2-0 with 40 (max) Battlepoints in my first two games against Nids and Tau. Also my beastpack is known as “the Emilystar.” Just go with it.
Game 3
I matched up against another Tau player. My friend and likely ATC teammate Matt. He was running the “Irontau Deathstar”
You can read about the design theory to his list here:
https://frontlinegaming.org/2013/10/22/irontau-fun-with-battle-brothers-by-anonymou5/
It’s probably funny to an outsider to see my list concepts come back and fight me.
He was running a Buff Commander, Iron Hands Chapter Master on a Bike (Shield Eternal, Thunder Hammer), 3xIon Tides (one with Shielded Missile Drones and Target Lock to go in the Death Star, the others with EWO), 7-8 Broadsides, 2×10 Kroot, 1×5 Iron Hands Scouts, 1×5 Bikes with Grav and a Skyshield Landing Pad.
It’s a pretty dirty list with an outrageous amount of firepower and decent scoring. He had done well with it, netting max points thus far, with crippling wins over an Ovesa Star and a White Scars Grav Spam Bike Army. That said, with the exception of his Broadsides, he does not have the volume of fire to effectively engage the Emilystar. The Emilystar does not care if your shooting is AP2, or if it ignores cover. Points invested in those things are a waste.
Our mission was as follows:
Vanguard Strike Deployment
Primary (12 Battle Points) Objective markers… Players take turns placing two markers each. These must be placed more than 6” outside all deployment zones, more than 6” away from all table edges and more than 12” away from each other. Once placed, prior to deployment, players secretly write down which marker is their primary objective. This objective is worth 2 points and all other markers are worth 1 point. Players may choose after deployment to announce their marker, it is then worth 3 points. Player with the highest total points earns the Battle Points. If the total points are a draw, each player earns 4 Battle Points.
Secondary (4 Battle Points) Slay the Warlord. Both players may earn this objective.
Tertiary (2 Battle Points) Player with the highest Victory Points. (2 Battle Points) Line Breaker.
For my powers I got Fortune, Invisibility, Misfortune (which I forget to use the entire game) and one Guide (no Prescience). I won the roll off and chose second turn (without help from the Baron).
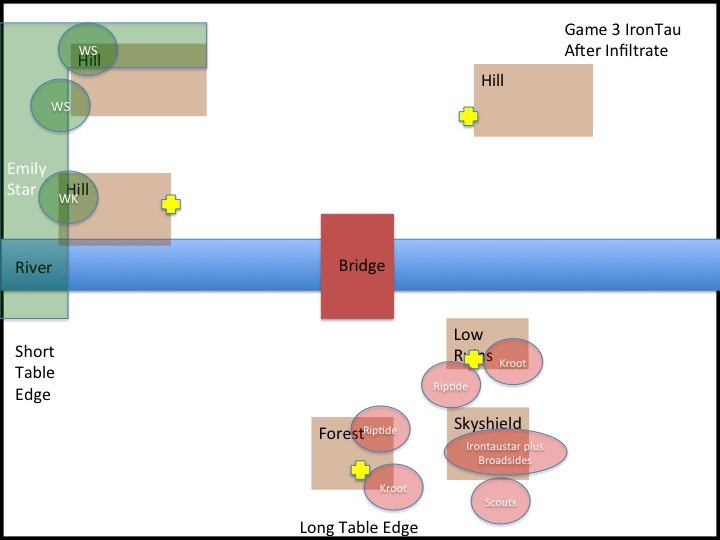
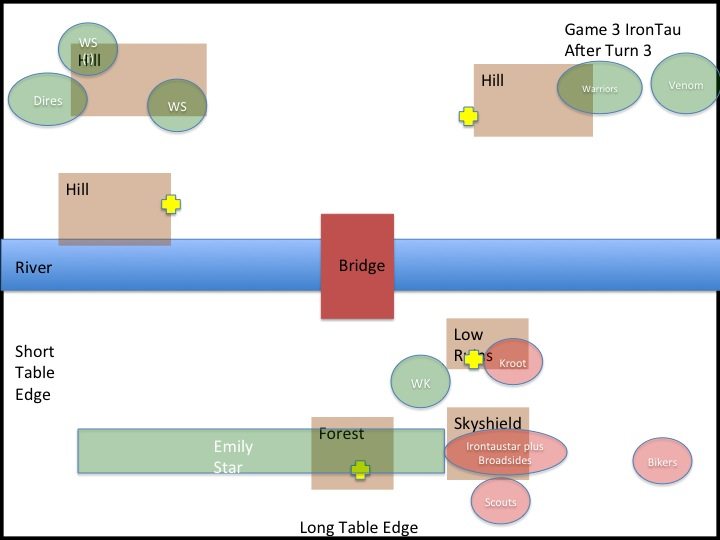
He deployed on his Skyshield landing pad with all of his Broadsides plus the Commander/Chapter Master/Riptide unit. No surprises there. His other two Riptides deployed in to the flanks of the Skyshield to help cover his Kroot, who both infiltrated onto his two “home” objectives (placed just outside of his deployment area). He left his Space Marine Bikers in reserve. The Ironhands Scouts deployed behind the Skyshield, pretty much out of sight.
I deployed the Emilystar 37 inches away, which put me out of SMS range entirely, and out of high yield missile pod range unless he moves, in which he would be snap firing. The Wraithknight stood back in terrain, and the Wave Serpents behind a hill, one unfortunately not out of sight due to his elevated firing platform.
I decline to seize.
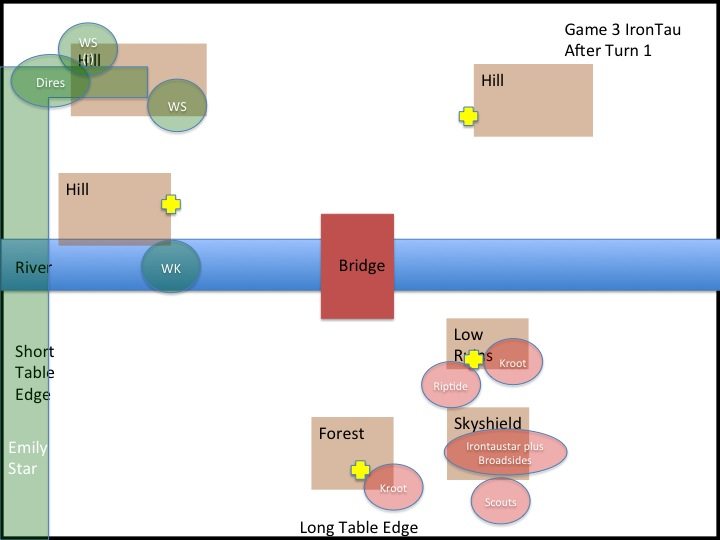
On his turn 1 he predictably did not move his Broadsides (Tau love their castles!) to snapfire at my dogs with high yield missiles. His non-deathstar Riptides shift to help cover the Kroot on objectives. His Chapter Master fires a twin linked, ignores cover, tank hunting orbital bombardment at my hidden Serpent and his Riptide Target Locks a twin linked, ignores cover, tank hunting Ion Accelerator shot at my other Serpent. Both penetrate. My hidden Serpent fails to downgrade the pen and is immobilized. Conveniently out of the fight. The other Riptides do nothing of note.
On my Turn 1 I fortune the Emilystar, Guide and Invisible the Wraithknight (I will be using Invisible as a verb, sorry). My Dire Avengers get out of their broken car and find a good hiding place. My other Serpent flies to the top of the hill to gain line of sight on the bottom Kroot squad. He rolls a 1 on his Serpent Shield shots and kills one Kroot. The WK jumps into the River and removes a Riptide with a distort shot. Matt gets very angry. The Emilystar moves in an L formation around the bottom of the board, staying outside of high yield missile range.
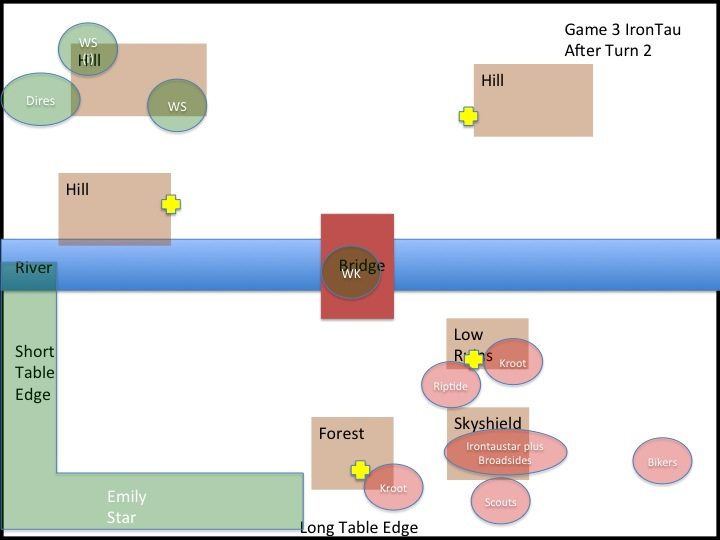
On Matt’s turn 2 he continues to hang out in his castle. He puts a lot of fire into my invisible Wraithknight, and does a wound or two. He shakes my Serpent on top of the hill. His bikers come out and decide to drive in circles in his backfield.
On my turn 2 I fortune the Emilystar, Guide and Invisible Wraithknight. My Serpent snap fires at some Kroot doing nothing. My Wraithknight moves forward and shoots at some Broadsides, rolling a 1 to wound. Despite this being the same statistical chance as rolling a Distort on a Riptide on turn 1, Matt does not get angry. He is somewhat of a hypocrite! My Emilystar continues its L shaped maneuver, drawing into Riptide SMS range and attempts a long charge on his bottom Kroot squad. The Kroot roll something like 8 sixes on overwatch, kill one dog, and my charge becomes impossible. I forgot to bring D7s.
On Matt’s turn 3 he fires into the Emilystar to no real effect. He hangs another wound on the WK and fails to do anything to my casually hanging out Wave Serpent.
On my turn 3 one of my Venoms decides it wants to come in from reserve despite Scrier’s Gaze, so I go ahead and bring in the other one. I make a mistake here, I decide if I bring them both on the right side of the long table edge (Vanguard Strike is great) he probably kills one with Intercept, but the other can maybe kill the Bikers/force them to run off the board and it will be worth it. Instead one dies to Intercept and the other crew decides to get drunk and kills zero bikers. The crews kill a few Kroot, but they hold.
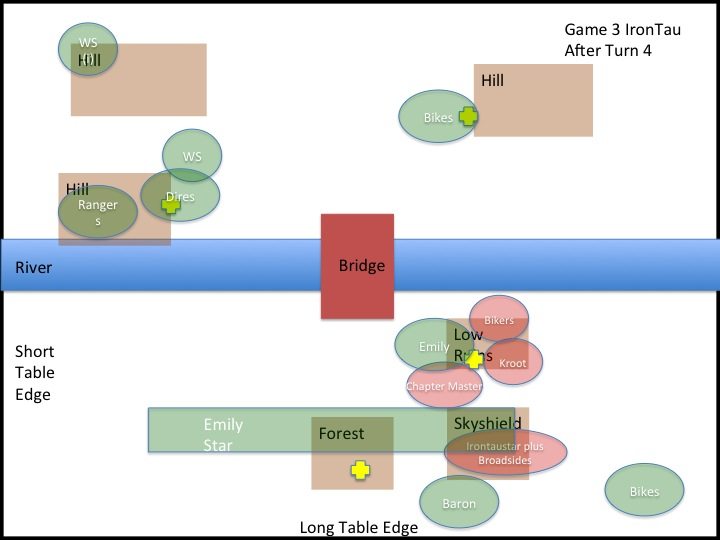
I bring my Rangers on and they outflank onto my side of the board, moving and running towards an objective (not depicted on the image, sorry)
I Fortune the Emilystar, but the Wraithknight is too far from Farseers (as my unit is stretched too far) so I cannot buff him up and instead I Invisible the Emilystar. The Wave Serpent on the hill drives down into the river near the objective and shoots into some Broadsides, doing a wound, but they pass their pinning check. The WK and Emilystar advance and multi assault a Kroot squad and a Riptide. The Wraithknight charges first to eat the overwatch. The Kroot all die horrible deaths at Initiative 6, and the Riptide fails morale and is swept.
At the beginning of 4 we decide we will not have enough time for a turn 5, so Matt’s failure to make a play to contest all of his objectives is his own fault.
On Matt’s turn 4 he breaks the Chapter Master off from the Deathstar to deal with the Wraithknight. The Bikes advance to help claim the objective the Kroot are on. No Riptide 4d6 moves onto an objective to contest, no Chapter Master turbo boosts onto an objective to contest. His Tau Commander does wisely pick Stubborn, to prevent the unit from getting swept on his turn.
Shooting kills my Wraithknight. Everything else shoots at my Invisible, Fortuned Emilystar and does little. The Chapter Master turbos in front of his Kroot in order to block charge lanes.
On my Turn 4 one squad of bikes comes on and claims and objective. The other squad of bikes grabs line breaker. Dire Avengers get out of their car and claim an objective. Emily breaks off from her death star and flies over the Chapter Master to contest. Needing kill points, the Baron breaks off and chases the Scouts off the board. The Emilystar sans Emily charges all the Broadsides, kills a squad and some wounds, but the remaining Broadside heroicly makes his morale, causing us to tie on Kill Points and denying me the Tertiary. Stubborn saved his Warlord, so I do not get the Secondary.
I win 14-0
I blame this game not finishing on Tau, because they are slow. Sorry to the readers. Turn 5 would have just been more lopsided for me though, as I would have wracked up more kill points.
Game 4
My final game was against a multiple GT Winner and top 15 player on Torrent of Fire (and fantastic painter) who was running a list that will seem very familiar to Frontline Gaming readers. It is essentially a better version of the LVO Raffle Taudar Army.
He had a Buffcommander, an Ethereal, an Iontide, 4×10 Kroot with Hounds, 2×3 Broadsides (one squad with Drones), a Farseer, 2×3 Jetbikes, a Wraithknight, and a Bastion with Comms Relay.
Our mission was actually similar to the asymmetrical missions in development by the various TOs, and required a different tactical approach.
Vanguard Strike Deployment
Primary (11 Battle Points) Hold the bridge… Players earn 1 point for each full turn (i.e. until the beginning of their next turn) they hold the bridge with the majority of a scoring unit on the bridge. The player holding the bridge at the end of the game earns an additional 2 points. The player with the most points earns the objective. A total the ends in a draw earns both players 4 Battle Points.
Secondary (6 Battle Points) The player that destroys all their opponent’s scoring units earns the objective. Both players may claim this.
Tertiary (3 Battle Points) Line Breaker
Psychic power rolls in this game almost give me a heart attack. Eldrad gets Doom and Guide, but no Fortune. My Bikeseer ends up with Doom, something useless, and on the last roll, Fortune. As such, I will not be twin linking as many units as I am used to. My opponent draws Guide and Prescience.
His list is threatening to me, with the dual Missilesides and Storm of Fire Kroot capable of putting out a solid amount of fire. He also has more durable scoring units than I do, so he will be able to “hold” the Bridge better than I can.
I win the roll off to go second thanks to the Baron. I roll a 2 and he rolls a 3, then I roll a 4 and he rolls a 5. Then we both roll 6. He asks if the Baron can add 1 to 6 or if it’s capped. In my mind, 6+1 is 7, and that beats 6. In retrospect it’s possible I was cheating, there is no evidence that Games Workshop understands math. So, I deploy second.

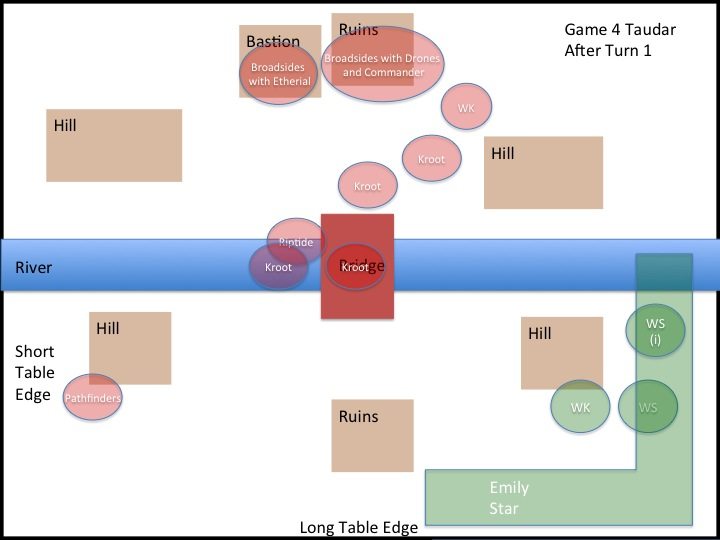
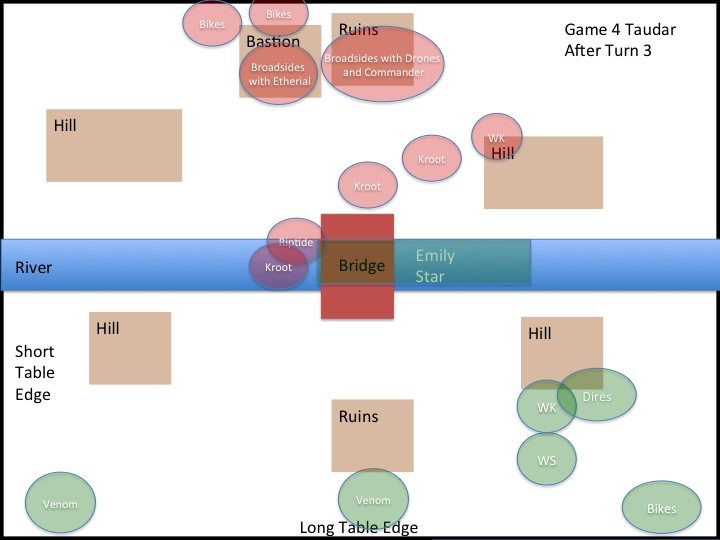
He deploys his Broadsides with Ethereal in his Bastion with his Broadsides, drones and Buffmander next to the Bastion. His Pathfinders scout pretty low into the bottom half the board. His MCs deploy on either flank of his Broadside firebase.
He inilftrates some Kroot fairly close to my Beasts, and dares me to seize. It’s all in good fun, he knows I’m not an idiot. The rest of the Kroot infiltrate near the Bridge, to allow him multiple units to hold it and collect points.
I deploy once again with the Emilystar on a huge front, outside of HYMP range, and almost entirely outside of Kroot Rifle Range (only the closest squad can shoot at me, and if they don’t move they will die). My Wraithknight deploys outside of his WK’s range, so I don’t get distorted on Turn 1. My Serpents deploy on my back edge, behind the Emilystar. The Venoms and Bikes stay in reserve, the Rangers debate long and hard and decide to outflank. Credit to my opponent for listening to me waffle on what the Rangers were doing at least eleventy two times in thirty seconds. I was tired, he was patient.
On his turn 1, as expected the close squad of Kroot runs back and claims the bridge. He twinlinks his MCs and shoots my Serpents. One Pen gets through and yet again my Shield fails to downgrade it, and yet again it is immobilized. At least this time, my Wave Serpent can see something. I need to check my warranty, as my Shields are defective.
On my turn 1 I Guide the Wraithknight and Fortune the Emilystar. The WK shoots at the Riptide, doing nothing. The Emilystar basically stays in place, nicely out of range of everything that matters and still reasonably close to the bridge itself.
Right now my plan is to shoot Kroot off of the Bridge each turn until I have whittled him down enough to bring the Emilystar in. This is a mistake, because I completely forget about the Ethereal bringing their leadership up to 10. As it is, I kill some Kroot, and they hold. My opponent gets a point towards the Primary Objective. My plan has already failed. New plan!
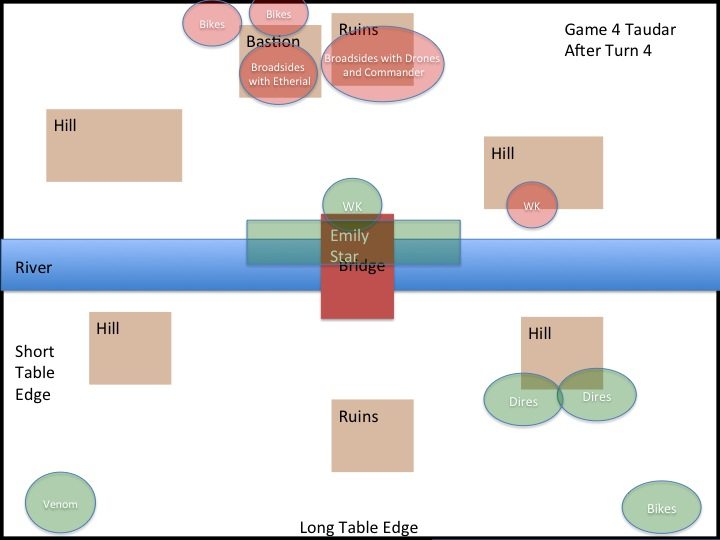
On his turn 2 he twinlinks his MCs and shoots at my Serpents some more. The immobilized Serpent dies. Another squad of Kroot hops onto the Bridge to keep scoring it.
On my turn 2 all my reserves come in. They deploy out of intercept range of everything but the Ion Accelerator. He chooses not to intercept. One Venom comes on in on the left flank, the crew shoots at Pathfinders, who go to ground and hold on morale. The other Venom comes in below the Bridge. Both Venoms shoot into the Kroot killing a few. The Emilystar Fortunes up and stays in place. All remaining shooting, including Distort, goes into Kroot. One Squad ceases to be, the other goes to ground, but holds.
The new plan goes into effect and a squad of Jetbikes bravely fly onto the Bridge, sacrificing their lives in order to prevent the Kroot from scoring another point by contesting the Bridge.
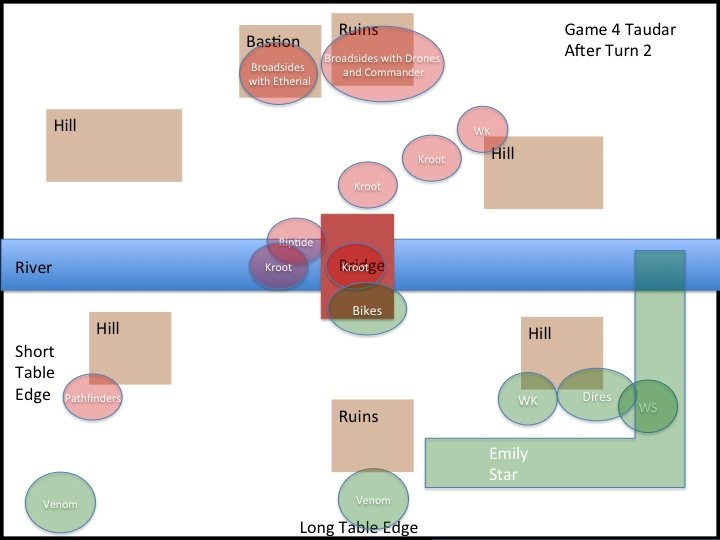
On his turn 3 he again twinlinks everything. He shifts around his Kroot, putting a third squad on the Bridge. Unfortunately due to the Kroot laying on the ground, and my jetbikes, he is running out of room, and a few Kroot wander 20 inches from the Emilystar. FORESHADOWING LIKE AN ARTSY MOVIE: this will cost him. I believe his bikes come in here and bravely hide. They are not impressed with the suicidal actions of my Windriders.
He puts his super Broadside squad into my Jetbikes. Who have to make so many saves I am digging into my dice bag. Somehow they survive. I have a glimmer of hope for the future of these brave bikers. Then the other Broadsides shoot and I fail three saves and write some letters home to some sad Eldar mothers. Shouldn’t have let your sons hang out with the Baron, he’s a bad influence. The rest of his shooting does very little.
On my turn 3 I fortune up the Emilystar again. The Emilystar and the Wraithknight advance. No one shoots at the close squad of Kroot, don’t want to make that charge distance any longer. The surviving Wave Serpent intentionally moves into Broadside range, in order to draw some fire off of the Emilystar. The left Venom crew again fails to finish off the piddly Pathfinder squad. The other Venom and remaining Serpent shoot at the back squads of Kroot. The Wraithknight doesn’t shoot at all, as he has to charge the close Kroot first to try to eat overwatch. My opponent is not an idiot, and does not overwatch, the WK fails his charge. The Emilystar does not. It eats a squad of Kroot and consolidates onto the bridge.
On his turn 4 his WK kills a Venom and the entire crew in the explosion. He uses HYMP to kill my Wave Serpent, just as planned. The rest of his shooting goes into the Emilystar and kills a decent number of dogs.
On my turn 4 I fortune up and Doom the WK. My Venom flies forward 12 towards the bridge. The crew finally kills the last Pathfinder with snapshots, earning a pain token I just thought about now (depicted incorrectly on the image, apologies). The Venom puts a few wounds onto the WK. The Dire Avengers team up to put a few more on him. The Emilystar and Wraithknight conduct a gigantic multi assault and get all three squads of Kroot and the Riptide. Everyone who likes fish dies.
On his Turn 5 he shoots at the Emilystar and the Wraithknight. The WK actually goes down to 1 wound. He takes linebreaker with a squad of Jetbikes. His WK almost greases my Jetbike squad in the backfield, which would have put a damper on my plans.
On my turn 5 I surround the bridge entirely with the Emilystar but leave a hole for my jetbikes. Who land there. Emily flies off to grab Linebreaker. My WK kills his Bastion. My Venom comes up to take the Bridge if there is a turn 6. I doom his WK again and he will die if we keep playing. My Rangers exist and did something. We call it.
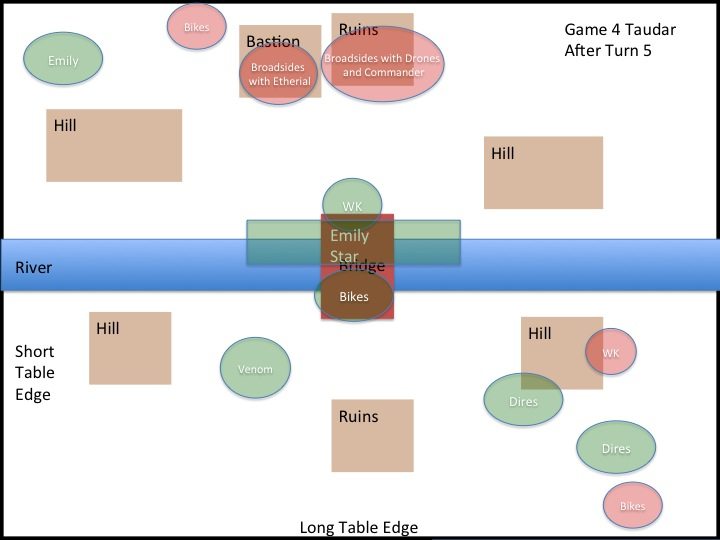
20-3 Victory for the Emilystar.
I finish 4-0 with 74 Battlepoints, netting me Best General:
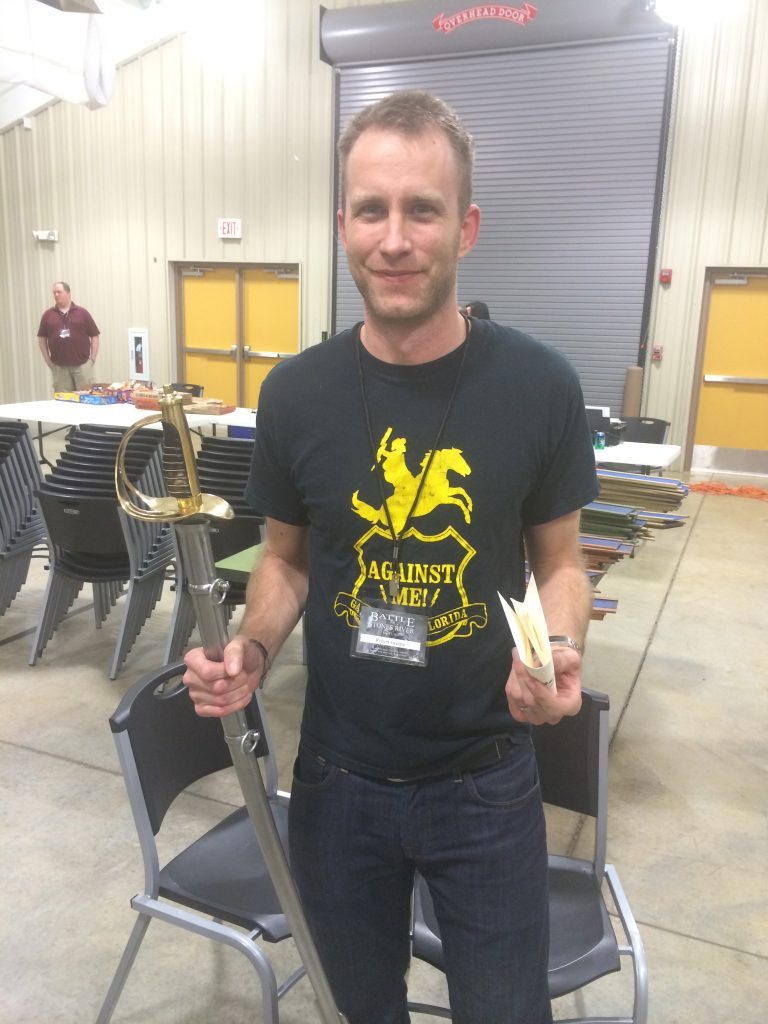
I win a Civil War era Saber (reconstruction) and some store credit (which I use on X-Wing, as is my tradition with 40k winnings. One day I will play it). I am happy that I did fly in, as it might be difficult to take a sword home with me.
Takeaways
The Beaststar is a very powerful unit. However, it is not a Seer Council. It takes casualties and functions very differently. I say this as a warning to readers. Do not play against a Beaststar as if it were a Seer Council. Spreading out alone will not defeat it. The Beaststar has a tremendous footprint, it can easily stretch five feet wide.
The secret to beating the Beaststar is to have high volume of fire shooting. It literally does not care about AP or Cover, but it is T3. It is easy to wound. You can overwhelm sections of it and slow its movement. It is also very deadly in assault, but with a limitation. It struggles with hard targets, but will absolutely roll almost every Troop unit in the game.
Thus, you need to combine these two weaknesses into a coherent strategy. This means you need to plan areas of the board to defend. Place objectives with this in mind, and design firing lanes where you can whittle it down and slow its movement. Then use hard units to screen your scoring units. When you do this, use positioning and angle of fire to deny multi charges. Rhino scoping to remove models capable of wrapping around the hard target it will prevent it from enveloping the hard target in a multi assault.
All that said, the Beaststar, in my opinion, while powerful, is not game breaking. What is broken is the Eldar Jetbike. When I have played against Eldar players in the past I knew it was powerful, but this was the first time I had ever run the Jetbikes myself. Eldar (and Necrons to an extent) are playing a different game than anyone else. The ability to capture and contest objectives anywhere on the board at any time is unparrelled. To score an objective against Eldar you must completely surround it. You must prevent the jetbike from landing within contest range. You should also bring weapons capable of rooting out and killing jetbikes. Barrage weapons, fliers, fast units in general. You must take account how you will kill Jetbikes in the list planning stage, or you will have trouble.
Also, if running single unit close combat monsters, be careful of two things when you consider assault. 1) it is very likely that a Beastmaster will challenge you and that you will it, then the squad will hit and run and all you did was grant free movement. 2) Eldrad has a fleshbane, AP3, Forceweapon and is very capable of killing things when Prescience is up.
In general, do not charge the Beaststar because you will just grant it free movement. Most of its movement is done through the assault phase, and you don’t want to help it with that on your own turn. The exception to this is if you have an extremely high volume of close combat attacks and can put out 30+ wounds on the charge (after taking into account the Baron’s defensive grenades and the fact that you are going to get punched in the face a lot at I6).
I hope this article helps players understand how the Beaststar works. Do not mistake it for a Seer Council, it is an entirely different type of list. And it will conduct multi assaults you did not think were possible; be ready and you can defeat it.