
Dr. Sathonyx or: How I Learned To Stop Worrying and Love the Death Star. A Tournament Report. Part 1
As always, check out the Tactics Corner for more great reports!
I recently attended the Battle for Stones River in Murfreesboro TN. For the uninitiated, Stones is a 60 person tournament over 4 rounds (so sort of a GT minus) that draws players from all over the South East. All of the missions are intended to reflect the actual Battle for Stones River, and incorporate a river running through the board, and a bridge crossing said river.
The missions are heavily Troop dependent, and the point total is 1863 (to reflect the year of the battle). It’s also the tournament that most heavily rewards Imperial Guard Chimeras, as they can cruise down the river with abandon! It’s a fantastic tournament and I highly encourage any readers who are interested to attend in 2015.
That said, last year’s Stones River was fairly light on terrain, and I did not feel like playing my Daemons in the current Tau and Eldar shooting gallery without a safe place to deploy. Plus, to be honest, I’m kind of bored with the Flying Circus right now, and wanted to try something a little different. Fortunately, over the past year I have accumulated a lot of Dark Eldar models and have the option to bring something different. I decided to run a Beast Star, and see how it functioned. I decided to run it Eldar Primary, but in order to not feel entirely like I was hopping on the Bandwagon, I painted everything in my Dark Eldar scheme. With the help of a friend and some last minute painting and converting, I brought the following list.
Farseer (shard of Anaris, Bike)
Eldrad
5 x Dires in a Wave Serpent (shurikan cannon, holofields, scatter laser)
5 x Dires in a Wave Serpent (holofields, scatter laser)
3 x Jetbikes
3 x Jetbikes
5 x Rangers
Wraith Knight (stock)
The Baron
5 x Warriors in a Venom (night shields, extra splinter cannon, trophies)
5 x Warriors in a Venom (night shields, extra splinter cannon, trophies)
5 x Beastmaters with 23 Khymerae
The general concept of the Khymerae Beast Star is pretty simple. The HQs join the beastpack, ideally bringing Fortune to the unit, granting it a rerollable 4++. The Baron also has Stealth, so if you can somehow claim a ruins or hill save, you can reroll a 3+ cover. The giant beast pack uses its huge footprint and fast movement to clog up the board and grant tremendous amounts of board control. It is extraordinarily good at multi assaults, and actually capable of both bubble wrapping Eldar troops while pursuing and killing enemy Troops simultaneously. It is effectively invulnerable to elite shooting, and really only fears heavy, heavy volume of fire lists. It’s designed to be counter meta, in a sense, because it honestly does not care about Ovesa Stars, Centurion Bombs, and other super elite shooty lists.
I brought Eldrad over a second Bikeseer for a few reasons. Primarily because his odds of getting Fortune are actually significantly better thanks to his Mastery Level 4. However, his ability to redeploy D3+1 units is fantastic and removes some of the downside for going first. Plus, his fleshbane, AP3 Forceweapon makes Wraith Knights, Tervigons, and Daemon Princes go away. Finally, he comes with Runes of Witnessing and Warding stock, which are fantastic abilities. The fact that he is walking is not very important, because the Beastpack is so ridiculously big that it can easily keep him in coherency as it crosses the board.
I brought the Rangers specifically because the TN/AL area has the best (and only) Ravenwing player in the United States, and his list is one of the few in the game that can significantly hamper my Beast Star with sheer volume of fire. The Rangers would allow me to block his Scout moves.
I took the Wraith Knight to help me handle “hard” targets that the Beast Star would struggle with. The Venoms fulfill a similar role, in that they can pour wounds on high toughness models. They took the Trophies because why should Eldrad have to use his Runes if he doesn’t have to? Wave Serpents and Jetbikes fulfill obvious roles.
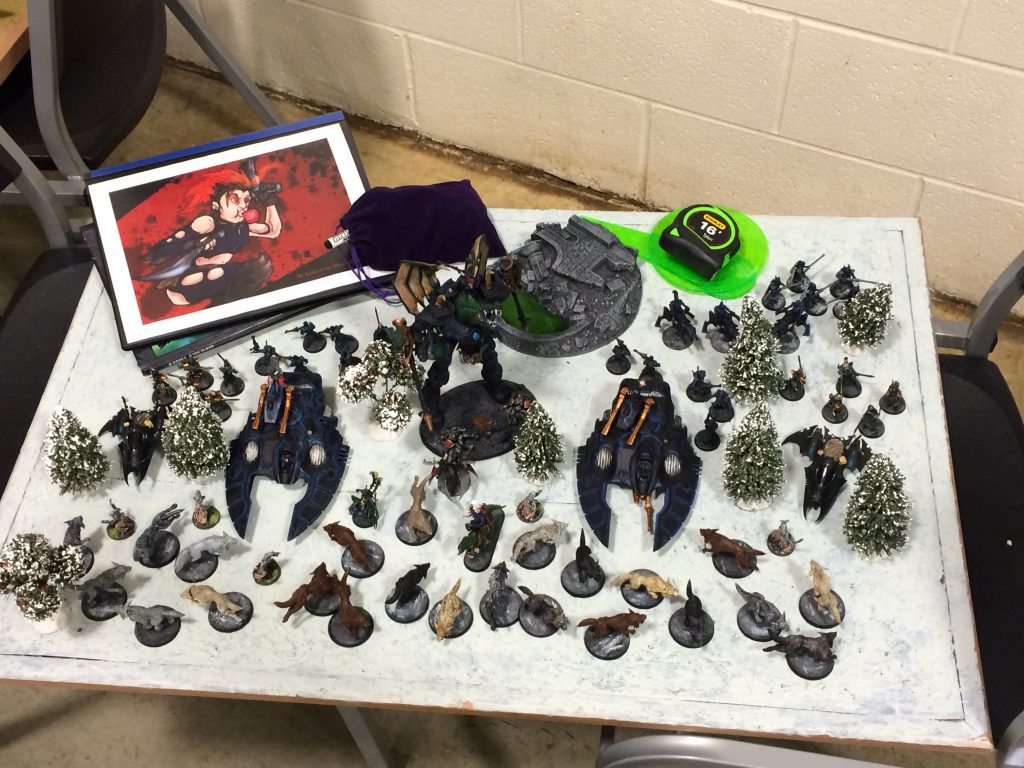
Here is a pic of my Army on its display board.
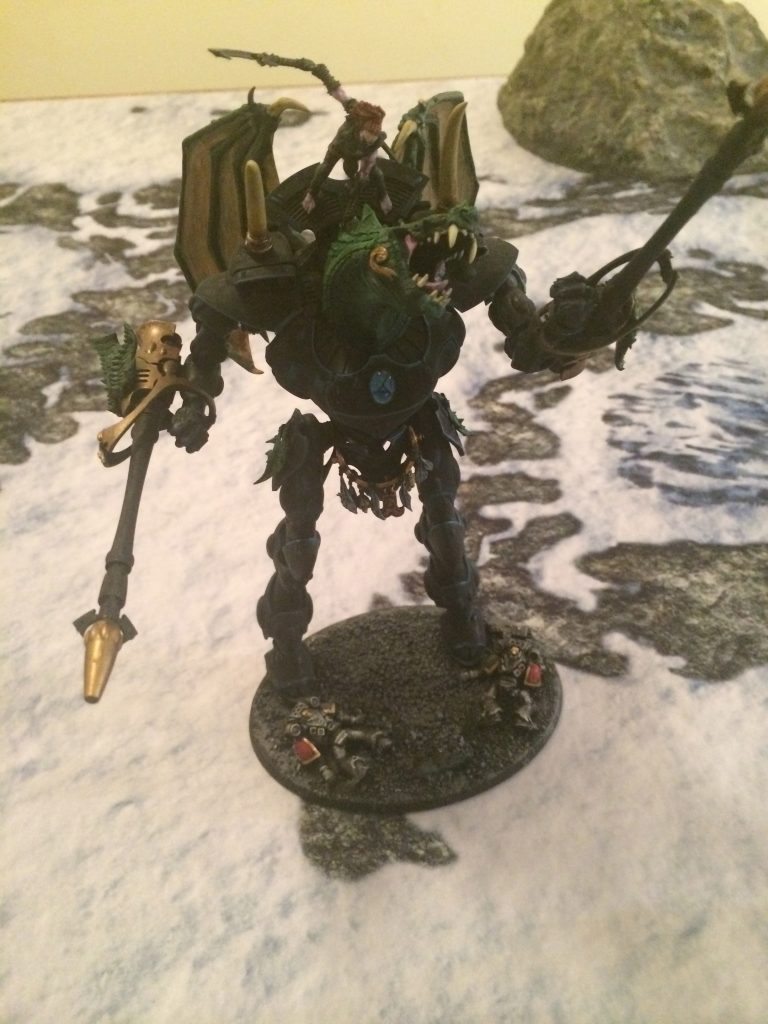
Here is a close up of the Wraith Knight. The fluff behind my WK is that the Kabal used its Beastmasters to tame an eldritch horror and through Haemonculi science crammed it into ghost warrior armor. Instead of a pair of psychic twins piloting it, a Beastmaster rides on the back and guides the Beast itself in combat.
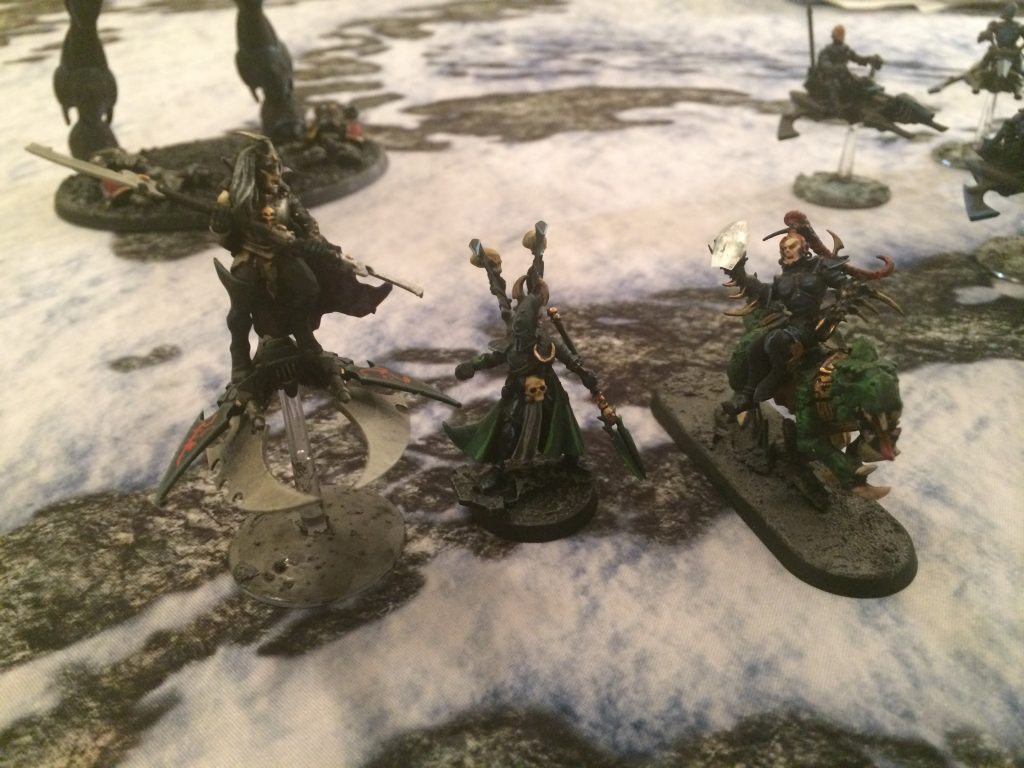
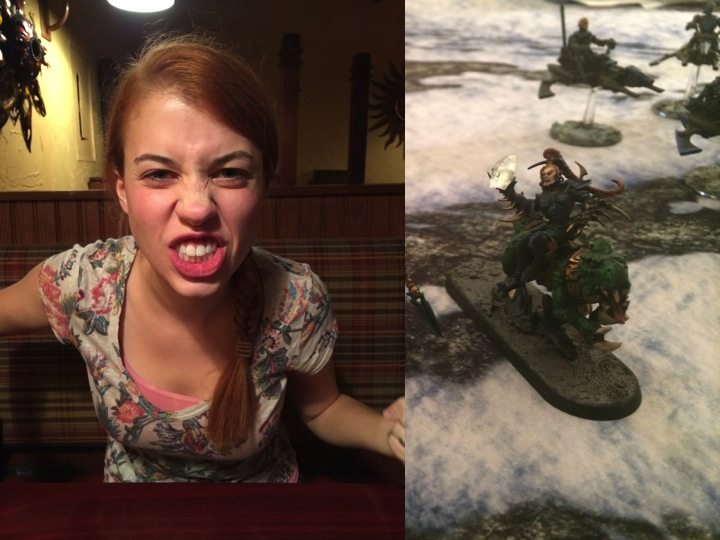
Finally, here is a picture of my three HQs. The Baron, Eldrad, and the Shardseer.
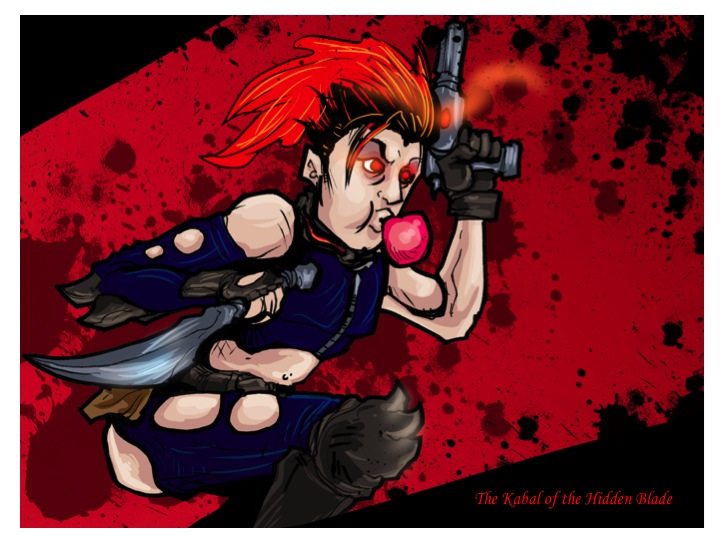
The Shardseer, you may have noticed, is a female ginger. This is because, much to my wife’s despair, she was patterned after the female ginger I sold my life to. Thus, at Stones River, my beastpack became known as the “Emilystar.” You readers will adjust to that name. I promise.
See the resemblance?
Going into the tournament I was a little worried. I decided to change lists at the last minute, kind of on a whim, and did not get many chances to play test. I played the list a total of five times. However, two of them were against myself and two of them were against volunteers at the local FLGS. I set my expectations fairly low for the tournament, and went in deciding to think of this as an experiment.
For this article I am going to recap the entire tournament (in two parts!). For some of the games I will only cover the critical maneuvers, as you will notice many of the same Emilystar tricks work repeatedly.
Also, if you played in one of these games and I made a small mistake please let me know in the comments!
Game 1
My first game found me matched against Tyranids. The mission was as follows:
Dawn of War Deployment
Primary (11 Battle Points) The player with the most scoring units on his opponent’s side of the river at the end of the game wins this objective. The entire unit must be off the river terrain piece. A draw earns both players 3 Battle Points each.
Secondary (6 Battle Points) The player who occupies the bridge at the end of the game with a non-vehicle unit (majority on the bridge) with no enemy units on the bridge earns this objective.
Tertiary (3 Battle Points) Slay the Warlord. Both players may earn this objective
He is running a Tyrant, two Tervigons, 2×30 Gaunts, one of the new FMCs, a few Zoeys, and four more MCs of various types.
I gave him first turn (thanks Baron!) and he deployed on a broad front. He held one Tervigon in reserve (outflanking due to Hive Commander) as well as his FMC. He kept all his scoring gribblies and second Tervigon near the bridge, along with his Tyrant. He flanked this central formation with his Zoeys and additional MCs.
I understand that Tyranids are somewhat limited on deployment simply by the size of their Army, but this broad deployment effectively decided the game before any models were moved. I counter deployed in my bottom left corner, with the Emilystar surrounding my Wave Serpents, Venoms, and WK.
Deployment effectively looked like this:
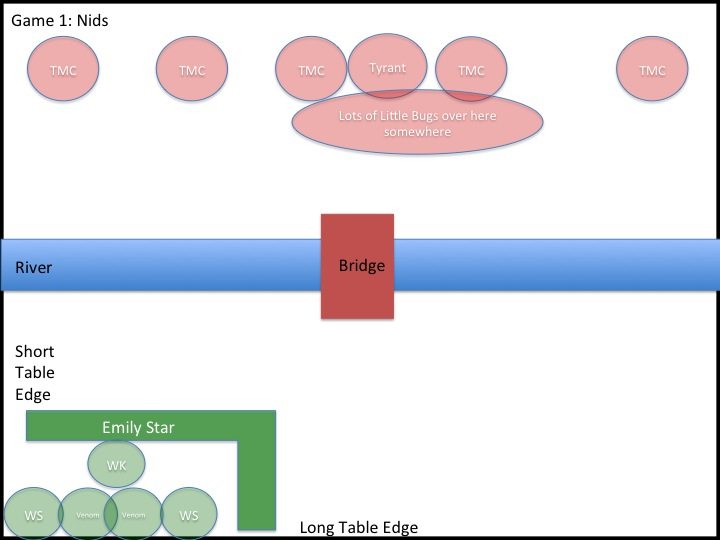
This is a classic example in force concentration through a flank attack. Every turn I could utilize 100% of my Army, and because of how spread out he was, he was limited in what he could bring to focus on me. I effectively rolled his flank, killing 2 TMCs a turn as he collapsed into my killing power.
I used the Emilystar to shield my vehicles and WK, then used the vehicles and WK to pick off selected MCs, followed by using the Emilystar to multi assault Gaunts and single MCs. A single MC can be poked to death by Eldrad, and the Emilystar kills entire Gaunt Broods at I6.
It was a brutal game, and just a bad matchup for the Nid player.
Game 2
I was then matched against a Pulse Bomb variant. The Pulse Bomb is supposed to be dead in competitive play! I was not expecting to see it. Many of you readers will look at this list and scoff at it, but the Beast Star would much rather play against an Ovesa Star than what my opponent was bringing. Plus, it’s Dawn of War Deployment!. And to make it worse, the Tau General is the father of the Tyranid player I just defeated! He will have family vengeance on the mind!
Seriously though, from a straight list stand point, this game is actually dangerous for me.
He was running
Ethereal, Cadre Fireblade, 6×12 Firewarriors, 3×8 Pathfinders, Bursttide, 3xHammerheads (two with Rail, one with Ion)
His list is designed to murder Infantry. He can put out over 200 S5 shots in a Turn, many of them guided by Markerlights. The tanks are assumedly there to help kill things that won’t die to mass S5. It’s hard to say what was selected for tactics and what was selected for story, as his Army had a very elaborate and awesome paintjob and background. Different Fire Warrior squads had different “uniforms” and names. It was kind of fantastic. He was a good general, but it was clear that optimization was taking a backseat to narrative. That said, by coincidence, his list was almost a hard counter to mine.
Almost.
Our mission was as follows
Dawn of War Deployment
Primary (12 Battle Points) Floating objective… Treat as Relic Objective with the following modifications. The objective begins in the river on one table edge. It moves 2D6 towards the other table edge at the beginning of each game turn. If the objective if dropped while in the river after being claimed, it will continue to float at the beginning of the next game turn.
Secondary (5 Battle Points) River crossing… Have more scoring units on the opponent’s side of the river at the end of the game. The entire unit must be off the river terrain piece. No points for a draw.
Tertiary (3 Battle Points) Slay the Warlord. Both players may claim this objective.
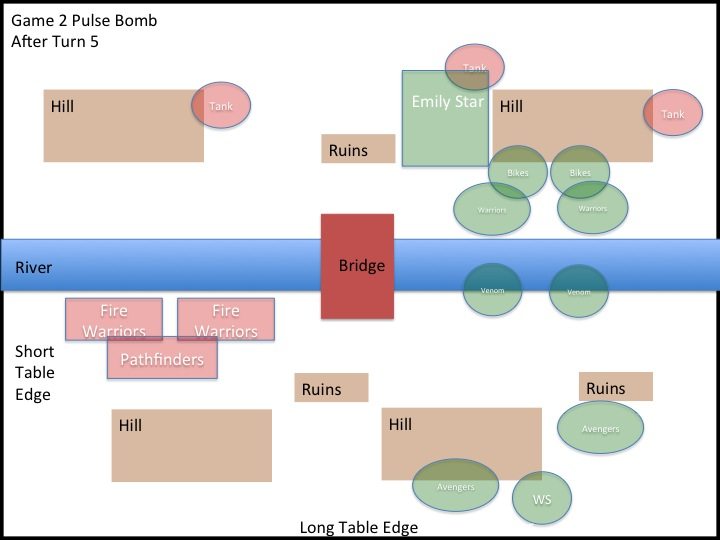
Deployment (post Scout move)
In this game I get Fortune, two Dooms, and two Presciences.
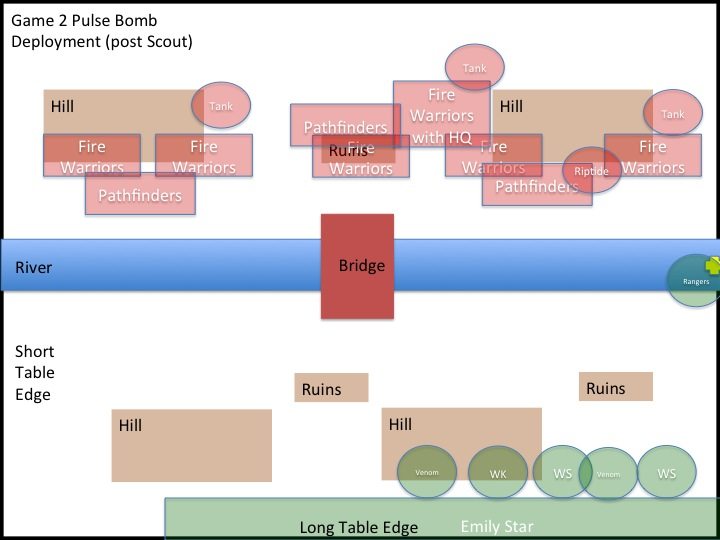
He wins the roll off and takes first turn (way to go Baron). Like his son, he deploys on a broad front, with his Fire Warriors lined up as much on the edge of his deployment zone as his huge footprint will allow him. He deploys two of his tanks and his Riptide on my right side, where the relic is located. For a Tau Pulse Bomb list, this wide deployment is fine, because it allows him to limit my own deployment, and his range is such that he will still be able to apply most of his firepower.
His deployment puts me in a bit of a quandary, as I cannot completely escape pulse rifle range, and hundreds of S5 shots can absolutely kill the Emilystar. I deploy on a line at the back of my deployment zone, putting me roughly 35 inches from his front line of Firewarriors. In a few spots I have LOS blocking provided by the hill, and I can stuff a few more Beasts into those locations, a little closer to the mass of death sitting across from me. The max effective range of a Fire Warrior is 36 inches, so I am not entirely out of range. Fortunately, he will have to make difficult terrain tests to get his guns into range, but I am not willing to count on that. I need a few more things to keep my unit alive.
I deploy my WK closer, not to soak Pulse shots, but to soak up markerlights. The base of the hill is area terrain, and he won’t want me to have saves against his tank fire that wounds. Similarly my Wave Serpents are going to be getting cover saves from his AT fire, and my Venoms are out of sight of tanks (and thanks to night shields, out of range of Fire Warriors). I also infiltrate my Rangers onto the Relic, in order to eat small arms fire for a turn that would ordinarily go into my Beasts. If he doesn’t shoot my Rangers, I will have the Relic. To further ensure the Rangers get shot, the Wave Serpent behind them is deployed empty. My Jetbikes stay in ongoing Jetbike Reserve.
I know in this game that the Baron is probably going to die. He’s going to die because he’s going to have to tank Pulse Rifle Wounds at some point. Because that many Pulse shots are going to kill my Emilystar. The Baron can take 36 wounds off of my hands. However, he cannot die until after the Riptide dies, because until then I will need Hit and Run. This presents an interesting dynamic and I need to frame the game in a way that reflects this goal.
The deployment has made my strategy simple, I am going to ignore the two Fire Warrior Squads on the far left (along with their Pathfinder friends) as I can largely take them out of the fight by shifting all my forces right. I am going to concede the points toward the Secondary Objective (troop units crossing the river) as I know I can kill the remainder of his Fire Warrior squads (or at least box them in) and get at least three of my Troop units across the board (thus winning Secondary).
On his turn 1 very little happens. My WK takes a wound, my Rangers go to ground and somehow survive (Stealth plus area terrain plus going to ground equals a very poor man’s terminator, and his markers had all gone into Serpents or the WK at that point), and my Serpents escape glance free. None of the Firewarrior squads manages to get into range of the Emilystar.
On my turn 1 I cast Prescience on a WK and a Venom, Fortune on the Emilystar. I shift the Emilystar up and right, funneling them around range of the furthest left Fire Warrior squads, and outside of the triple tap range of the middle two Fire Warrior squads. I bring my Wave Serpents and Venoms up slightly (the Venoms to the edge of their range) and target the remaining two Fire Warrior Squads. My WK jumps forward into the river and whiffs on a Tank. The Warriors in the Venom both shoot at the Riptide, inflicting two unsaved wounds (meaning I’m probably not going to have to even assault the Riptide). The Venoms and Serpents put the hurt into two squads of Fire Warriors. However, due to the Ethereal, no one runs.
On this turn I have reduced the amount of effective fire that can reach the Emilystar, I have continued to dance the Venoms outside of Pulse Range (so if he wants to kill them he has to waste real firepower), and I have shoved the Wraithknight in his face.

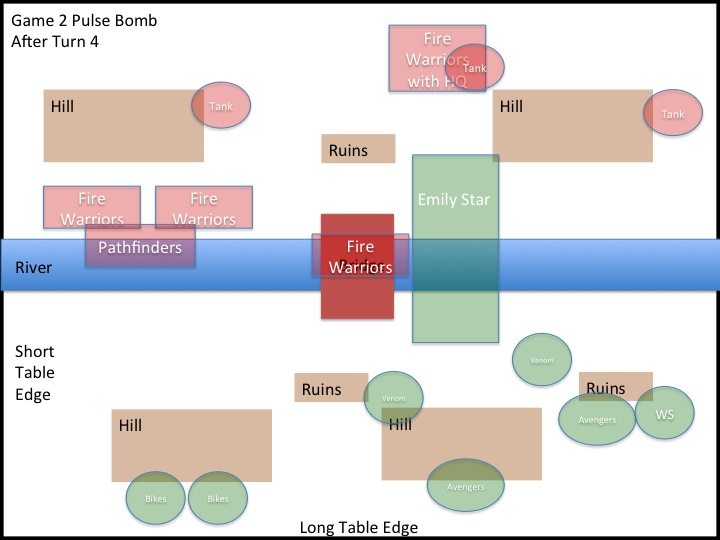
On his turn 2 he now has two serious threats in his face, the leading edge of the Emilystar and the Wraithknight. He also just lost a good handful of Fire Warriors, crippling his ability to really hurt the Beasts. The intent of this was to force him into a decision, does he use his Ion Large Blast and Railgun Submunitions on the Beasts or the powerful version on the WK. This decision in turn, should take the attention off of my crafty Rangers. He ends trying to use pulse fire on the Beasts and Tank/Riptide/Markerlight fire on the WK, killing two Khimarae and putting a wound on the WK. His other squads of Firewarriors advance. His Riptide, down three wounds now (two from Kabalites, one from a failed Nova Charge), decides not to charge my WK. His turn 3 is effectively a repeat, with him getting the WK down to a single wound and killing a few more beasts. My turn 2 and 3 are both similar, shifting the Emilystar forward and whittling down the right Fire Warrior squads with Venom and Serpentfire.
On my turn 3 I shift my shooting left, and begin working on his center two squads of Fire Warriors. My Jetbikes and extra squad of Avengers come in and hide bravely behind hill. My Wraithknight moves up and charges the Fire Warrior squad on the hill (denying them overwatch on the Emilystar), and my Emilystar charges the right most Fire Warrior squad. The Wraithknight smash attacks, in an attempt to not kill many Fire Warriors and lock them into combat. The cowardly Fire Warriors fail morale anyway, and are swept. The Emilystar also massively overkills its squad of Fire Warriors and causes a lot of back pain as I pile in then consolidate 30 models across the board.

On his turn 4 he kills the Wraithknight and a Wave Serpent and a whole bunch of poor innocent Beasts (the Baron makes a lot of Look Out Sirs). The Riptide charges into the Emilystar hoping to get lucky and kill some stuff before it dies on my turn. The Emilystar hits and runs to the left.
On my turn 4 I Doom the Riptide, Prescience the Emilystar and a Venom, and fortune the Emilystar. The Dire Avengers who climbed out of the broken Wave Serpent kill the Riptide. The Rangers get into the empty Serpent with the Relic which turbo boosts backwards six inches. The Venoms shoot at the Fire Warriors on the Bridge, killing several. The Emilystar shoots at the HQ squad, planning on charging it and the squad on the Bridge. The HQ squad falls back (even with the Ethereal) denying the Emilystar a sweet multi charge (or any charge at all, since that was the squad it shot at), however the HQ stays on the board.
On his Turn 5 he puts a metric ton (that’s 1000 KG) of firepower into the Emilystar and the brave Baron dies.
The Emilystar kills his HQ squad, Venoms finish the squad on the bridge, and the Serpent with the Relic in it hides. At this point it is clean up and I win 20-0 after 5 turns.
In Part 2 there will be two more games, and more Tau! Riptides (in multitibles) and Buff Commanders! And a multiple GT winner, also playing Tau! But he has Eldar too!