
Hey everyone, we’ve got another great, in-depth battle report from Anonymou5! Check out the Tactics Corner for more articles and videos!
I have been on a Warhammer 40k hiatus due to work and holiday travel, but last Saturday I finally played in a Crucible Qualifer in Jacksonville Florida This allowed me to test out a unit I have been theory hammering about for a while. Be’lakor the Dark Master.
For the uninitiated, Be’lakor is a named Daemon Prince available as an HQ for both the Chaos Daemons and Chaos Space Marines Codex. He is leadership 10, so if taken as a Chaos Daemons HQ he MUST be the warlord in place of the Fateweaver. Thus, he joins my Army as an allied HQ, with some cultists and a Dragon in tow.
The tournament was 2k points, dual force org, Forge World allowed. I brought the following list:
Daemons Primary:
HQ: Fateweaver (Warlord)
HQ: Daemon Prince of Slaanesh (Greater Reward, Exalted Reward, Flight, Armor, level 3 Psycher)
AKA Lash Prince
Troops: 10 Horrors with the Sergeant Upgrade
Troops: 10 Daemonettes
Fast: 7 Screamers
Heavy: Daemon Prince of Tzeentch (Greater Reward, Exalted Reward, Flight, Armor, level 3 Psycher)
AKA Grimoire Prince
Chaos Marines Allies
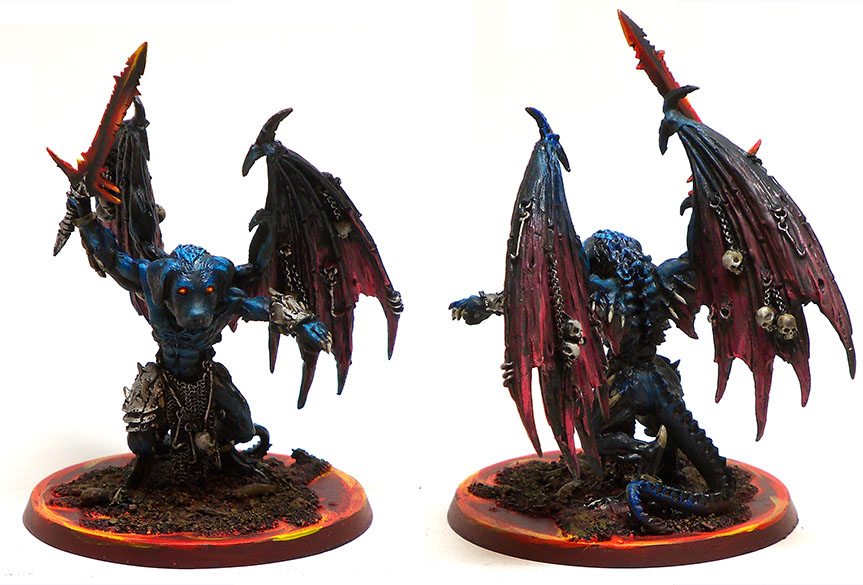
HQ: Be’lakor
Troops: 10 Cultists
Fast: Heldrake with Hades Autocannon
Fortification: Bastion (no upgrades)
I confirmed some theories, and am confident that Be’lakor performs two roles in a Daemons Army.
1) Telepathy Toolbox
This is obvious, of course. Be’lakor has the entire Telepathy tree. Every one of these powers has a use, it just depends on the match up. Invisibility is obvious, most of the time I threw it back onto my Tzeentch Prince, who totes the Grimoire. This grants her a rerollable 2 up cover save, which is somewhat useful. At another point in the tournament I used Terrify on a squad of Chaos Spawn, who I then swept in combat. I also used Puppet Master to put Heavy Wraith Cannon Fire into some Broadsides. I even used Mental Fortitude to stand Fateweaver back up after he went to ground in response to turn 1 Drop Pods (as a Fearless unit cannot go to ground).
2) Monster Hunter
Be’lakor is fantastic at killing other MCs in close combat. His Eternal Warrior means he does not care about smash attacks. His Fleshbane means he does not care about high toughness targets. His 4++ means that he is more resistant to AP2 attacks than a normal DP (or 2++ if needed). His master crafted means that you do not need to dedicate Prescience to him in a fight. His Invisibility makes the WS of the opposing MC meaningless. He is an excellent Wraith Knight, Riptide, and Daemon Prince hunter.
The Qualifier was three games. I won my first two games pretty handedly, including beating a Spawntide variant list that placed top 15 at the 11th Company GT. At that point, I was very pleased with Be’lakor.
Game 3 would be on Table 2, with an outside chance at winning the Event. I was currently in third place by a couple of Battle Points. My final opponent made the third bracket at the Nova Open (out of 14 brackets) and won the last RTT at this very shop. In short, he’s a very good player. Also, he was running Eldau.
His list (out of memory, could be off)
Eldar Primary
HQ: Farseer
HQ: Spiritseer
Troops: Big blob of Guardians with a Bright Lance (with a Wave Serpent they couldn’t fit in)
Troops: 2 squads of Jetbikes
Heavy: Dark Reapers (with a Wave Serpent)
Heavy: Wraith Knight (stock)
Tau Allies:
HQ: Toolbox Commander
Elite: Riptide with Ion Accelerator, Smart Missile Systems, Early Warning Override
Troops: 2xKroot with Hounds
Fast: Pathfinders
Heavy: Missilesides with Smart Missile Systems, Early Warning Override
Let me jump on the two obvious criticisms to his list before the comments section goes crazy.
1) That Spirit Seer is wasted points?!?!?!
Yes, yes he is. It was an RTT and my opponent wanted to test him out. He’s generally not in the list, and won’t be next time.
2) Pathfinders suck!
Yeah, Pathfinders do kind of suck. But my opponent used them very smartly. Let me point you the following graphic:
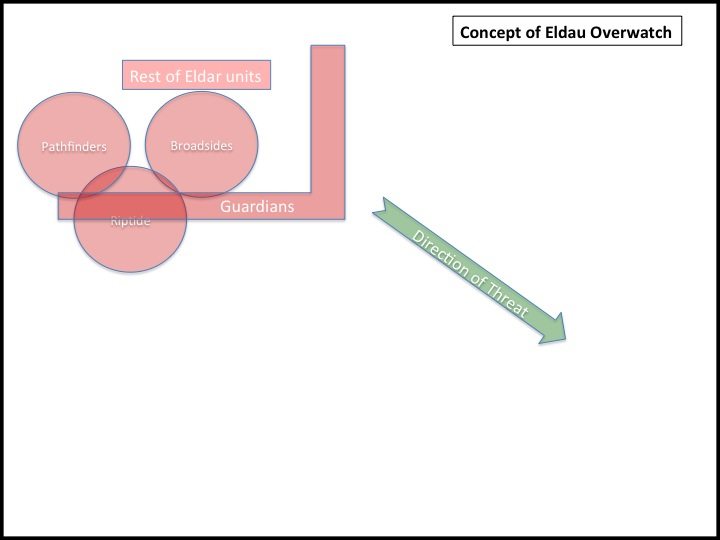
My opponent uses the Guardian blob to bubble wrap his Serpents and Dark Reaperstar (moving the Tau Commander to grant stubborn if needed) and link through the Supporting Fire bubble of the Pathfinders, Broadsides, and Riptide. The Tau units are depicted as large circles to represent their Supporting Fire bubble. Anything that charges his fire base (which means it got past his WK) will get overwatched with Markerlights first, then ALL THE MISSILES and the Ion Accelerator.
The mission is a little silly, to say the least. Each Player nominates one Troop unit that can respawn. After that unit dies, 1/6 it deep strikes, 1/6 it outflanks, 4/6 it walks on the board. I nominate my Daemonettes, because they have the speed to quickly reposition if they die and walk back on the board. He nominates his giant Guardian blob, because he assumes that with the HQs backing it up that it won’t die.
Primary Objective: 4 Objectives, placed outside of each player’s deployment zone.
Secondary Objective: The Relic
Tertiary Objective: Kill Points, Troops are worth 2 VPs.
Extras: First Blood, Linebreaker, Warlord, Last Blood (last unit killed).
Dawn of War Deployment
Both Daemons DPs drew Endurance, Enfeeble and Life Leach. Notably, no Iron Arm. Always fun with Serpents and Wraith Knights rolling around. The Tzeentch Prince did draw the 4+ Feel No Plan, and the Slaanesh Prince took Lash (as she almost always does). Fateweaver, notably, drew Forewarning, which is always fun. Due to the extra VPs awarded by Troop Units, I decline to take the Portaglyph on my Lash Prince. 3 Troop Units (1 respawning) will have to be enough. Letting my opponent farm 1 man units from a Portaglyph for double VPs seems like a poor tactical decision.
His Farseer got Misfortune, Perfect Timing, and Guide. His Spirit Seer drew Conceal/Reveal and Enhance/Drain. Thus, he has quite a few ways to ignore Be’lakor’s Invisibility. A Tau Commander, Serpent Shields, Perfect Timing, and Reveal. Furthermore, Misfortune means that the 2++ reroll trick will be far less effective than it normally is.
This is the map prior to deployment.
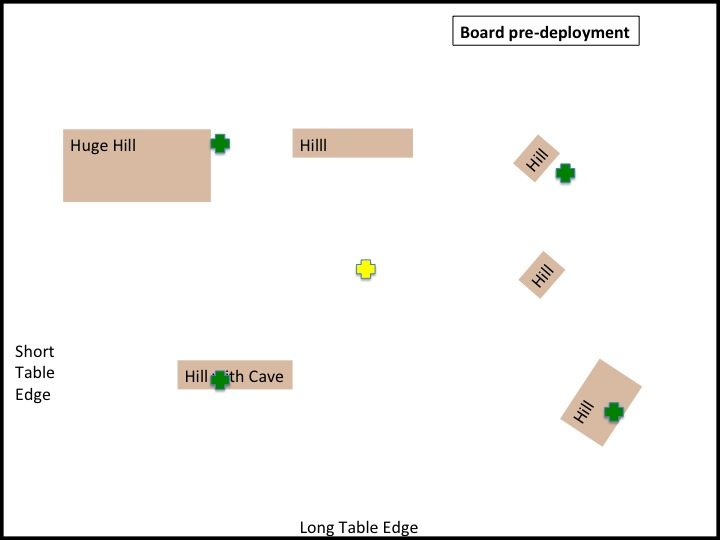
This is depicted from my perspective, with my board edge being on the bottom. Left, Right, Up, and Down will be used through out this report, and will always be from my perspective (and thus the perspective of the reader). The small hills on the right are generally not large enough completely hide a DP, but can be used to block MOST shooting from hitting him. The large hills on the top left and bottom left are actually large enough to block a Riptide entirely, but not a Wraith Knight.
Also keep in mind that these images will not be exactly to scale, but are intened to depict a general view of the battlefield. When distances are key, they will be depicted with a key.
The Relic is the Green Objective in the Center. The yellow objective in the hill is located inside a cave, as I figured I may be able to sneak a Troop in there and hide it completely.
An interesting house rule at the Crucible Qualifier that worked in my favor was that Fortifications were deployed with the Army. My opponent had first turn, and this allowed me to completely counter deploy.
After deployment, the board looked like this:
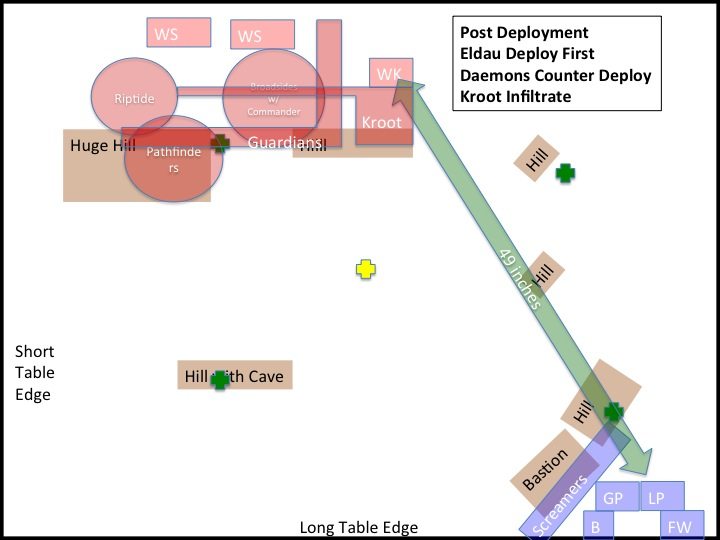
Again, he deployed first. He makes a small mistake in not deploying completely in the center. However, the two hill masses to the left are very large, and I understand his desire to use them to dominate the left side of the board. He probably also wanted to prevent me from being able to maneuver Princes behind those larger hills. Thus, while a more central deployment would confer advantages, his deployment was carefully thought out. He placed his MCs on the flanks, with the shorter ranged WK near mid field. The Guardian blob is threaded through all the Tau units to grant interlocking overwatch in future turns. The Commander is attached to the Broadsides. The Farseer and Autarch are attached to the Guardians. The Dark Reapers are in their Wave Serpent to protect them in the event of a Seize.
The Commander should probably be attached to the Riptide Turn 1, but he wanted to leave him near the Dark Reaper’s Wave Serpent to allow a disembark volley of Starshot Missiles into anything left in the open.
I Counter Deploy as well as I can. I manage to get all 4 FMCs entirely out of the WK’s threat range (48 inches, measure 49 to be safe), and position the Screamers where night fight plus Hill or Fortification will grant them a 2+ rerollable cover to WK shooting. I am worried that his Dark Reaper Wave Serpent will turn backwards, move six, disembark, move Dark Reapers out six, and attach the Tau Commander. However, I do a decent amount of guessing as to what that would look like, and at least place Fateweaver and my Grimoire Prince out of sight of anywhere that trick can deposit his Reaperstar to.
He then infiltrates his Kroot. Since I have deployed so conservatively, he does not need them to block midfield (and placing them midfield would effectively guarantee me first blood), so he puts them on the flank of his castle, in a position to make a run at the top right objective or the Relic later in the game. They are mostly out of sight, and threaded into his overwatch bubble.
Turn 1
I decline to seize, and he repositions slightly. He does some premeasuring, and cannot get any decent shots with his Reaper Star. He does maneuver that unit into a better firing position and attaches the Tau Commander. His shooting is ineffectual, and the Riptide manages to kill one Screamer. The WK adjusts further off his flank, and the Riptide pushes down the board to threaten midfield.
On my turn I Grimoire and Forewarning the Screamers, Invisible my Grimoire Prince, Endurance Be’lakor, and fly Fateweaver and the Lash Prince off the board. I advance my Grimoire Prince and Be’lakor slightly, utilizing the LOS blocking terrain to cut off angles to the Dark Reapers and the Wave Serpents, as they are the most dangerous weapons against my cover save dependent FMCs.
One of the tenants to running a Flying Circus is “Present no Easy Targets.” To prove my point, at this point my units have the following durability options (I will eventually finish my article on the tenants on the flying circus, check back on FLG to see it one day!):
Screamers: 2++ Rerollable
Grimoire Prince: 2+ Rerollable Cover, 3+ Armor (Rerolling 1s), 5++ (Rerolling 1s), 4+ FNP
Be’lakor: 2+ Cover (Hill save plus Shrouding), 4++, 5+ FNP
These are the only three units on the table. My Screamers Turbo Boost to threaten his lines. I do an excellent job of staying out of charge range of his Wraith Knight, but I completely forget about Misfortune on his Farseer.
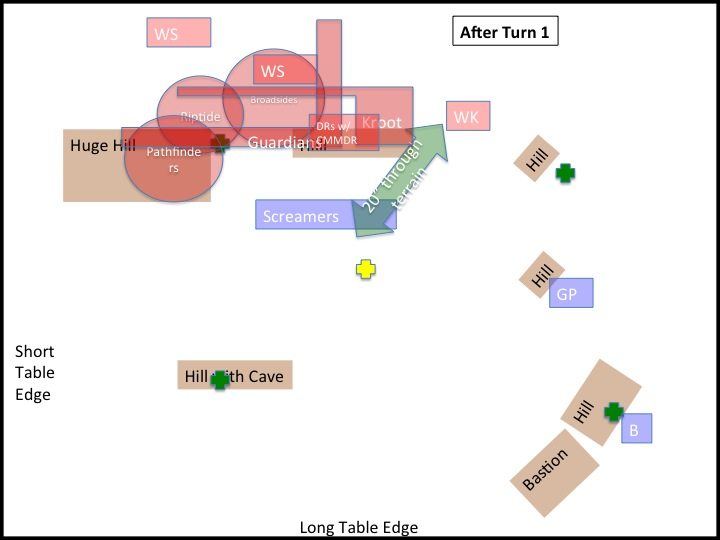
Turn 2
At this point I am trading my Screamers for First Blood, and more importantly, for time. He will have to reposition his units defensively to prevent the Screamers from hitting something valuable. However, forgetting about Misfortune was a huge blunder. Fortunately, to start the turn off they successfully deny the witch.
His second squad of Kroot come in from reserve as well as both units of Eldar jetbikes. He outflanks the Kroot onto the left side of the board; away from my Army. The Jetbikes deploy in his castle, on the left and right side, out of sight.
He continues to push the Wraith Knight up the flank to gain an angle on my Grimoire Prince (who started the turn out of sight). He is forced to shift his Dark Reapers backwards and down the hill to avoid the Screamers. The Tau Commander is similarly forced to join the Guardians and cast Stubborn. Otherwise I could sweep them with my Screamers, kill his HQ, gain first blood, and gain two VPs for the Tertiary for a Troop. This denies the Reapers the ability to shoot, as they cannot see anything through the hills. The original Kroot (on my right) shamble backwards in an attempt to avoid the Screamers. The WK and Riptide take pot shots at my Grimoire Prince, doing nothing.
On my turn, my Hades Drake and my Horrors come in. The Daemonettes and Cultists stay in reserve. The Lash Prince and Fateweaver automatically return from ongoing reserve. Fateweaver and the Lash Prince fly behind my Bastion and the Hill next to it, safe from interceptor. The Drake flies behind the large hill on the left side of my deployment zone, with only its head poking free (blocking LOS to some units and granting that sweet Hill save). The Horrors deepstrike behind the same hill to threaten the objective inside the cave. Intercept fire goes into my Drake rather than my Horrors, and nothing significant happens.
The Grimoire Prince puts the Grimoire on the Screamers, which fails. He places Endurance on Be’lakor, and then he leaves the board. Be’lakor places Invisibility on Fateweaver, and then he flies into the same location that the Grimoire Prince was standing in, out of sight to the vast majority of the Eldau Army. The Screamers advance towards the Kroot, in order to take First Blood. In this movement phase I remember Misfortune and Reveal exist, and ensure I am out of range with significant units (the 6++ Screamers are no longer significant, their parents were not pleased with how callously I treated their children’s lives).
Warp Storm kills the right most Jetbike unit, granting me First Blood before the Screamers can do anything. Be’lakor uses Puppet Master on the WK, killing a Broadside. The Hades Drake does a Pen and a Glance to the left most Wave Serpent, immobilizing it (although the glance is jinked). The Horrors run behind the hill.
The Screamers assault the Kroot (losing one to super Overwatch), killing them outright, and they consolidate back onto the base of the hill, which we are playing as area terrain.
For my turn I have taken First Blood, and killed two Troop units (for 4 points towards the Tertiary). I also have multiple units in Vector Strike Range of the Relic (the Secondary), denying his Jetbikes the opportunity to turbo boost towards it. Finally I have killed a Broadside and immobilized a Serpent.

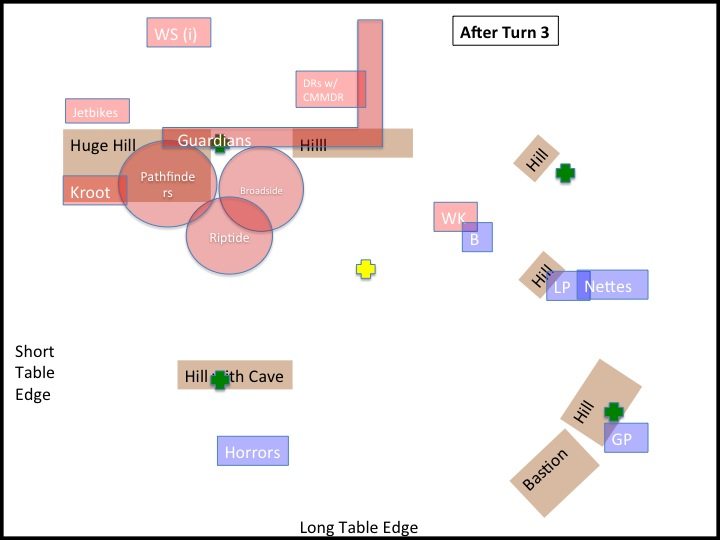
Turn 3
He repositions his Army somewhat, moving his WK straight down (thus keeping it close to the Screamers if needed, but still capable of pressing my flank). He moves his Riptide further downfield as well. The Kroot and Pathfinders on my left march down, but stay on the hill to grant good Line of Sight. The lone Broadside also advances in order to shoot SMS at my hidden Horrors. The Tau Commander joins the Reapers again and moves backwards and right. The Guardian blob extends to cover their move and protect them from encroaching Daemon units. His bikes shift slightly to deny the Drake a Vector Strike. They then Turbo in place. I believe he Misfortunes my Screamers, which makes their upcoming feat even more amazing.
The Pathfinders mark my Horrors and boost the Broadsides BS (as he moved and was snap firing). He and the Riptide use SMS to whittle down my Horror Squad. The Reapers blow the gun off of my Drake. The rest of the Army fires into my Screamers, who go to ground for a 3+ cover, Rerolling 1s (but only a 6++ to Serpent Shields). 2 Screamers survive. The WK Charges into the Screamers and finishes them off, he then consolidates towards my Army, looking for a fight. This is clearly a mistake, as my opponent forgot that Be’lakor has eternal warrior. In his defense, this was his first game against the Daemons Character.
To recap, I did just describe the Screamers dying in one turn as amazing. That is how ridiculous Eldar firepower is, that a unit dying in assault defies belief.
On my turn the Daemonnetes come in from reserve and the Cultists stay in hiding. The Grimoire Prince returns. The Daemonettes attempt to scatter behind the small hill on my right but scatter into the open. They eat an Ion Accelerator blast for their troubles, and six die (in the exact same scenario 6 Terminators would have also died. Terminators are terrible). The Grimoire Prince put the Grimoire on Be’lakor, who in return casts Invisibility on the Grimoire Prince. The Lash Prince Endurances herself. Fateweaver flies off the board. Be’lakor moves in position to assault the WK. The Lash Prince moves into Be’lakors old hiding place. The Horrors shift backwards (to once again force the Broadside to move in order to SMS them) and to the left (to engage the Kroot). My Drake flies off the board, killing the right WS with Vector Strikes.
The surviving Nettes run behind the hill, crowded up next to the Lash Prince. The Horrors engage and kill a couple of Kroot (range limiting their kill radius). Be’lakor Puppet Masters the WK, who shoots at the Broadside. He makes both his cover saves.
Be’lakor then charges into the WK. I actually debate smashing here, to guarantee I do not kill the WK outright on my turn. With six attacks on the charge, Master Crafted, Fleshbane, and a 2++, Be’lakor takes the WK down to 1 wound, and takes none in return.
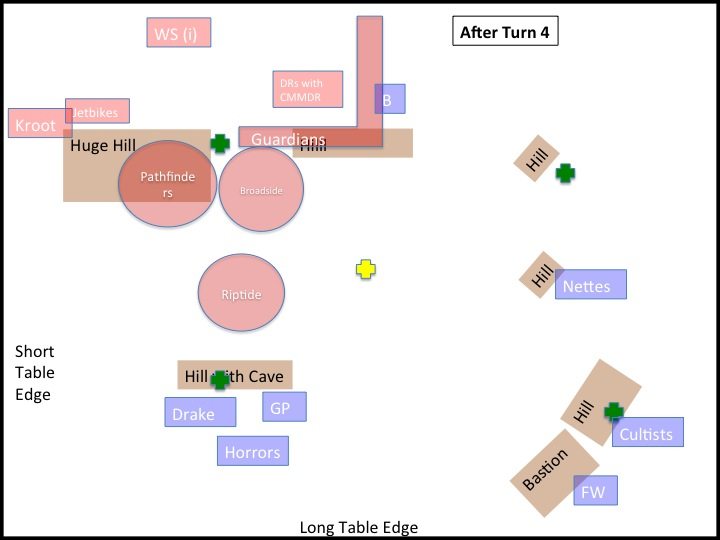
Turn 4
My opponent is not foolish, and sees that Be’lakor is about to break free and roll his flank. As such, he begins to move his firebase back to the left as best he can. Unfortunately, his guardian blob is stretched out and subject to difficult terrain tests, and is moving slower than he would like. He probably should have put the Tau Commander back into the Guardian squad, but he has an opening at my Lash Prince, and wants to take that shot instead. The Riptide and Broadside continue to move down the board.
Again, Pathfinders mark my Horrors, and SMS whittles them down to 2 models. The Reapers put a couple of wounds on my Lash Prince, but do not ground her. Be’lakor finishes off the WK and advances toward the Guardians.
On my turn, the cultists finally come on, and walk towards my home objective near my Bastion. Fateweaver returns, and hides behind the Bastion. The Grimoire Prince throws the Grimoire and Endurance onto Be’lakor. The Lash Prince leaves the board. The Grimoire Prince pivots and flies left, eventually running behind the Hill with a Cave. I have saved my Reroll to use as a poor man’s Fleet for Be’lakors upcoming charge. The Daemonettes shift slightly. The Drake returns behind the hill to look menacing (as he has no gun), but more importantly, to threaten the Relic with Vector Strikes. Intercept is not used, in order to save fire power for my Troops on Turn 5.
Horror shooting at max range causes the Kroot on the left hill to fall back.
Be’lakor makes the charge without the reroll, although he takes two wounds to overwatch. He kills the brave Spirit Seer in a challenge. More importantly, he forces the Guardian blob to consolidate off of the left most objective. He gains one of his wounds back through It Will Not Die, utilizing Fateweaver’s reroll.
The consolidation and fall back moves are important, and believe it or not, part of my plan. He now has one Troops unit that can reach an objective on turn 5. I am threatening to take 3 myself. This is going to force hard choices.
Turn 5
His Kroot rally. He successfully casts Misfortune on Be’lakor. The Riptide moves to stand on top of the hill with a cave in it, denying that objective and daring the Grimoire Prince to charge through terrain and step to Strength 10. The Tau Commander detaches from the Dark Reapers and casts Stubborn on himself, the Dark Reapers make a line on the edge of his deployment zone. This is extremely crafty, and I will depict it with an image, then explain why. The Tau Commander charges into the combat, and the result is shown here:
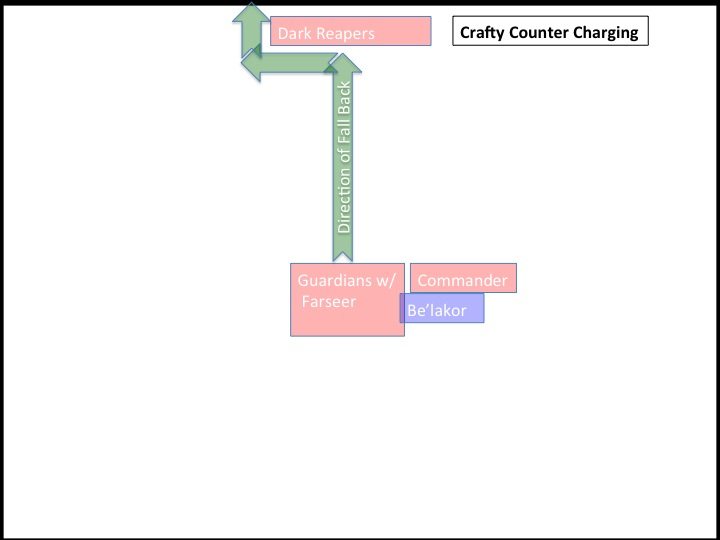
The Stubborn Tau Commander joins the combat. My opponent denies the challenge. Be’lakor wins combat. The Stubborn Commander passes morale which means Be’lakor cannot sweep the Guardians and Farseer. The Dark Reapers prevent the Guardians from running straight off the board, they must go around. Thus, in turn 6 he can rally them and prevent me from taking Warlord. Unfortunately in execution he rolls an 11 and makes it around the Dark Reapers, losing the unit, the Warlord, and his crafty plan.
For the rest of his turn, he kills my Drake with the Reapers, as that’s all they can see from their Shield Wall. He kills all but one Daemonnete, and a few Cultists (who hold). He also builds a wall around his Jetbikes, who have moved onto the top left objective. This wall will prevent me from contesting his objective with a FMC. Had he managed to kill my Nettes this would have forced a draw on the Primary (at least going into my turn), and had he broken my Cultists this would have had him winning the Primary (again, going into my turn).
On my turn, the Lash Prince returns and moves within 12 inches of his jetbikes. My Grimoire Prince puts the Grimoire on Fateweaver, and Endurance on the Lash Prince. My Grimoire Prince advances up the field, flying past the Riptide and his challenge. I believe the Riptide announced “Come at me Bro” as the Prince flew by. Fateweaver also advances straight ahead. The remaining Daemonette moves and runs onto the top right objective, the cultists form their own bubble wrap around my home objective.
The Lash Prince and Grimoire Prince combine their Life Leaches with the Lash and kill the Bikes. Fateweaver kills the Reapers. Be’lakor finishes the Tau Commander in combat.
The Game ends and looks like this:
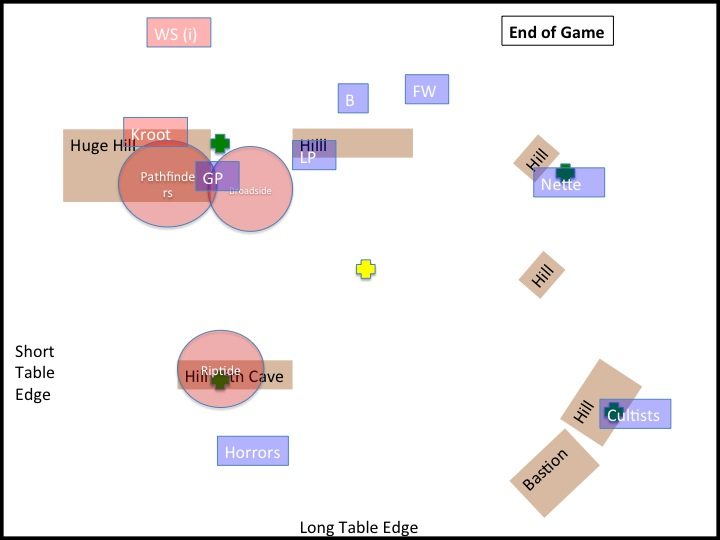
Daemons win Primary Objective (4 Objectives), Tertiary (Kill Points) and take all four bonus points (First Blood: Jetbikes, Warlord: Farseer, Linebreaker: Be’lakor, Last Blood: Jetbikes). No one wins the Secondary, the Relic.
In short, Belakor killed a Wraith Knight, which allowed him to roll a flank and kill a Troop unit, a Warlord, a random Spirit Seer, and a Tau Commander. This also shifted an objective, and forced a Jetbike unit to score a home objective. He also used Invisibility to keep my Grimoire Prince alive, and Puppet Master to add heavy long range fire to my Army. To top it off, he scored Linebreaker and gave me a hell of a hug for my victory.
He does work.
To see this list in action in a slightly less serious and far more offensive game, check out my Beerhammer report here: http://www.youtube.com/watch?v=0hG3S78ru8w
Bonus points if you can guess the paint genius who painted my Be’lakor for me.