
Another guest editorial from Anonymou5.
At the risk of disclosing too much about myself, I am a Soldier. In the Army, we often use “Vignettes,” or a short scene taken from a larger event, in order to teach a lesson related to a specific tactic, technique or procedure. That style of learning also serves a purpose in Warhammer 40k.
I played a game recently, where to be frank, my opponent was overmatched. I say that not to demean my opponent, but to deter comments declaring his list was terrible, or that I should have lost had he done X, Y, or Z. He asked for a game that would simulate a “tournament,” because he has been playing casual games for a long time, and wants to get into the more competitive side of the hobby. Thus, it was in effect, a teaching game. That’s not to say my opponent was bad, because I would rate him as much better than my average match up at my FLGS. Just, that he needs some work. The game, however, featured one moment that applies to a larger lesson about Sixth Edition Warhammer 40k, and I felt it worth deconstructing. That said, the game as a whole is not worth a Battle Report, so I am introducing the world’s first Warhammer 40k Battle Vignette.
He wanted a 1500 point game, and I obliged. I constructed my list blind; not knowing what Army he was playing (we met through a social networking/dating site known as Dakka). I suggested we do the ATC format, for two reasons. One, it simulates “Tournament Style” as many tournaments use similar missions, and two, it helps me practice the scenario before the ATC. For the uninitiated, ATC runs Crusade, Emperor’s Will, and Purge the Alien simultaneously as Primary Objectives. It uses the same Secondary Objectives as the Book Missions. There are always five Crusade Objectives, but as ATC is designed for 1999+1 points, we played with Three Crusade. ATC also features three deployment types, for this game we rolled Deployment Type 3. Vanguard Strike, no night fight or mysterious objectives, Heavy Support is scoring (and an extra Victory Point for Purge the Alien).
I brought Daemons
Fateweaver (Warlord)
Daemon Prince of Slaanesh (Two Greater Gifts, Armor, Flight, Level 3 Psycher)
10 Daemonettes (Allures)
10 Daemonettes
10 Pink Horrors
15 Fleshhounds
Daemon Prince of Tzeentch (One Greater Gift, Exalted Gift, Armor, Flight, Level 3 Psycher)
I would say my list was a stolen Netlist from the Daemons Blog (by the always excellent Slaede, at http://daemons40k.blogspot.
My opponent brought something like this:
Swarmlord and Friends
Tervigon
Tervigon
Gaunts
Gaunts
Ymgarl Genestealers
Deathleaper
Trygon
I mentioned before that his list was unoptimized, but any Tyranid list is a good test for a Daemon Army, if nothing else to practice avoiding Shadows. To his credit, he defended his lack of the Doom in a can, saying that he knew I was bringing a fast circus Army, and that he figured the Doom would not be able to make much of a difference…and that he thought Deathleaper’s minus to Leadership would hinder my psychic tests. Unfortunately he rolled a 1 for Deathleaper versus Fateweaver, and Daemons of Tzeentch get a plus 3 to psychic tests….nice idea anyway. In retrospect I should have had him pick the Slaneesh Prince, as she is only leadership 9 on psychic tests, but I can only help my opponents so much. He’s also missing a Flyrant, but shrug…he’s learning.
One of my favorite things about Circus style lists is the ability to tailor powers to the opponent at hand. For Tyranids, Iron Arm is a must. Otherwise, assault with FMCs is a complete non-starter. Although I consider FMCs “vector strike first, shoot second, assault last,” vector strike is only mediocre against Tervigons, and Flickering Fire isn’t exactly ideal. So, not counting Fateweaver (who doesn’t count, because if he’s in assault, I’m probably losing), I have six rolls for Iron Arm. I roll the Slaanesh Prince first, because she’s expendable (and she has the Fleshbane/Armorbane gift, which is awesome versus MCs). Endurance, Enfeeble and Hemmorage. Not bad, but not what I need. The Tzeentch Prince fortunately get’s Iron Arm, Endurance, and Warp Speed. Fateweaver also got Endurance, and the Tzeentch Prince has the 4+ FNP gift. My entire Army will feel no pain! Or get smash attacked. This however, isn’t ideal, because the Tzeentch Prince is carrying the Grimoire, and mostly needs to hide and provide support. Oh well, could have been worse.
By now, you, the reader, are probably wondering why a “short vignette” has droned on for 800 words. Don’t worry, only a bit more rambling before I get to my point!
I now skip forward to the bottom of turn 2. We each control a Crusade and an Emperor’s Will Objective in our own backfields. The third Crusade Objective is open, at midfield sitting in some ruins, which we are both attempting to secure. I have achieved some level of board control by taking advantage of a small tactical mistake. My Hounds killed a Tervigon with a turn one charge (his Gaunt screen had an exploitable hole in it). Thus, the Swarmlord is currently chasing a pack of Hounds around his backfield before they kill all his Gaunts. However, this maneuver has been somewhat countered by the fact that his Trygon has not come in from reserves yet, which prevents me from going full offense (as my Tzeentch Prince has to stay on my board edge as a counter punch unit). Which in turn prevents me from using that Prince to challenge his Tervigon at midfield. Fortunately, I have another tool to deal with Monstrous Creatures. The humble Daemonette.
So, at the bottom of turn 2, my Daemonettes deep strike midfield, and run mostly out of line of sight, in order to bait my opponent. Anticipating a specific series of events, I Grimoire and Prescience them (we play it that units can receive buffs the turn they come in from reserve, but cannot cast them)
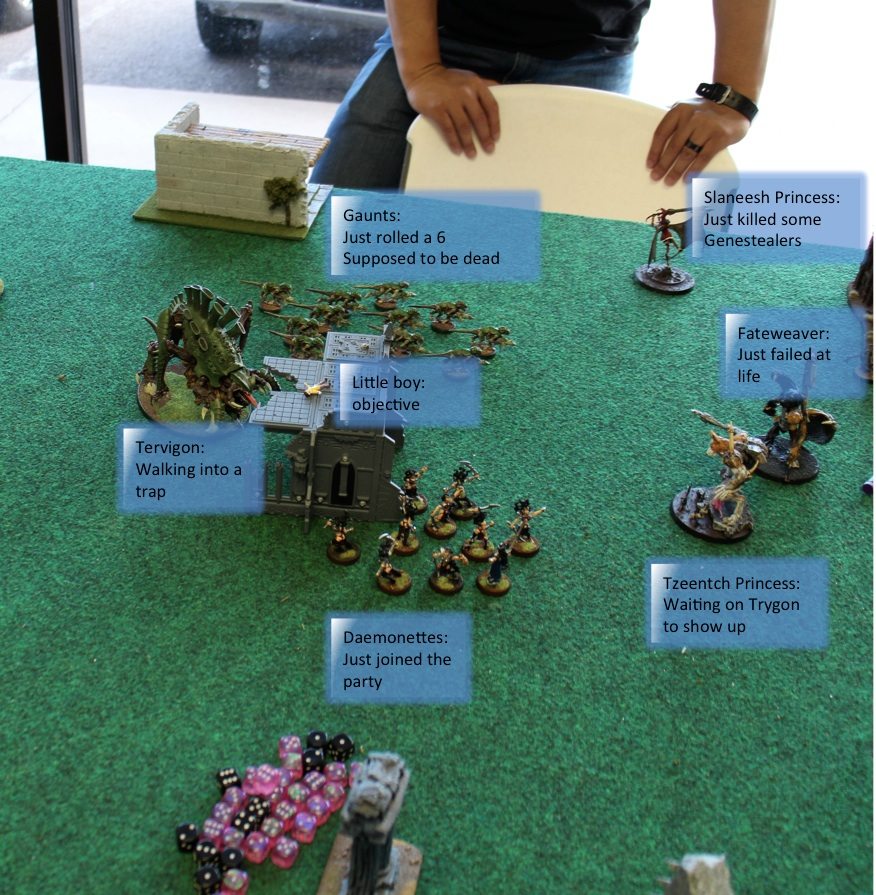
This image shows the pivitol midfield objective at the end up my turn. The plan was simple, Fateweaver kills the Gaunts with Flickering Fire and the Tervigon (who was corked) is forced to charge the buffed up Daemonettes, or better yet, fails his charge through terrain and allows my Daemonettes to charge him. Of course, the best laid plans of mice and men…
The Gaunts deny the witch on FF, and my turn ends with my plan somewhat in disarray. That said, the Gaunts will have a somewhat long charge to make through terrain (the angle on the picture is deceptive, they end their movement phase six inches from my Daemonettes). The Gaunts then shoot at my Daemonettes, somehow killing three (despite the Grimoire). This causes them to fail their charge. The Tervigon still makes his charge. Thus, the Tyranid shooting allowed my nefarious trap to still work, despite Fateweaver showing up to the fight drunk. However, I was planning on ten Daemonettes being in the fight….
Now we have a Tervigon versus seven Daemonettes (with an Allures). The Daemonettes have Prescience and the Grimoire. The Tervigon has Warp Speed. This means the Daemonettes should do 2.2 wounds at initiative step 5 (would be 3.1 with the full squad). They do 4. The Tervigon should in turn. The Tervigon should do roughly half a wound (depending on Warp Speed Roll), he does 1. Then on my turn, the Daemonettes do 2 more, and win the fight. This allowed me to capture the central objective, and take control of the game. Eventually the Swarmlord killed my Hounds, but by then he was completely out of position. The Trygon showed up to threaten my home objectives, and was killed by my Tzeentch Prince. Ultimately the game was decided by a fight between a Tervigon and a squad of Daemonettes…a fight I engineered.
So that’s a lot of text for one small fight in a mismatched game. What’s the point? There are three lessons here.
The first lesson is obvious: Board control (as part of JY2’s Positional Dominance) wins games. The speed of my Flesh Hounds drew the Swarmlord away from the battlefield at the center of the map, which directly lead to my victory there.
The second lesson is set up by the first. Have a tool (or more) for every task. By pulling the Swarmlord out of position, I freed up my anti-MC weapons to do other jobs. My Tzeentch Prince with Iron Arm was free to defend my backfield from the Trygon, and my Daemonettes could be maneuvered to midfield to handle his Tervigon. A competitive list needs tools for every task, and they need to be prioritized depending on their other jobs. In this match up I had three ways to kill a MC: two squads of Daemonettes, and the Tzeentch Prince. I had to balance this versus their other jobs. The Daemonettes second job is a given: scoring. In this scenario, the Prince was also scoring, and is also important because she carries the Grimoire. Thus, I committed the Daemonettes to the immediate threat, and saved the Prince for a later threat (the Trygon). This way, if things went poorly, at least I had more turns to utilize the Grimoire and did not sacrifice all of my scoring (as the other Daemonettes were used to deep strike in his backfield away from the Swarmlord, giving him another backfield threat to worry about). When I say “ have a tool for every task,” I do not mean “have the most optimal tool available for every task,” but at least feasible options. As an example: for some Armies, if the quad gun dies, that doesn’t mean they can’t kill fliers, it just means they have to use a sub-optimal tool (snap firing Lascannons for example). Daemonettes, even buffed up, are not the perfect MC killer. But they can do the job if needed (as well as other jobs). However, the available buffs certainly made their mission more realistic. This, in turn, leads directly to the third lesson.
Synergy Kills. Know your opponent’s codex. I have no doubt that my opponent thought that his 200+ point Monstrous Creature was going to mop up my weakened Troops unit. Obviously, this was a mistake. And it’s easy to chastise him for it. But it’s a reflection of a tactical error that happens all the time… Players lose smaller tactical fights due to ignorance, which costs them the game. The 6ED codexes are full of combat multipliers. On the internet, we talk about the big ones. I wrote an entire article about the Screamerstar, people obsess over the Farsun bomb, the Seer Council, and the rest. But I would argue that it’s the little synergies that are more important, they’re the ones that tend to push close games in one direction in another. They’re all over the place; Tau Toolbox Commanders leading Fire Dragons or Broadsides, Rad Grenades and Plasma Talons inflicting Instant Death on T4, Prescience and Grimoire turning any Daemon unit into a mini death star, the Eldar power Protect creating 2+ Wraithguard, and so on. This is both the best and worst part of 40k. It allows a lot of flexibility in list design, and increases the value of tactical thought in game. To me, that’s a huge advantage over earlier editions. However, it also punishes a player for not researching, not watching battle reports, and not learning what’s out there. It makes competitive play even more time consuming. Which can get frustrating. Thus, to win against an equally skilled General, you need to understand the synergies present in his list. You need to assess how they work and what they can do before every turn, and you need to be prepared to attack them in unconventional ways. This may mean bypassing an invincible Fateweaver in order to kill the Grimoire carrier in the backfield, or to use precision shot or barrage sniping to kill a key model, or to use the movement phase to bypass or isolate a unit you cannot otherwise handle, or to throw a tarpit into something and remove it from the game.
In the feature Vignette, by turn 2 I had already boxed my opponent into a corner. The decision point that cost him the midfield on turn 3 happened at turn 1, when he left me a hole into his backfield. At that point, I had free reign of either his home objectives, or the center field objectives, depending on where the Swarmlord chose to go. Which I suppose leads to one last lesson, stolen directly from the “real” Army, always consider second and third order effects. Who says 40k is a simple game?